Sunday, December 2, 2018

Container Networking

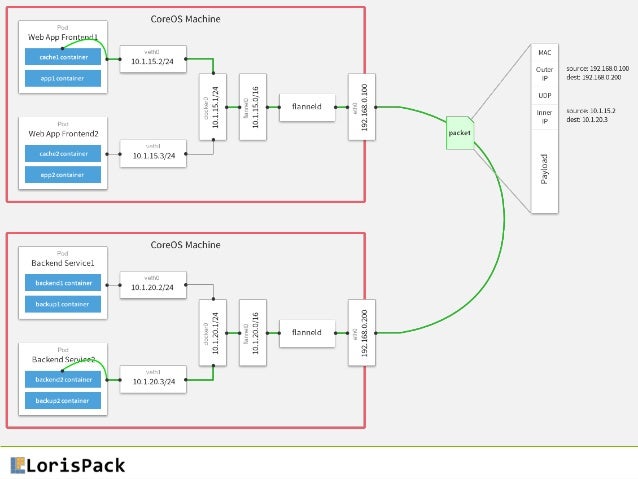
  • flannel is a virtual network that gives a subnet to each host for use with container runtimes.

Platforms like Google's Kubernetes assume that each container (pod) has a unique, routable IP inside the cluster. The advantage of this model is that it reduces the complexity of doing port mapping.
https://coreos.com/flannel/docs/latest/


  • Flannel is a simple and easy way to configure a layer 3 network fabric designed for Kubernetes.

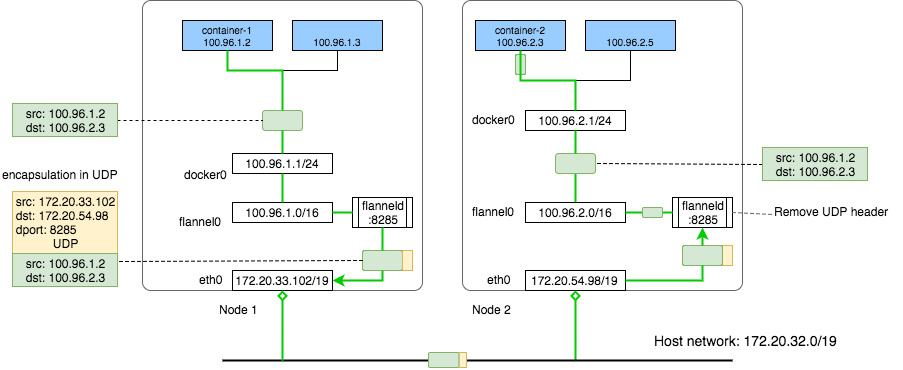
Flannel runs a small, single binary agent called flanneld on each host, and is responsible for allocating a subnet lease to each host out of a larger, preconfigured address space. Flannel uses either the Kubernetes API or etcd directly to store the network configuration, the allocated subnets, and any auxiliary data (such as the host's public IP). Packets are forwarded using one of several backend mechanisms including VXLAN and various cloud integrations.
https://github.com/coreos/flannel


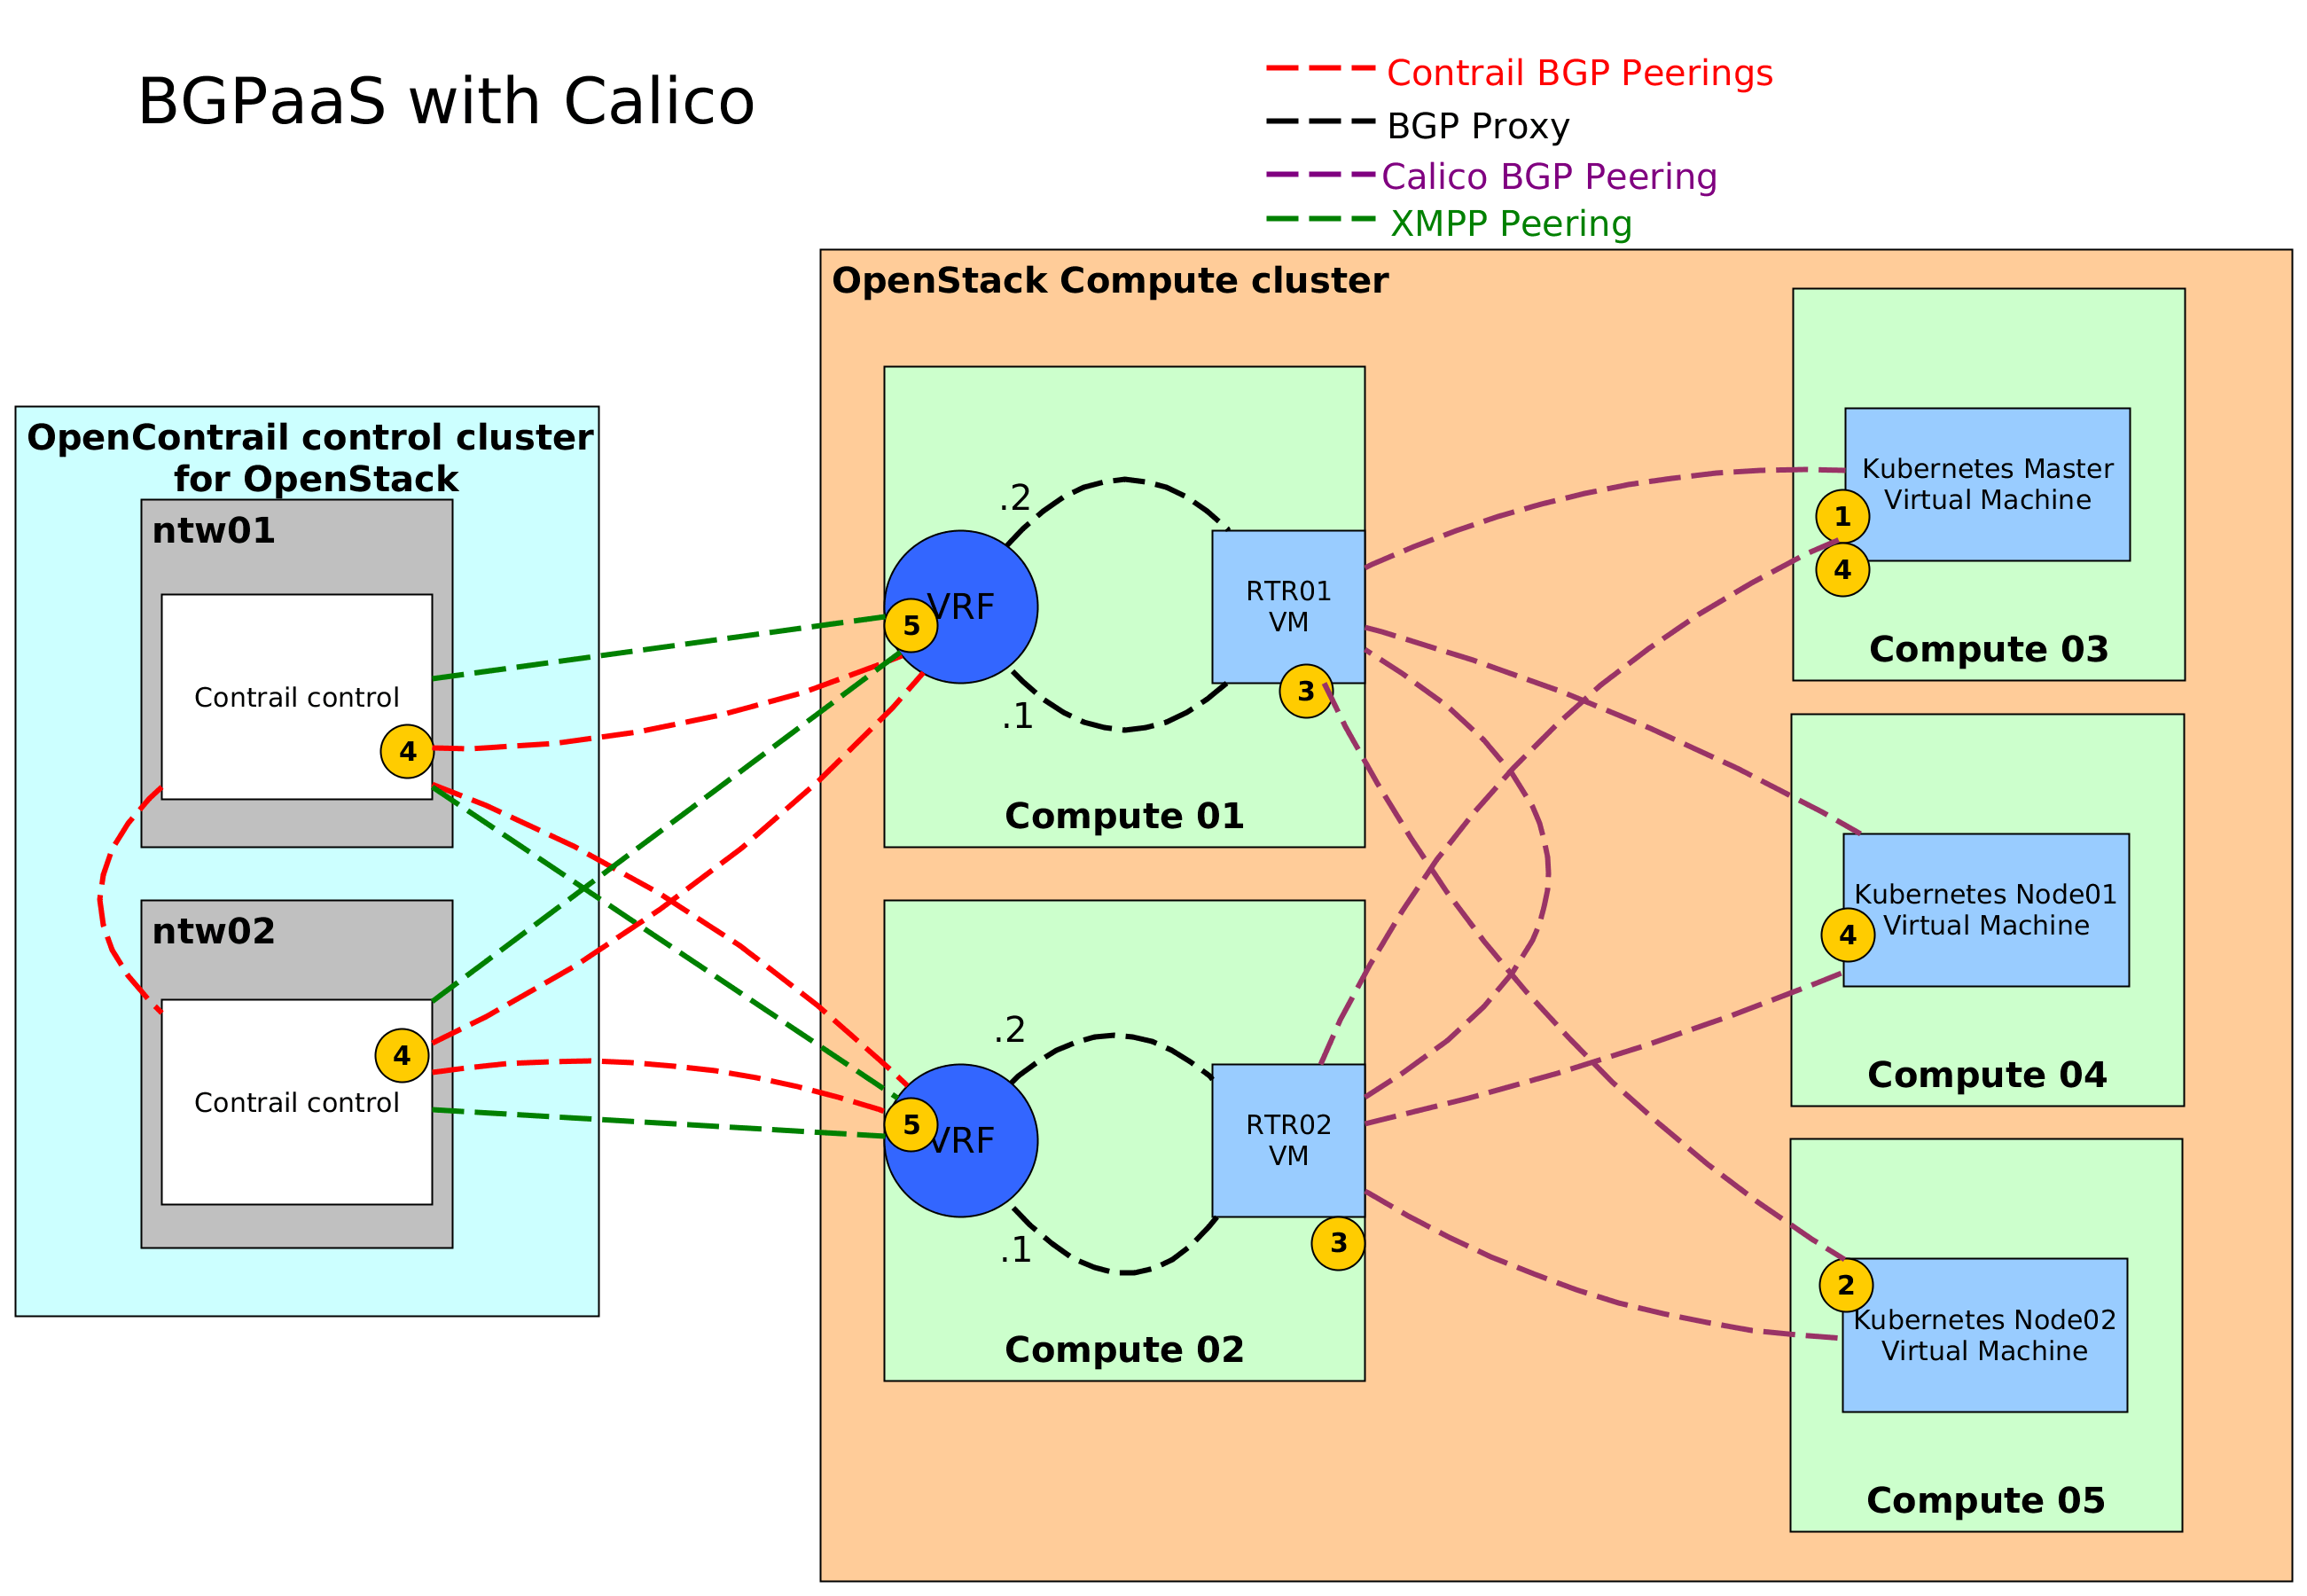
  • Free and open source, Project Calico is designed to simplify, scale, and secure cloud networks

Unlike SDNs that require a central controller, limiting scalability, Calico is built on a fully distributed, scale-out architecture. So it scales smoothly from a single developer laptop to large enterprise deployments.
https://www.projectcalico.org/


  • container networking front

standardize one of a couple of container networking models, called CNI
Standardizing networking and orchestration in the container space will really help take the technology mainstream 
build a healthy ecosystem of technology providers
the network needs to be automated, scalable and secure to adapt to next generation hybrid cloud and application architectures based on microservices
network interfaces for containers versus virtual machines
Virtual machines simulate hardware and include virtual network interface cards (NIC) that are used to connect to the physical NIC.

containers are just processes, managed by a container runtime, that share the same host kernel.
containers can be connected to the same network interface and network namespace as the host (e.g., eth0)
In the ‘host’ mode, the containers run in the host network namespace and use the host IP address. 
To expose the container outside the host, the container uses a port from the host’s port space. 
you need to manage the ports that containers attach to since they are all sharing the same port space

The ‘bridge’ mode offers an improvement over the ‘host’ mode.
In ‘bridge’ mode, containers get IP addresses from a private network/networks, placed in their own network namespaces.
the containers are in their own namespace, they have their own port space,don’t have to worry about port conflicts
the containers are still exposed outside the host using the host’s IP address
This requires the use of NAT (network address translation) to map between host IP:host port and private IP:private port.
NAT rules are implemented by using Linux IPtables, limits the  scale and performance of the solution

host,bridge?
these solutions don’t address the problem of multi-host networking
multi-host networking became a real need for containers

or
they can be connected to an internal virtual network interface and their own network namespace,then connected to the external world

Recognizing that every network tends to have its own unique policy requirements
a model where networking was decoupled from the container runtime
improves application mobility
networking is handled by a ‘plugin’  or ‘driver’ 
manages the network interfaces and how the containers are connected to the network
plugin assigns the IP address to the containers’ network interfaces
 a well defined interface or API between the container runtime and the network plugins

Docker, the company behind the Docker container runtime, came up with the Container Network Model (CNM)
CoreOS, the company responsible for creating the rkt container runtime, came up with the Container Network Interface (CNI).

Kubernetes, a popular container orchestrator has supported network plugins since its earliest releases
Since Docker is a popular container runtime, Kubernetes wanted to see if it could use CNM
Kubernetes decided that it would go with CNI for its network plugins.
The primary technical objection against CNM was the fact that it was still seen as something that was designed with the Docker container runtime in mind and was hard to decouple from it.

After this decision by Kubernetes, several other large open source projects decided to use CNI for their container runtimes. Cloud Foundry PaaS has a container runtime called Garden, while the Mesos cluster manager has a container runtime called Mesos Containerizer.

Container Network Model (CNM)
CNM has interfaces for both IPAM plugins and network plugin
The IPAM plugin APIs can be used to create/delete address pools and allocate/deallocate container IP addresses.
The network plugin APIs are used to create/delete networks and add/remove containers from networks. 
CNM also requires a distributed key-value store like consul to store the network configuration
Docker’s libnetwork is a library that provides an implementation for CNM. However, third-party plugins can be used to replace the built-in Docker driver.

Container Network Interface (CNI)
CNI exposes a simple set of interfaces for adding and removing a container from a network. 
Unlike CNM, CNI doesn’t require a distributed key value store like etcd or consul. 
The CNI plugin is expected to assign the IP address to the container network interface. 

There are several networking plugins that implement one or both of CNI and CNM
Calico, Contrail (Juniper), Contiv, Nuage Networks and Weave
generally expect these plugins to provide the following features 
IP address management
IP-per-container (or Pod in case of Kubernetes) assignment
multi-host connectivity.


One area that isn’t addressed by either CNM or CNI is network policy.
CNI has now been adopted by several open source projects such as Kubernetes, Mesos and Cloud Foundry.
It has also been accepted by the Cloud Native Computing Foundation (CNCF)

http://www.nuagenetworks.net/blog/container-networking-standards/

  • Access service from outside Kubernetes cluster


To expose your application / service for access from outside the cluster, following options exist:

    Kubernetes Service of type LoadBalancer
    Kubernetes Service of type ‘NodePort’ + Ingress

This tutorial discusses how to enable access to your application from outside the Kubernetes cluster (sometimes called North-South traffic.
For internal communication amongst pods and services (sometimes called East-West traffic)

Service Types
A Service in Kubernetes is an abstraction defining a logical set of Pods and an access policy.
Services can be exposed in different ways by specifying a type in the service spec, and different types determine accessibility from inside and outside of cluster.
    ClusterIP
    NodePort
    LoadBalancer

Type ClusterIP
A service of type ClusterIP exposes a service on an internal IP in the cluster, which makes the service only reachable from within the cluster. This is the default value if no type is specified.


Type NodePort
A service of type NodePort is a ClusterIP service with an additional capability: it is reachable at the IP address of the node as well as at the assigned cluster IP on the services network. The way this is accomplished is pretty straightforward: when Kubernetes creates a NodePort service kube-proxy allocates a port in the range 30000–32767 and opens this port on every node (thus the name “NodePort”). Connections to this port are forwarded to the service’s cluster IP

Type LoadBalancer
A service of type LoadBalancer combines the capabilities of a NodePort with the ability to setup a complete ingress path.

https://gardener.cloud/050-tutorials/content/howto/service-access/
  •   highly available (HA) Kubernetes clusters

      With stacked control plane nodes, where etcd nodes are colocated with control plane nodes
      With external etcd nodes, where etcd runs on separate nodes from the control plane
  
  Stacked etcd topology
  distributed data storage cluster provided by etcd is stacked on top of the cluster formed by the nodes managed by kubeadm that run control plane components.
  Each control plane node runs an instance of
  
  kube-apiserver
  kube-scheduler
  kube-controller-manager
  
  The kube-apiserver is exposed to worker nodes using a load balancer.
  Each control plane node creates a local etcd member and this etcd member communicates only with the kube-apiserver of this node. The same applies to the local kube-controller-manager and kube-scheduler instances.
  
  This topology couples the control planes and etcd members on the same nodes.
  simpler to set up than a cluster with external etcd nodes, and simpler to manage for replication
  a stacked cluster runs the risk of failed coupling.
  If one node goes down, both an etcd member and a control plane instance are lost, and redundancy is compromised.
  mitigate this risk by adding more control plane nodes.
  A local etcd member is created automatically on control plane nodes when using kubeadm init and kubeadm join --control-plane
  
  External etcd topology
  distributed data storage cluster provided by etcd is external to the cluster formed by the nodes that run control plane components.
  
  Like the stacked etcd topology, each control plane node in an external etcd topology runs an instance of the kube-apiserver, kube-scheduler, and kube-controller-manager. And the kube-apiserver is exposed to worker nodes using a load balancer
  
  etcd members run on separate hosts, and each etcd host communicates with the kube-apiserver of each control plane node.
  This topology decouples the control plane and etcd member.
  
  losing a control plane instance or an etcd member has less impact and does not affect the cluster redundancy as much as the stacked HA topology.
  this topology requires twice the number of hosts as the stacked HA topology. 
  A minimum of three hosts for control plane nodes and three hosts for etcd nodes are required for an HA cluster with this topology.
https://kubernetes.io/docs/setup/production-environment/tools/kubeadm/ha-topology/

  • The ~/.kube directory is a good place to keep your Kubernetes credentials. By default, kubectl will use a file named config (if it finds one inside the .kube dir) to communicate with clusters. To use a different file, you have three alternatives:


    First, you can specify another file by using the --kubeconfig flag in your kubectl commands, but this is too cumbersome.
    Second, you can define the KUBECONFIG environment variable to avoid having to type --kubeconfig all the time.
    Third, you can merge contexts in the same config file and then you can switch contexts.


How to Check the Nodes of Your Kubernetes Cluster
A node, in the context of Kubernetes, is a worker machine (virtual or physical, both apply) that Kubernetes uses to run applications (yours and those that Kubernetes needs to stay up and running).

In Kubernetes, to tell your cluster what to run, you usually use images from a registry. By default, Kubernetes will try to fetch images from the public Docker Hub registry. However, you can also use private registries if you prefer keeping your images, well, private

Deployment: Basically speaking, in the context of Kubernetes, a deployment is a description of the desired state of the system. Through a deployment, you inform your Kubernetes cluster how many pods of a particular application you want running. In this case, you are specifying that you want two pods (replicas: 2).

Using Services and Ingresses to Expose Deployments
Kubernetes ingress is an "object that manages external access to services in a cluster, typically through HTTP". With an ingress, you can support load balancing, TLS termination, and name-based virtual hosting from within your cluster.

To configure ingress rules in your Kubernetes cluster, first, you will need an ingress controller. As you can see here, there are many different ingress controllers that you can use. In this tutorial, you will use one of the most popular, powerful, and easy-to-use ones: the NGINX ingress controller.

https://auth0.com/blog/kubernetes-tutorial-step-by-step-introduction-to-basic-concepts/

  • Configuring HA Kubernetes cluster on bare metal servers with GlusterFS & MetalLB . 2/3

In this part of article, we’ll be focusing on setting up the internal load balancer for our cluster services — it’ll be a MetalLB. Also, we’ll install and configure a distributed file storage between our worker’s nodes. We’ll use a GlusterFS for the persistent volumes that will be available inside Kubernetes.
https://medium.com/faun/configuring-ha-kubernetes-cluster-on-bare-metal-servers-with-glusterfs-metallb-2-3-c9e0b705aa3d

  • Publishing Services (ServiceTypes)

Kubernetes ServiceTypes allow you to specify what kind of Service you want. The default is ClusterIP.

ClusterIP: Exposes the Service on a cluster-internal IP. Choosing this value makes the Service only reachable from within the cluster. This is the default ServiceType.

NodePort: Exposes the Service on each Node’s IP at a static port (the NodePort). A ClusterIP Service, to which the NodePort Service routes, is automatically created. You’ll be able to contact the NodePort Service, from outside the cluster, by requesting <NodeIP>:<NodePort>.

LoadBalancer: Exposes the Service externally using a cloud provider’s load balancer. NodePort and ClusterIP Services, to which the external load balancer routes, are automatically created.

ExternalName: Maps the Service to the contents of the externalName field (e.g. foo.bar.example.com), by returning a CNAME record
with its value. No proxying of any kind is set up.

You can also use Ingress to expose your Service. Ingress is not a Service type, but it acts as the entry point for your cluster. It lets you consolidate your routing rules into a single resource as it can expose multiple services under the same IP address.


External IPs

If there are external IPs that route to one or more cluster nodes, Kubernetes Services can be exposed on those externalIPs. Traffic that ingresses into the cluster with the external IP (as destination IP), on the Service port, will be routed to one of the Service endpoints. externalIPs are not managed by Kubernetes and are the responsibility of the cluster administrator.

In the Service spec, externalIPs can be specified along with any of the ServiceTypes. In the example below, “my-service” can be accessed by clients on “80.11.12.10:80” (externalIP:port)


https://kubernetes.io/docs/concepts/services-networking/service/#type-nodeport
  • Bare-metal considerations

In traditional cloud environments, where network load balancers are available on-demand, a single Kubernetes manifest suffices to provide a single point of contact to the NGINX Ingress controller to external clients and, indirectly, to any application running inside the cluster. Bare-metal environments lack this commodity, requiring a slightly different setup to offer the same kind of access to external consumers.

A pure software solution: MetalLB
MetalLB provides a network load-balancer implementation for Kubernetes clusters that do not run on a supported cloud provider, effectively allowing the usage of LoadBalancer Services within any cluster.

https://kubernetes.github.io/ingress-nginx/deploy/baremetal/


  • The Ingress is a Kubernetes resource that lets you configure an HTTP load balancer for applications running on Kubernetes, represented by one or more Services. Such a load balancer is necessary to deliver those applications to clients outside of the Kubernetes cluster.


The Ingress resource supports the following features:

    Content-based routing:
        Host-based routing. For example, routing requests with the host header foo.example.com to one group of services and the host header bar.example.com to another group.
        Path-based routing. For example, routing requests with the URI that starts with /serviceA to service A and requests with the URI that starts with /serviceB to service B.
    TLS/SSL termination for each hostname, such as foo.example.com.
https://github.com/nginxinc/kubernetes-ingress/


  • Setup Jenkins On Kubernetes Cluster


    Create a Namespace
    Create a deployment yaml and deploy it.
    Create a service yaml and deploy it.
    Access the Jenkins application on a Node Port.

For using persistent volume for your Jenkins data, you need to create volumes of relevant cloud or on-prem data center and configure it.

we are using the type as NodePort which will expose Jenkins on all kubernetes node IP’s. Also, we have mentioned the nodeport as 30000. So you can access the application on port 30000. If you are on Google Cloud or AWS, you can use the type as Loadbalancer which will launch create a Load balancer and points to the jenkins deployment.

https://devopscube.com/setup-jenkins-on-kubernetes-cluster/


  • Getting Started with Kubernetes


The goal of the Kubernetes project is to make management of containers across multiple nodes as simple as managing containers on a single system. To accomplish this, it offers quite a few unique features such as Traffic Load Balancing, Self-Healing (automatic restarts), Scheduling, Scaling, and Rolling Updates.

We’re using Vagrant for a few reasons, but primarily because it shows how to deploy Kubernetes on a generic platform rather than GCE.

A Pod is a group of containers that can communicate with each other as though they are running within the same system. For those familiar with Docker, this may sound like linking containers, but there’s actually a bit more to it than that. Containers within Pods are not only able to connect to each other through a localhost connection, the processes running within the containers are also able to share memory segments with other containers.

The goal of a Pod is to allow applications running within the Pod to interact in the same way they would as though they were not running in containers but simply running on the same physical host. This ability makes it easy to deploy applications that are not specifically designed to run within containers.
A Deployment, or Deployment Object, is similar to the concept of a Desired State. Essentially the Deployment is a high-level configuration around a desired function. For example, earlier when we started the Ghost container, we didn’t just launch a Ghost container. We actually configured Kubernetes to ensure that at least one copy of a Ghost container is running.

While containers within Pods can connect to systems external to the cluster, external systems and even other Pods cannot communicate with them. This is because, by default, the port defined for the Ghost service is not exposed beyond this cluster. This is where Services come into play.
In order to make our Ghost application accessible outside the cluster, the deployment we just created needs to be exposed as a Kubernetes Service.

the flag --type with the argument of NodePort. This flag defines the service type to expose for this service, in this case a NodePort service type. The NodePort service type will set all nodes to listen on the specified port.

Service types

At the moment, Kubernetes supports three service types:

    ClusterIP
    NodePort
    LoadBalancer

If we wanted to only expose this service to other Pods within this cluster, we can use the ClusterIP service type, which is the default. This opens the port on each node for Pod to Pod communication.

The LoadBalancer service type is designed to provision an external IP to act as a Load Balancer for the service. Since our deployment is leveraging Vagrant on a local laptop, this option does not work in our environment. It does work with Kubernetes clusters deployed in cloud environments like GCE or AWS.

Since we did not specify a port to use when defining our NodePort service, Kubernetes randomly assigned a port

we can see that the Ghost Pod is running on kubernetes-node-2. However, the HTTP request we just made was to kubernetes-node-1. This is made possible by a Kubernetes service called kube-proxy. With kube-proxy, whenever traffic arrives on a service’s port, the Kubernetes node will check if the service is running local to that node. If not, it will redirect the traffic to a node that is running that service.
In the case above, this means that even though the HTTP request was made to kubernetes-node-1, the kube-proxy service redirected that traffic to kubernetes-node-2 where the container is running.
This feature allows users to run services without having to worry about where the service is and whether or not it has moved from node to node.
https://blog.codeship.com/getting-started-with-kubernetes/

1 comment: