Showing posts with label DevOps. Show all posts

Sunday, July 25, 2021

jenkins x vs jenkins

  •  What is the difference between Jenkins and Jenkins X?


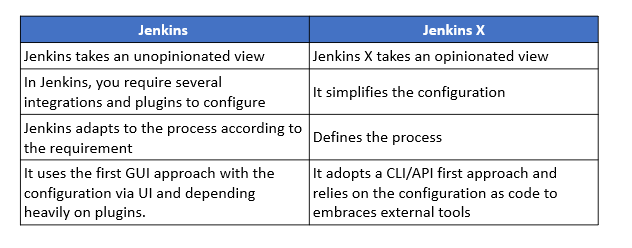
Unlike Jenkins, Jenkins X is opinionated and built to work better with technologies like Docker or Kubernetes. Having said that, Jenkins and Jenkins X are deeply related as everything that is done with Jenkins X can be done with Jenkins, using several plugins and integrations. However, Jenkins X simplifies everything, letting you harness the power of Jenkins 2.0 and using open source tools like Helm, Draft, Monocular, ChartMuseum, Nexus and Docker Registry to easily build cloud native applications.


In fact, it’s this selection of tools and processes that make Jenkins X special and different from Jenkins and any other CI/CD solution. For instance, Jenkins X defines the process, while Jenkins adapts to whichever process are wanted or needed. Jenkins X adopts a CLI/API first approach, relies on configuration as code and embraces external tools (e.g., Helm, Monocular, etc). On the other hand, Jenkins has a UI first approach with configuration via UI, and everything heavily driven by internal plugins. Additionally, the Jenkins X Preview environments enable developers to collaboratively validate changes integrated into the codebase by creating a running system per Pull Request


Why was Jenkins X started?


Microservices architecture: While the cloud with its several deployment models (public, private and hybrid) gained adoption across all industries, the challenge of deploying, managing and updating applications remained unresolved. 


Container ecosystem: Containers, which offer OS virtualization, gained popularity as they solve some of the problems associated with microservices.


The rise of Kubernetes: While containers make things simpler, they are not free from challenges. In fact, they are similar to VMs when it comes to managing or orchestrating them. 


What are the main features of Jenkins X?


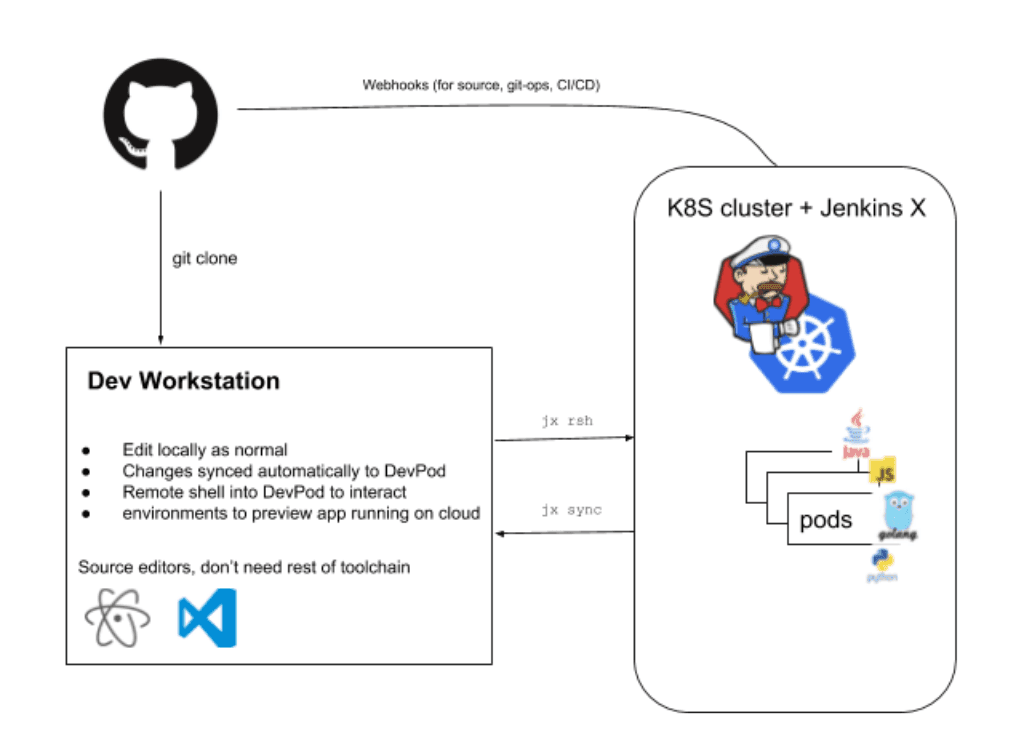
Automated CI and CD: Jenkins X offers a sleek jx command line tool, which allows Jenkins X to be installed inside an existing or new Kubernetes cluster, import projects and bootstrap new applications. Also, Jenkins X creates pipelines for the project automatically.


Environment Promotion via GitOps: Jenkins X allows for the creation of different virtual environments for development, staging, and production, etc. using the Kubernetes Namespaces.


Preview Environments: Though the preview environment can be created manually, Jenkins X automatically creates Preview Environments for each pull request. This provides a chance to see the effect of changes before merging them. 


What are the top 5 advantages of Jenkins X?


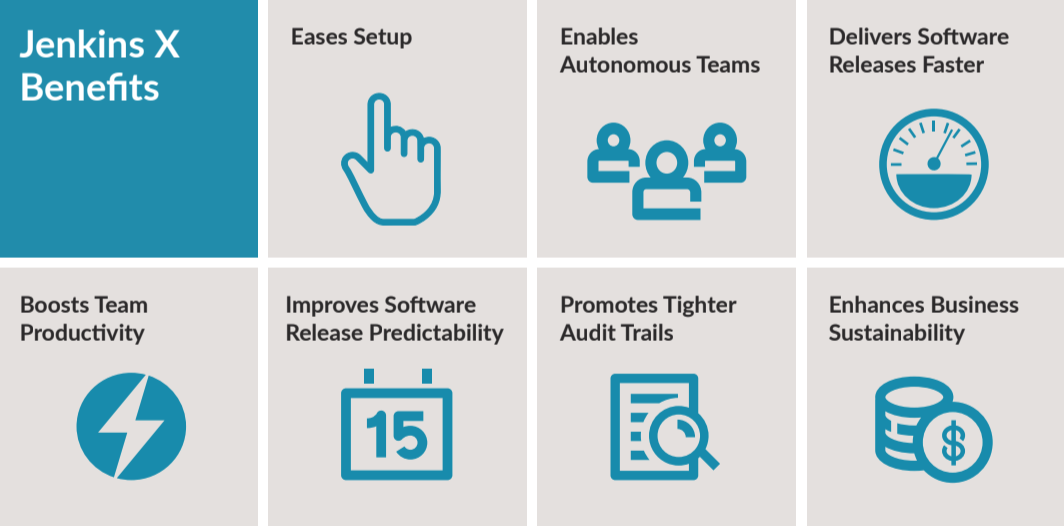
Easier setup: Jenkins X offers build packs for different kinds of projects, automates the installation, configuration and upgrades of external tools (Helm, Skaffold, Monocular etc.),


Isolation: Every team gets to run its own instance of Jenkins X; either in a shared cluster or in their own separate clusters. 


Higher velocity: Jenkins X allows unhindered development without shipping logistics slowing things down. Powerful commands expedite most tasks and provide seamless integration with cloud or SCM. For example, a simple ”jx create cluster gke” command installs Jenkins X on Google cloud. AWS (EKS), Azure (AKS), Oracle (OKE) and more can also be used


Faster recovery: GitOps creates a single source of truth with everything versioned and comments available for every pull request. The configuration as code, of both Jenkins X and your environments, allows developers to get the right context and traceable information to resolve outages faster.


Predictable releases: Jenkins X helps create development/test environments using the “jx create devpod” command to provide each developer their own sandbox inside the Jenkins X cluster. As the devbuild pods are the same as those used in the pipeline used in production, it ensures code will perform in a predictable manner. Further, Jenkins X helps spin up Preview Environments before code is promoted to production


https://www.cloudbees.com/jenkins-x/what-is-jenkins-x
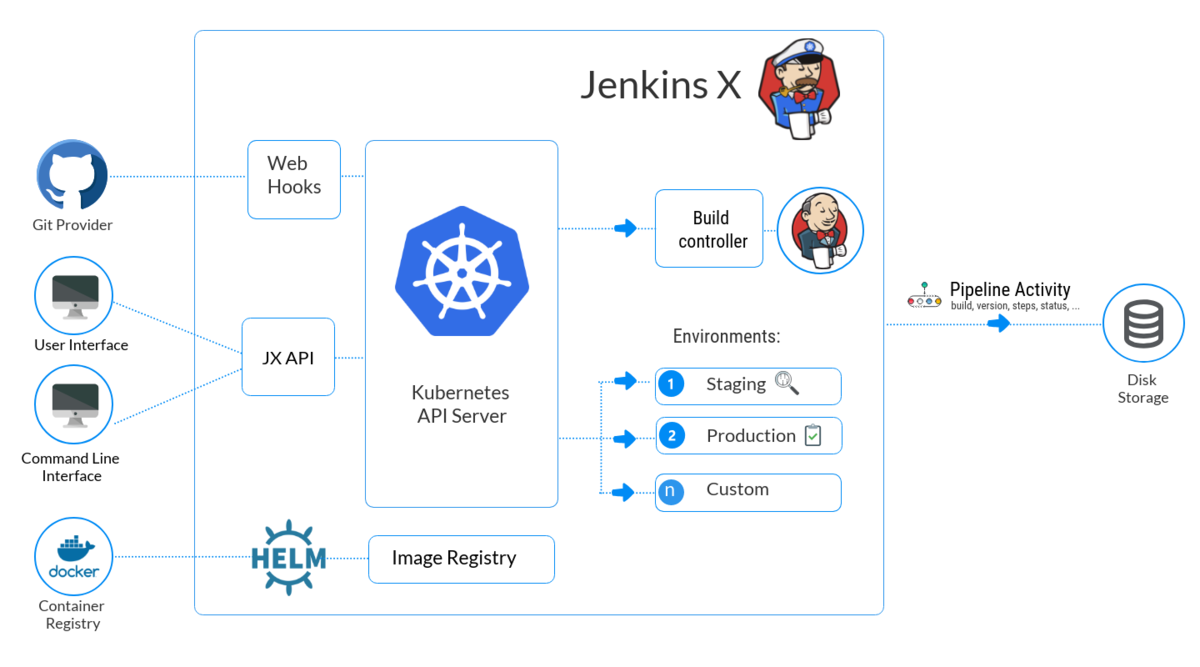


  • Following the success of Jenkins, a new version of Jenkins has been introduced lately called Jenkins X (JX). It provides continuous integration, automated testing, and continuous delivery to Kubernetes. 


It’s designed from the ground up to be a cloud-native, Kubernetes-only application that not only supports CI/CD but also makes working with Kubernetes as simple as possible. With one command you can create a Kubernetes cluster, install all the tools you’ll need to manage your application. You can also create build and deployment pipelines, and deploy your application to various environments.


Jenkins is described as an “extensible automation server” that is configured, via plugins, to be a Continuous Integration Server, a Continuous Deployment hub, or a tool to automate just about any software task. JX provides a specific configuration of Jenkins, meaning you don’t need to know which plugins are required to stand up a CI/CD pipeline. It also deploys numerous applications to Kubernetes to support building your docker container, storing the container in a docker registry, and deploying it to Kubernetes.


Serverless Jenkins:

the Jenkins community has created a version of Jenkins that can run classic Jenkins pipelines via the command line with the configuration defined by code instead of the usual HTML forms.


Preview Environments:


Though the preview environment can be created manually, Jenkins X automatically creates Preview Environments for each pull request. This provides a chance to see the effect of changes before merging them. Also, Jenkins X adds a comment to the Pull Request with a link for the preview for team members.


https://medium.com/edureka/jenkins-x-d87c0271af57

  • Jenkins Configuration as Code

The ‘as code’ paradigm is about being able to reproduce and/or restore a full environment within minutes based on recipes and automation, managed as code

https://www.jenkins.io/projects/jcasc/


Monday, January 4, 2021

gitops

  •   What is GitOps?

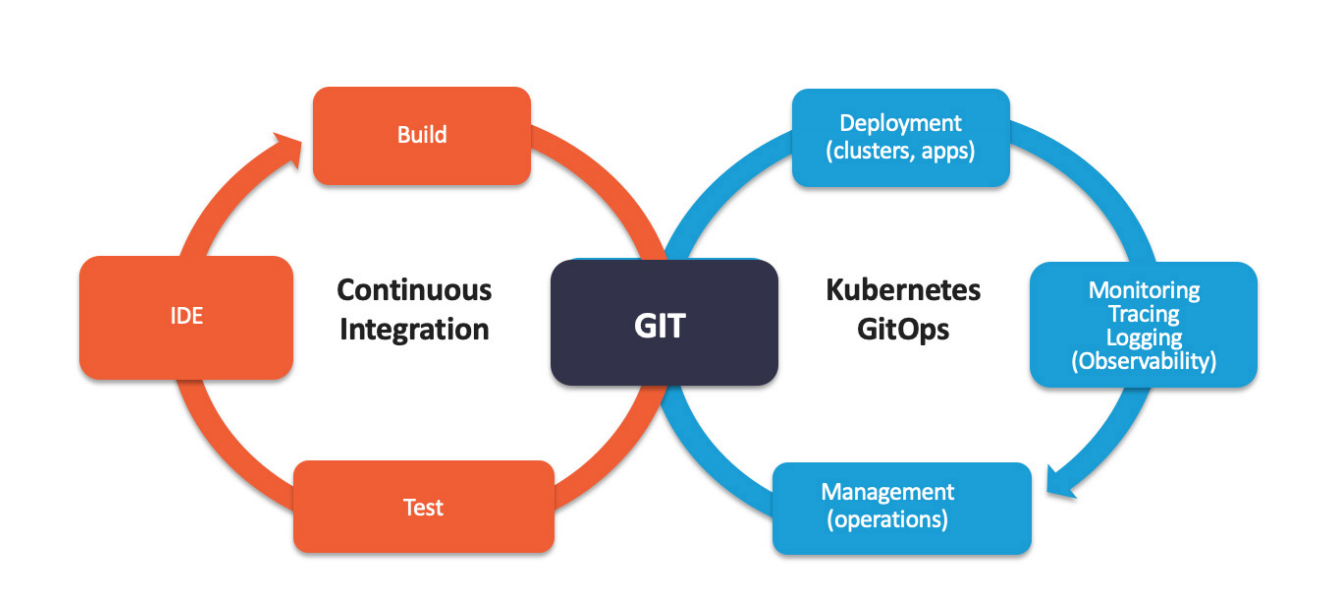
GitOps is a way of implementing Continuous Deployment for cloud native applications. It focuses on a developer-centric experience when operating infrastructure, by using tools developers are already familiar with, including Git and Continuous Deployment tools.


The core idea of GitOps is having a Git repository that always contains declarative descriptions of the infrastructure currently desired in the production environment and an automated process to make the production environment match the described state in the repository. If you want to deploy a new application or update an existing one, you only need to update the repository - the automated process handles everything else. It’s like having cruise control for managing your applications in production.


Why should I use GitOps?

Deploy Faster More Often

What is unique about GitOps is that you don’t have to switch tools for deploying your application. Everything happens in the version control system you use for developing the application anyways.

When we say “high velocity” we mean that every product team can safely ship updates many times a day — deploy instantly, observe the results in real time, and use this feedback to roll forward or back.


Easy and Fast Error Recovery

This makes error recovery as easy as issuing a git revert and watching your environment being restored.The Git record is then not just an audit log but also a transaction log. You can roll back & forth to any snapshot.


Easier Credential Management

your environment only needs access to your repository and image registry. That’s it. You don’t have to give your developers direct access to the environment.

kubectl is the new ssh. Limit access and only use it for deployments when better tooling is not available.


Self-documenting Deployments

With GitOps, every change to any environment must happen through the repository. You can always check out the master branch and get a complete description of what is deployed where plus the complete history of every change ever made to the system. And you get an audit trail of any changes in your system


Shared Knowledge in Teams

Using Git to store complete descriptions of your deployed infrastructure allows everybody in your team to check out its evolution over time. With great commit messages everybody can reproduce the thought process of changing infrastructure and also easily find examples of how to set up new systems.


How does GitOps work?


Environment Configurations as Git repository

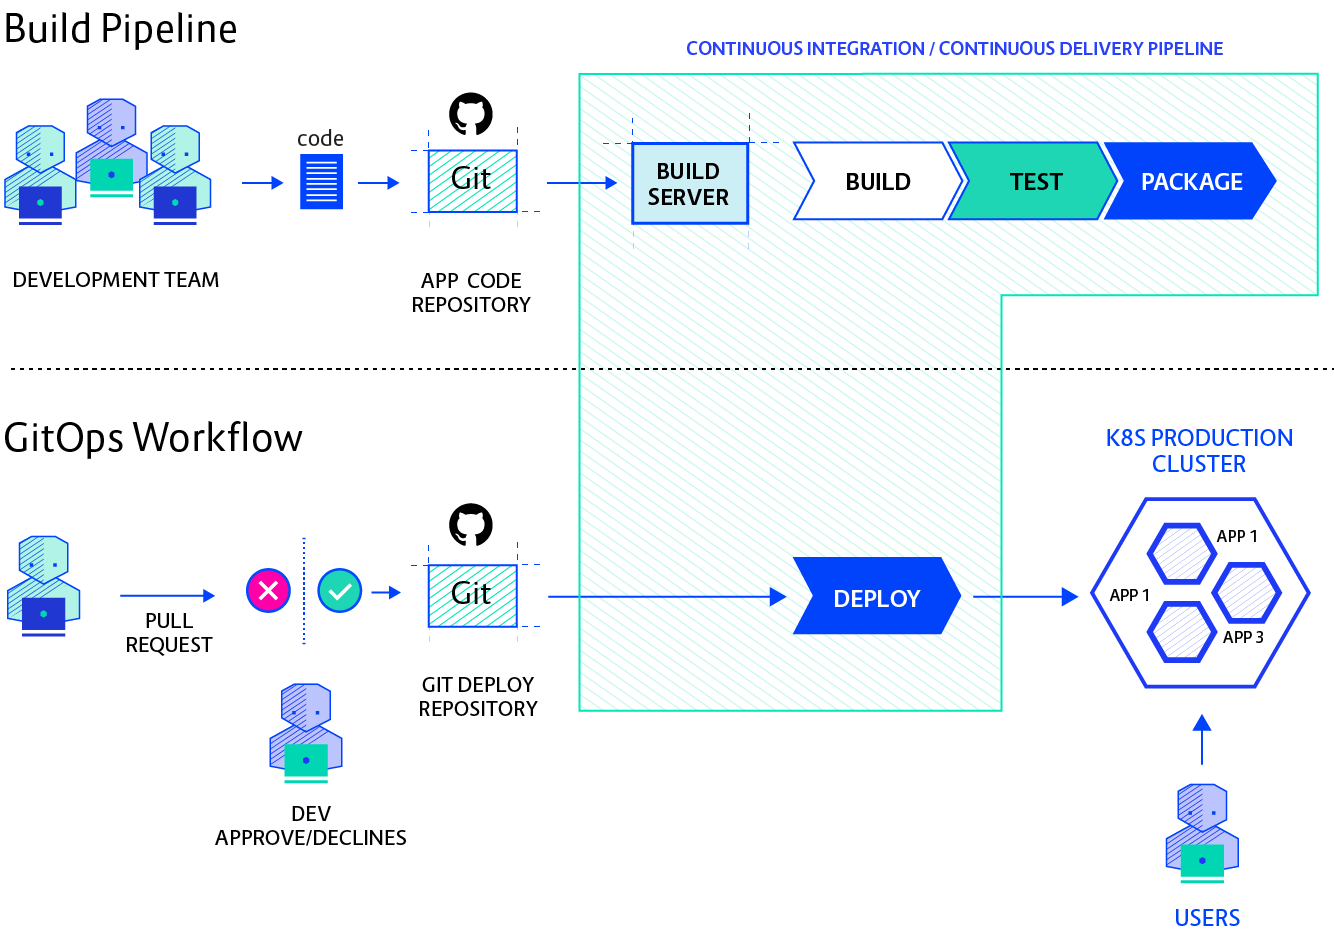
GitOps organizes the deployment process around code repositories as the central element. There are at least two repositories: the application repository and the environment configuration repository. The application repository contains the source code of the application and the deployment manifests to deploy the application. The environment configuration repository contains all deployment manifests of the currently desired infrastructure of an deployment environment. 


Push-based vs. Pull-based Deployments

There are two ways to implement the deployment strategy for GitOps: Push-based and Pull-based deployments. 

The difference between the two deployment types is how it is ensured, that the deployment environment actually resembles the desired infrastructure.

When possible, the Pull-based approach should be preferred as it is considered the more secure and thus better practice to implement GitOps.


Push-based Deployments

The Push-based deployment strategy is implemented by popular CI/CD tools such as Jenkins, CircleCI, or Travis CI. The source code of the application lives inside the application repository along with the Kubernetes YAMLs needed to deploy the app. Whenever the application code is updated, the build pipeline is triggered, which builds the container images and finally the environment configuration repository is updated with new deployment descriptors.

With this approach it is indispensable to provide credentials to the deployment environment.

In some use cases a Push-based deployment is inevitable when running an automated provisioning of cloud infrastructure. In such cases it is strongly recommended to utilize the fine-granular configurable authorization system of the cloud provider for more restrictive deployment permissions.

Another important thing to keep in mind when using this approach is that the deployment pipeline only is triggered when the environment repository changes. It can not automatically notice any deviations of the environment and its desired state. This means, it needs some way of monitoring in place, so that one can intervene if the environment doesn’t match what is described in the environment repository


Pull-based Deployments

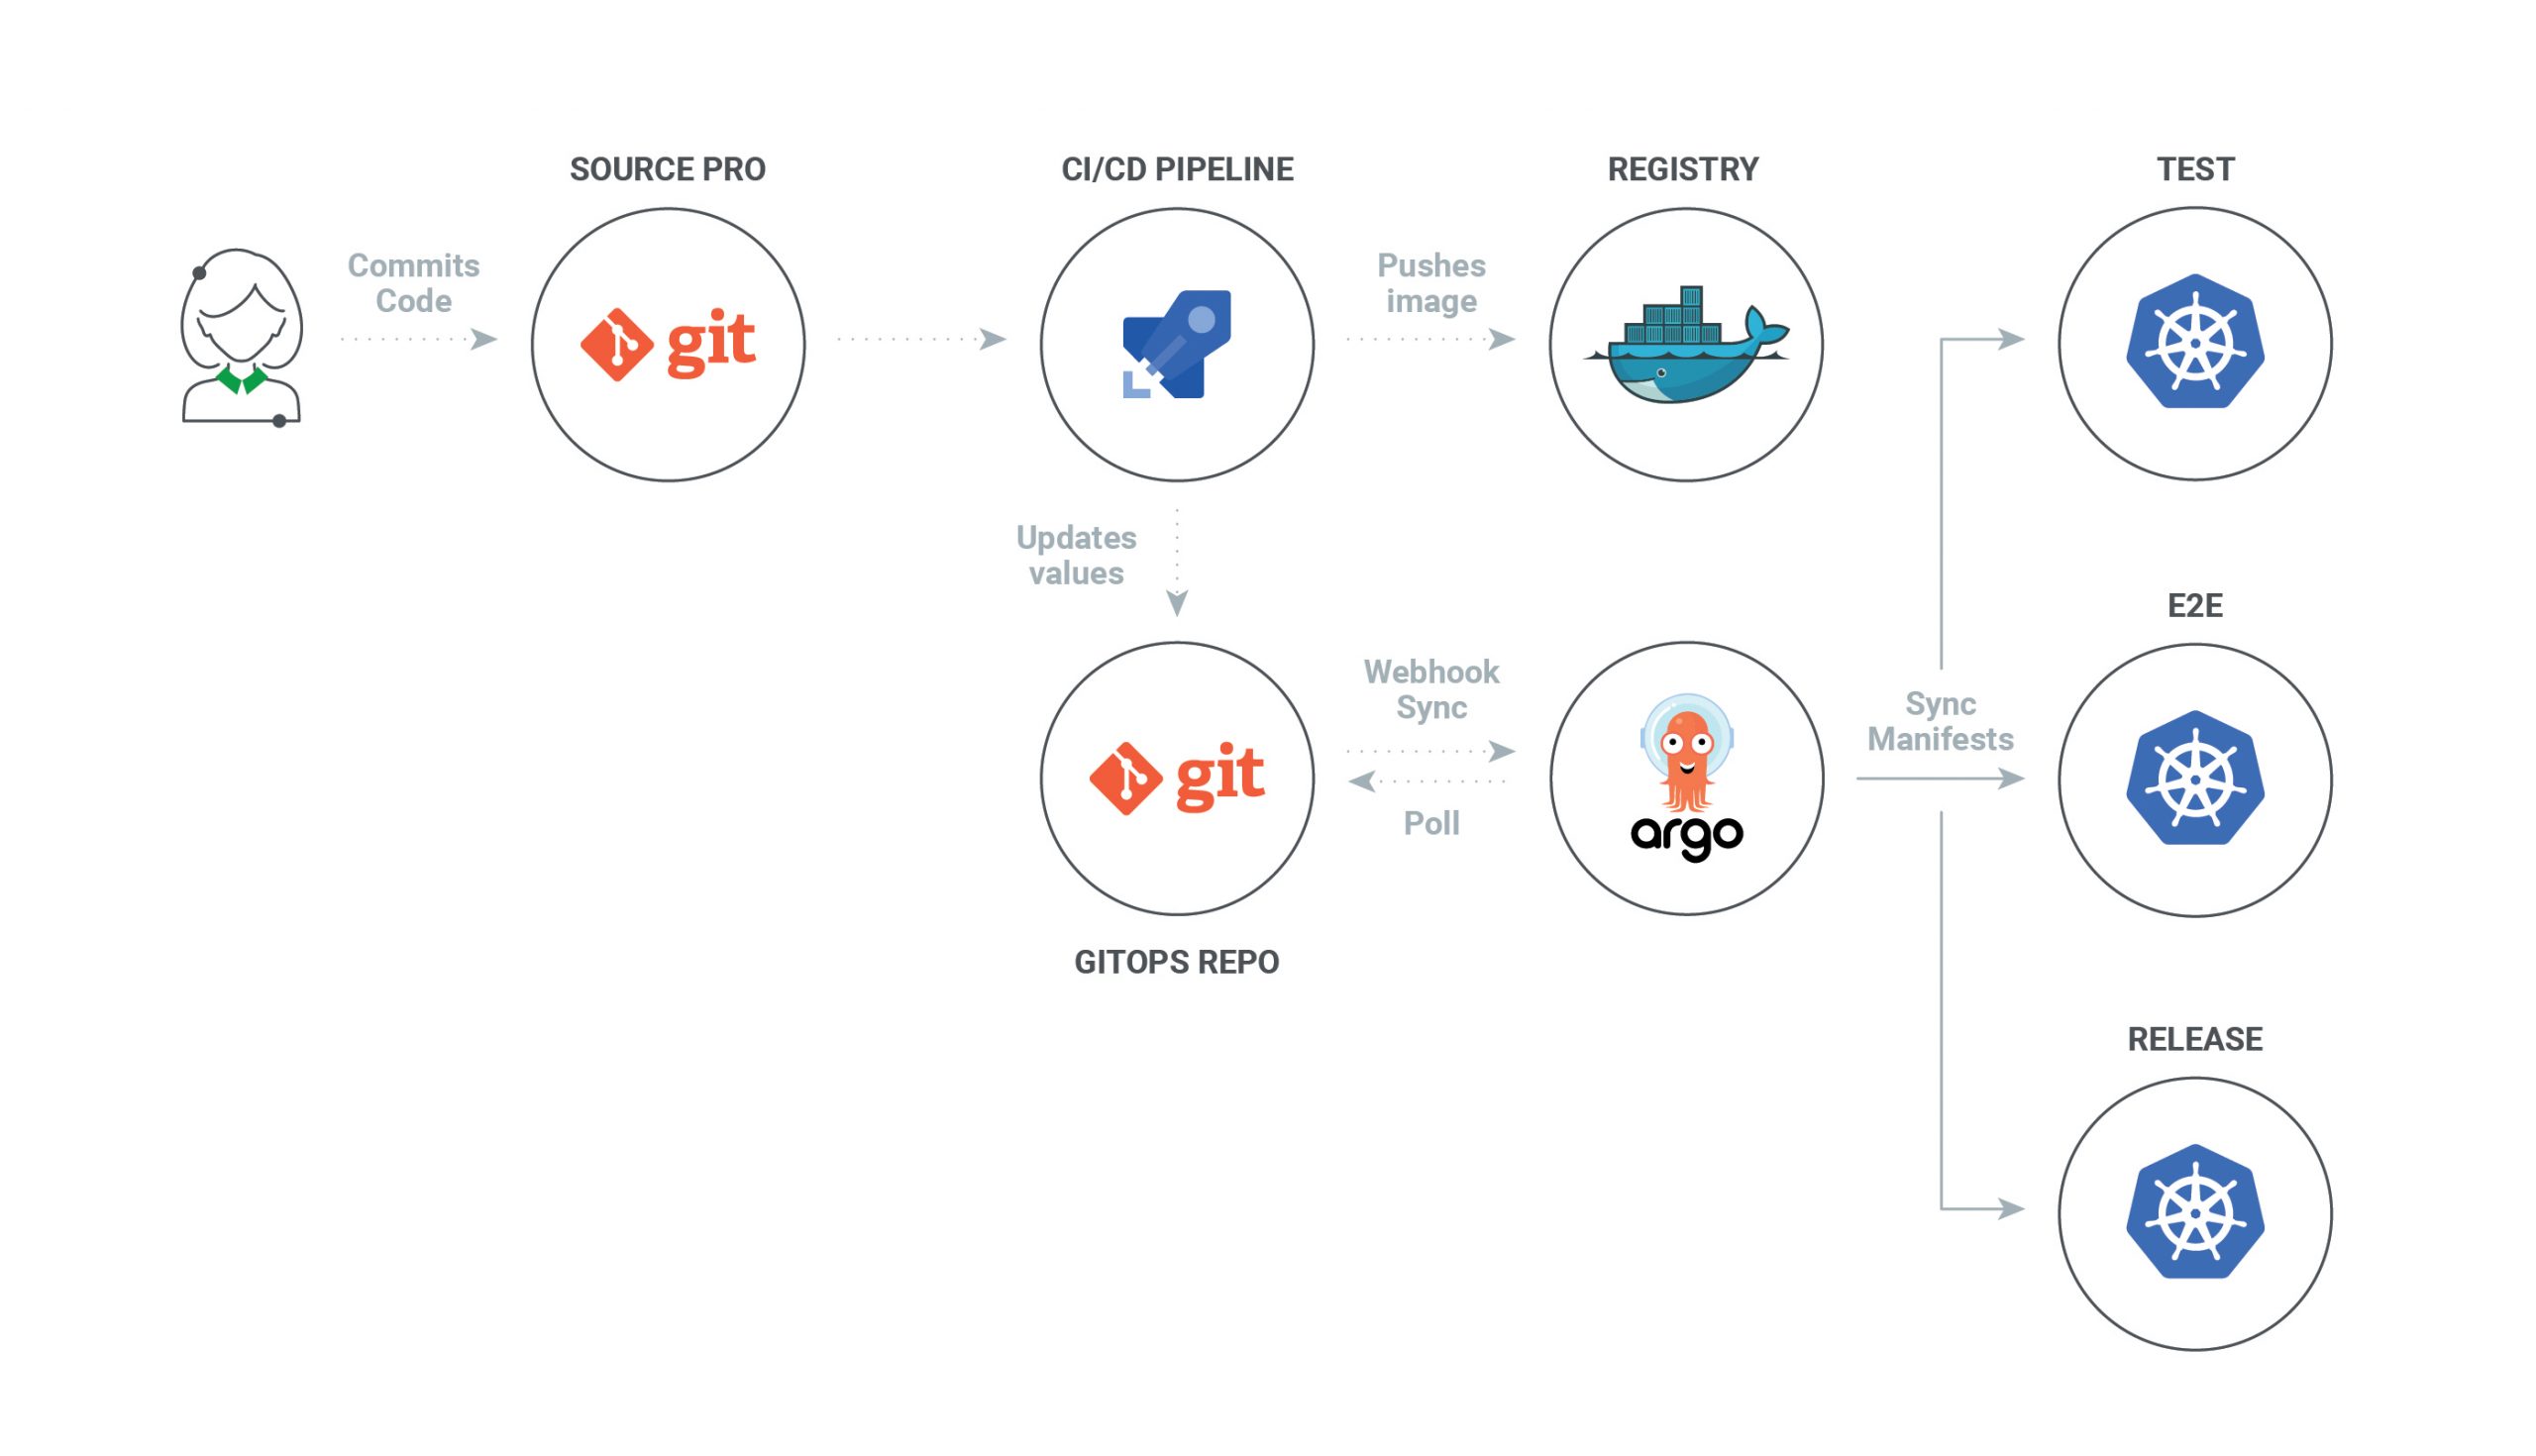
The Pull-based deployment strategy uses the same concepts as the push-based variant but differs in how the deployment pipeline works. Traditional CI/CD pipelines are triggered by an external event, for example when new code is pushed to an application repository. With the pull-based deployment approach, the operator is introduced. It takes over the role of the pipeline by continuously comparing the desired state in the environment repository with the actual state in the deployed infrastructure. Whenever differences are noticed, the operator updates the infrastructure to match the environment repository. Additionally the image registry can be monitored to find new versions of images to deploy.

Just like the push-based deployment, this variant updates the environment whenever the environment repository changes. However, with the operator, changes can also be noticed in the other direction. Whenever the deployed infrastructure changes in any way not described in the environment repository, these changes are reverted. This ensures that all changes are made traceable in the Git log, by making all direct changes to the cluster impossible.

This change in direction solves the problem of push-based deployments, where the environment is only updated when the environment repository is updated.

Most operators support sending mails or Slack notifications if it can not bring the environment to the desired state for any reason, for example if it can not pull a container image. 

Additionally, you probably should set up monitoring for the operator itself, as there is no longer any automated deployment process without it.

The operator should always live in the same environment or cluster as the application to deploy

seen with the push-based approach, where credentials for doing deployments are known by the CI/CD pipeline. 

When the actual deploying instance lives inside the very same environment, no credentials need to be known by external services.

The Authorization mechanism of the deployment platform in use can be utilized to restrict the permissions on performing deployments. 

When using Kubernetes, RBAC configurations and service accounts can be utilized.


Working with Multiple Applications and Environments

When you are using a microservices architecture, you probably want to keep each service in its own repository.

GitOps can also handle such a use case. You can always just set up multiple build pipelines that update the environment repository. From there on the regular automated GitOps workflow kicks in and deploys all parts of your application.

Managing multiple environments with GitOps can be done by just using separate branches in the environment repository.

You can set up the operator or the deployment pipeline to react to changes on one branch by deploying to the production environment and another to deploy to staging.


FAQ

Is my project ready for GitOps?

All you need to get started is infrastructure that can be managed with declarative Infrastructure as Code tools.

I don’t use Kubernetes. Can I still use GitOps?

In principle, you can use any infrastructure that can be observed and described declaratively, and has Infrastructure as Code tools available

However, currently most operators for pull-based GitOps are implemented with Kubernetes in mind.

Is GitOps just versioned Infrastructure as Code?

Declarative Infrastructure as Code plays a huge role for implementing GitOps, 

GitOps takes the whole ecosystem and tooling around Git and applies it to infrastructure. 

Continuous Deployment systems guarantee that the currently desired state of the infrastructure is deployed in the production environment.

Apart from that you gain all the benefits of code reviews, pull requests, and comments on changes for your infrastructure.

How to get secrets into the environment without storing them in git?

you have have secrets created within the environment which never leave the environment

For example, you provision a database within the environment and give the secret to the applications interacting with the database only.

Another approach is to add a private key once to the environment (probably by someone from a dedicated ops team) and from that point you can add secrets encrypted by the public key to the environment repository.

How does GitOps Handle DEV to PROD Propagation?

GitOps doesn’t provide a solution to propagating changes from one stage to the next one. We recommend using only a single environment and avoid stage propagation altogether. But if you need multiple stages (e.g., DEV, QA, PROD, etc.) with an environment for each, you need to handle the propagation outside of the GitOps scope, for example by some CI/CD pipeline.

We are already doing DevOps. What’s the difference to GitOps?

GitOps is a technique to implement Continuous Delivery. While DevOps and GitOps share principles like automation and self-serviced infrastructure, these shared principles certainly make it easier to adopt a GitOps workflow when you are already actively employing DevOps techniques.

So, is GitOps basically NoOps?

You can use GitOps to implement NoOps,

If you are using cloud resources anyway, GitOps can be used to automate those. 

Typically, however, some part of the infrastructure like the network configuration or the Kubernetes cluster you use isn’t managed by yourself decentrally but rather managed centrally by some operations team.

So operations never really goes away.

Is there also SVNOps?

If you prefer SVN over Git,you may need to put more effort into finding tools that work for you or even write your own.

All available operators only work with Git repository

https://www.gitops.tech/


  •     ArgoCD: A GitOps operator for Kubernetes with a web interface
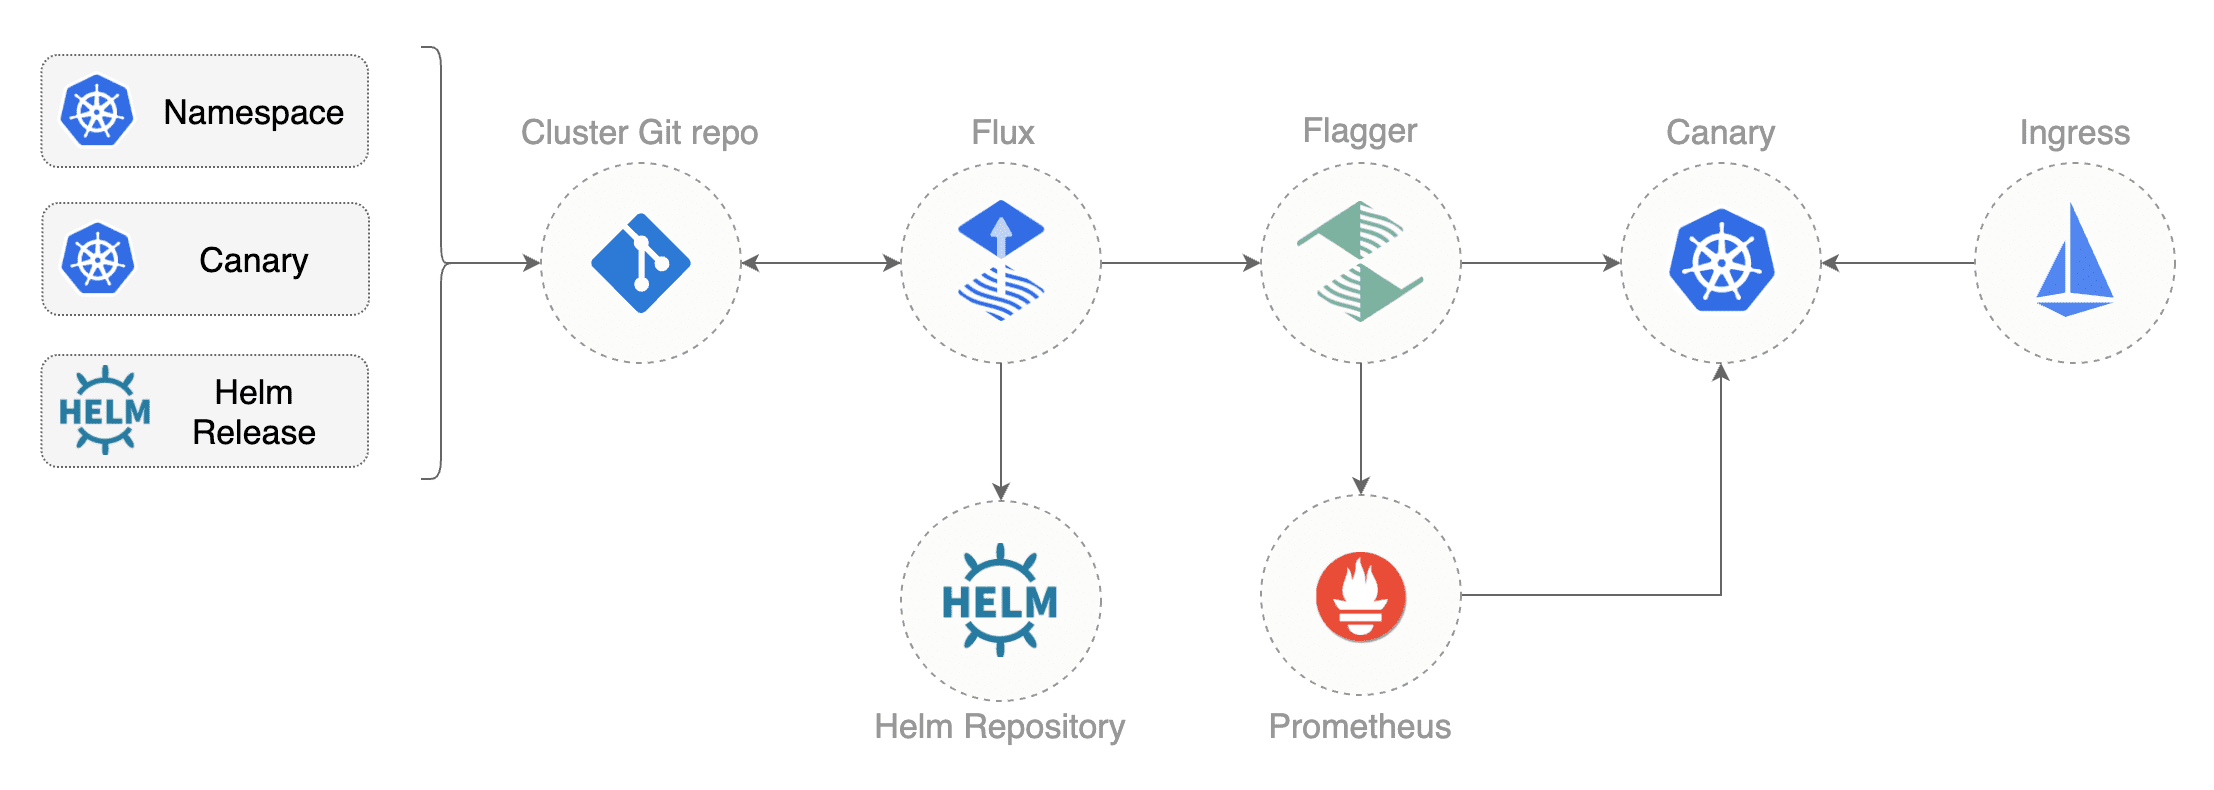
  •     Flux: The GitOps Kubernetes operator by the creators of GitOps — Weaveworks
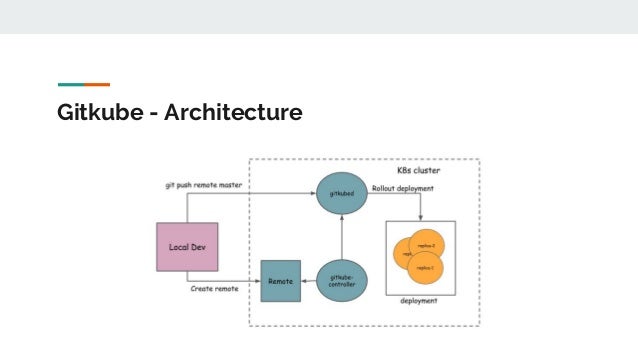
  •     Gitkube: A tool for building and deploying docker images on Kubernetes using git push
  •     JenkinsX: Continuous Delivery on Kubernetes with built-in GitOps
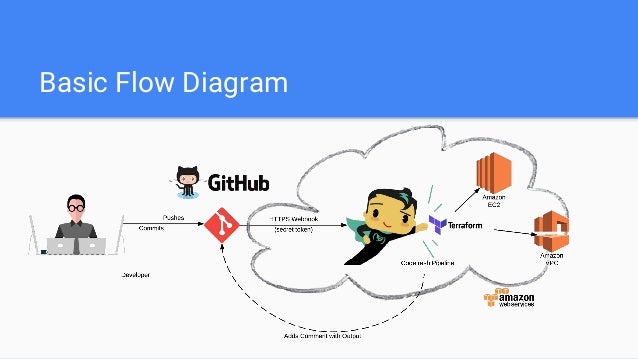
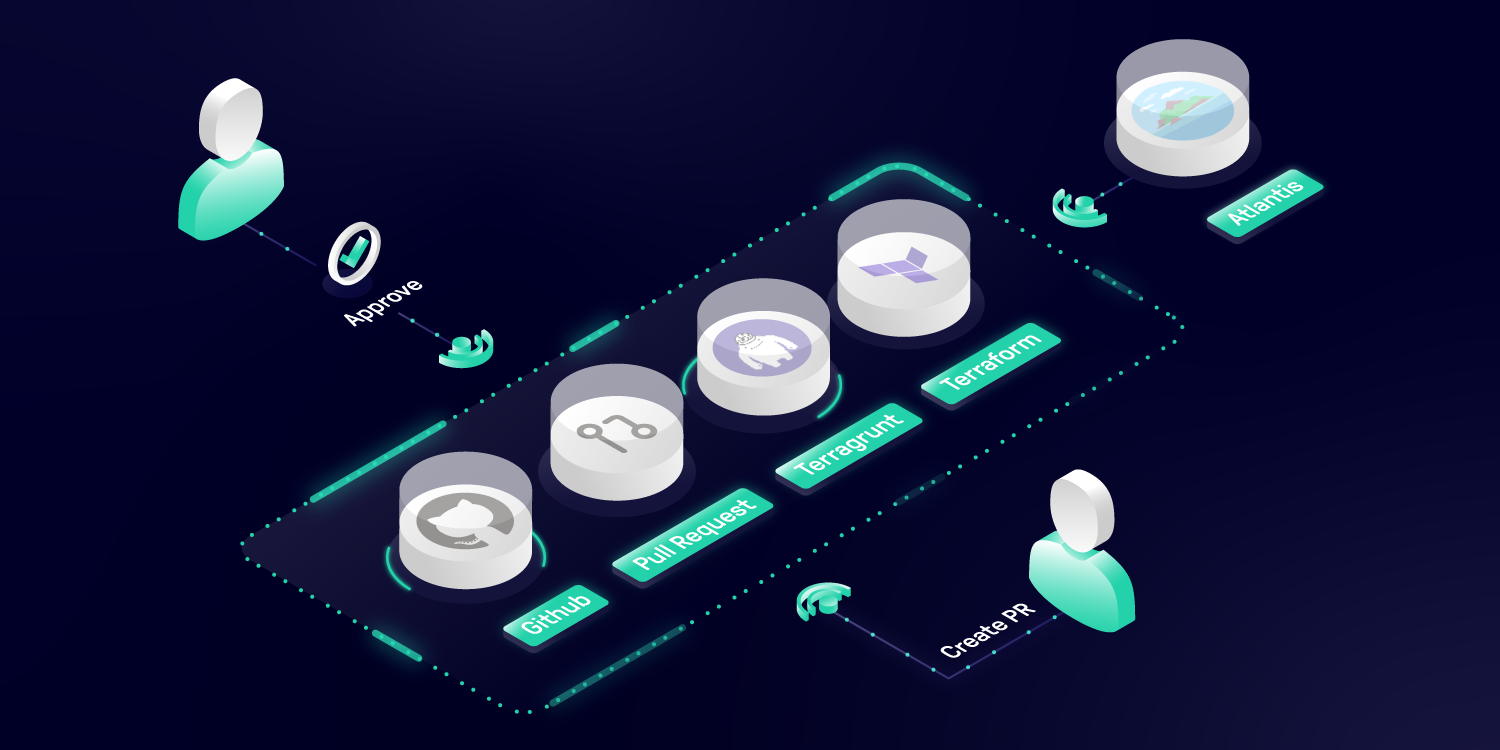
  •     Terragrunt: A wrapper for Terraform for keeping configurations DRY, and managing remote state
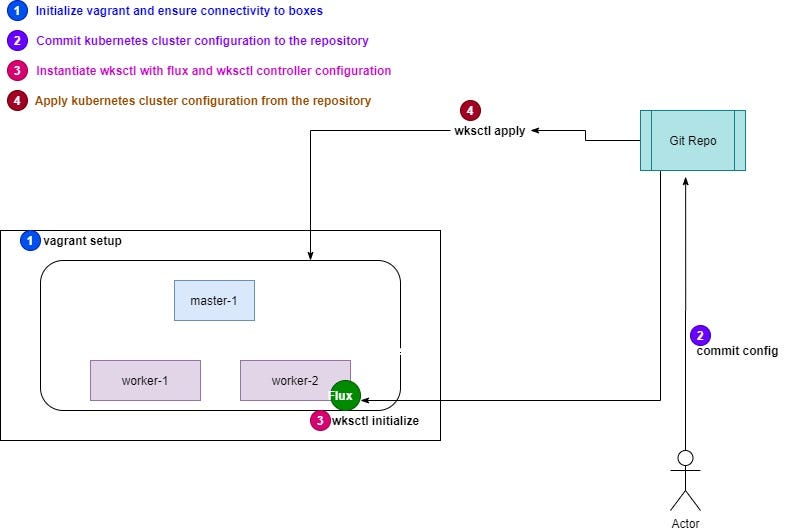
  •     WKSctl: A tool for Kubernetes cluster configuration management based on GitOps principles
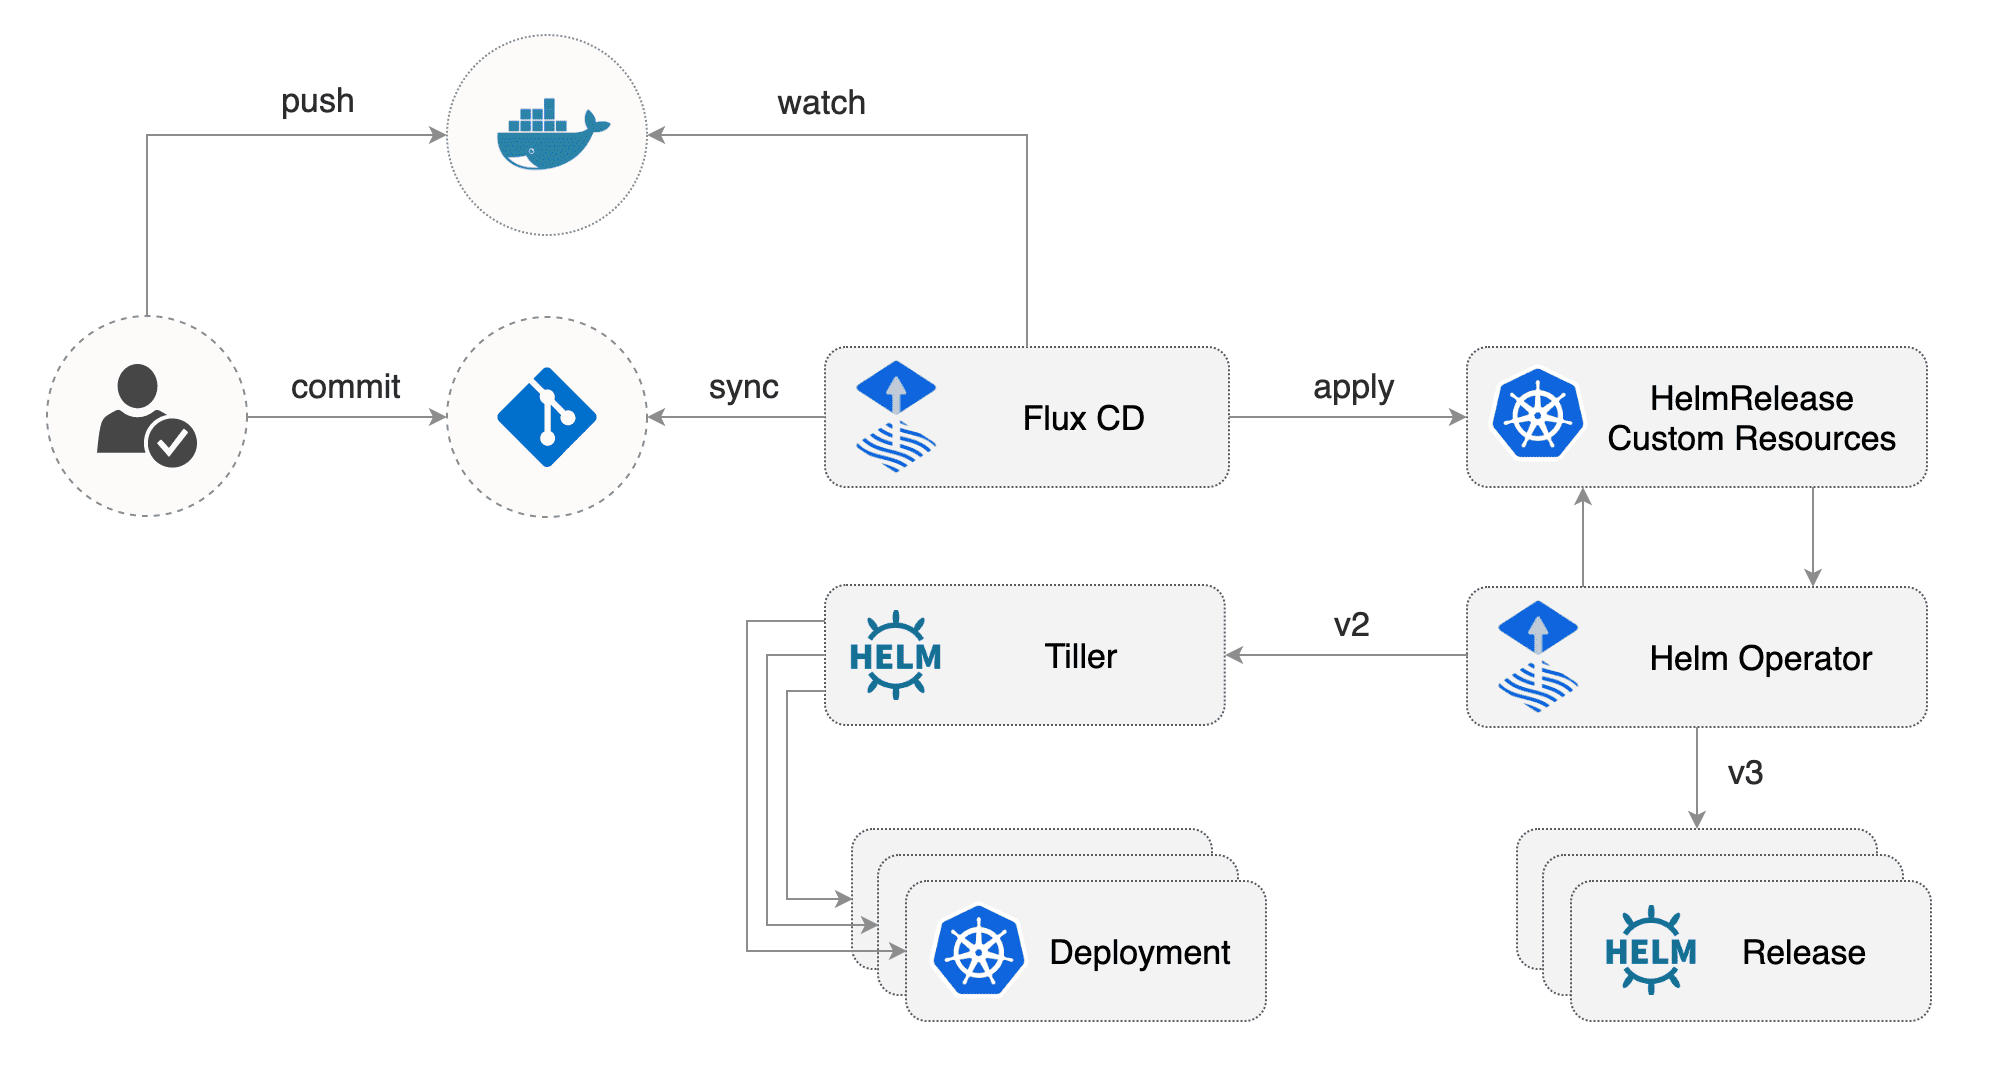
  •     Helm Operator: An operator for using GitOps on K8s with Helm
  •     werf: A CLI tool to build images and deploy them to Kubernetes via push-based approach

Saturday, October 5, 2019

network automation

  • A Use Case for Network Automation 

Use the Python Netmiko module to automate switches, routers and firewalls from multiple vendors.
I frequently find myself in the position of confronting "hostile" networks.
I describe the tools I've found useful to recover control, audit, document and automate these networks
 control
 audit
 document
 automate

In order to save money, I wanted to use open-source tools to gather information from all the devices on the network.
SNMP could provide a lot the information I need, but it would have to be configured on each device manually first.
the mass enablement of SNMP could be one of the first use cases for the network automation tools
Why Netmiko?
I discovered the Paramiko SSH module quite a few years ago and used it to create real-time inventories of Linux servers at multiple companies.
It enabled me to log in to hosts and gather the output of commands, such as lspci, dmidecode and lsmod.
Netmiko also is optimized for the network device management task, while Paramiko is more of a generic SSH module.
Netmiko doesn't auto-detect the vendor, so you'll need to specify that information when using the functions.

A Few Words of Caution
Mass configuration:With network automation tools, you can render all your network devices useless within seconds.
Configuration backup strategy: this ideally would include a versioning feature, so you can roll back to a specific "known good" point in time. Check out the RANCID package
Out-of-band network management:almost any modern switch or network device is going to have a dedicated OOB port. This physically separate network permits you to recover from configuration mistakes that potentially could cut you off from the very devices you're managing.
A strategy for testing: for example, have a dedicated pool of representative equipment permanently set aside for testing and proof of concepts. When rolling out a change on a production network, first verify the automation on a few devices before trying to do hundreds at once.

Using Netmiko without Writing Any Code
several standalone scripts called Netmiko Tools that you can use without writing any Python cod

netmiko-cfg
Apply snippets of configurations to one or more devices.
Mass changes could include DNS servers, NTP servers, SNMP community strings or syslog servers for the entire network.

You still will need to verify that the commands you're sending are appropriate for the vendor and OS combinations of the target devices, as Netmiko will not do all of this work for you.
All of the Netmiko tools depend on an "inventory" of devices, which is a YAML-formatted file stored in ".netmiko.yml" in the current directory or your home directory.

As I was dealing with hundreds of devices, I didn't want to create the YAML-formatted inventory file by hand. Instead, I started with a simple list of devices and the corresponding Netmiko "device_type":
I then used standard Linux commands to create the YAML inventory file:
I'm using a centralized authentication system, so the user name and password are the same for all devices.
Once you've created this inventory, you can use the Netmiko Tools against individual devices or groups of devices.
https://www.linuxjournal.com/content/use-case-network-automation


  • Netmiko

Multi-vendor library to simplify Paramiko SSH connections to network devices
https://github.com/ktbyers/netmiko


  • What is eNMS

eNMS is a vendor-agnostic NMS designed for building workflow-based network automation solutions.

        Configuration Management Service: Commit / Rollback of a configuration with Napalm or Netmiko.
        Ansible Service: Sending and managing Ansible playbooks.
        ReST Service: Sending a ReST call (GET/POST/UPDATE/DELETE) with variable URL and payload.
        Custom Services: Any python script can be integrated into the web UI. If the script takes input parameters, a form will be automatically generated.
        Workflows: Services can be combined together graphically in a workflow.
        Scheduling: Services and workflows can be scheduled to start at a later time, or run periodically.
        Event-driven automation: Services and workflows can be triggered by an external event (ReST call or Syslog message).


https://enms.readthedocs.io/en/latest/base/introduction.html


  • Oxidized

Running with Docker
build the container locally (requires docker 17.05.0-ce or higher):
docker build -q -t oxidized/oxidized:latest oxidized/
https://github.com/ytti/oxidized
  • RANCID is a config differ.If you had it installed RANCID could have told you exactly what configuration the technicians changed. Aside from showing you what changed during last night RANCID shows you all the changes since it was introduced.

So if you hade been using RANCID for three years it could show you all the changes on all your network devices since that time.
Having all your configurations stored on the RANCID server also works as a backup.
Though great for collecting device configurations you can also use RANCID to get specific information from your devices by sending a command to several nodes, such as “show ip route” or “show crypto pki certificates”. Taking it a step further you can use it to change configurations, so if you need to change an access list on all firewalls or routers you can use RANCID to do so.
Our test network
For the purpose of testing let’s say you are installing RANCID in a network where you have a headquarter and four branch offices. In the headquarter there is one router, one distributions switch, three access switches and six stand-alone access-points. In each of the branch offices you have one router, one access-switch and two access-points. You want to use RANCID to handle all of these devices.
Now you have a system you can use to collect information from your devices and it will act as a backup and you will see changes. Also you should have a basic understanding of what RANCID can do and how you can save time with it.
https://networklore.com/rancid-getting-started/


  • Network Automation with Python

we have been using RANCID [Really Awesome New Cisco confIg Differ] for the backup and versioning of the configuration of our equipment as well as for systematizing the changes.
RANCID quickly showed us its limitations, and, in general, the community considers the project obsolete
that’s not a big surprise since RANCID is based on Expect, the TCL extension

The fact is that RANCID is based on a number of assumptions that are no longer valid in the context of modern production network environments
These include its emulating the slow and random typing rate of a human so as not to “overload” the system’s CPU, storing configurations in a centralized and outdated file version management system (CVS), concentrating run commands in order to query devices on their configuration in vendor-dependent scripts and storing passwords in plain text in flat configuration files.

One open-source alternative is known as Oxidized.
it aims to correct several of RANCID’s restrictions.
Oxidized stores configurations in databases to facilitate scaling, integrates its own monitor for scheduling, and is open to other file versioning systems, such as Git.

Another benefit is that Python 3 handles IPv4 and IPv6 address manipulation and semantics through its IP address standard module.

https://blog.intercloud.com/network-automation-with-python


  • How to remotely monitor hosts over Telnet and SSH [Tutorial]

the Telnet module
SSH using different modules in Python.
You will also learn about how telnetlib, subprocess, fabric, Netmiko, and paramiko modules work.
how to apply these patterns and build working software on top of a serverless system.

The telnetlib() module
Telnet is a network protocol that allows a user to communicate with remote servers. It is mostly used by network administrators to remotely access and manage devices.
Python has the telnetlib module to perform Telnet functions through Python scripts

you will learn to do SSH by using different modules in Python, such as subprocess, fabric, Netmiko, and Paramiko.
The subprocess.Popen() module
SSH using fabric module
Fabric is a Python library as well as a command-line tool for the use of SSH. It is used for system administration and application deployment over the network. We can also execute shell commands over SSH.
SSH using the Paramiko library
Paramiko is a library that implements the SSHv2 protocol for secure connections to remote devices.
we created a few virtual LANs on a remote device
SSH using the Netmiko library
https://hub.packtpub.com/how-to-remotely-monitor-hosts-over-telnet-and-ssh-tutorial/

Tuesday, May 21, 2019

Kubernetes Hardening

  • Kubernetes Hardening
I’m running on AWS using Kops to create and manage my Kubernetes cluster.

Private topology with Calico
Calico is an open-source project to manage and enforce network policy of the cluster and it comes built-in in the latest google container releases.

Network Policies
If you created your cluster with private topology you can use Network Policies. Set up your network policy to explicitly allow/deny connections between elements in the cluster.

Bastion
Access with SSH through a single point-of-contact: Bastion.By default, all nodes have a public IP and are accessible to SSH from the outside world. With a Bastion you can limit the vulnerabilities of penetration to your cluster.

Default Authorization with RBAC
Add the option --authorization=RBAC to kops create cluster command when creating the cluster for the first time.

POD dangerous IAM credentials
By default every pod has the powers of its hosting node in terms of AWS access (IAM). To fix, you will install kube2iam which is a daemonset that runs on each instance and provides a firewall to the IAM credentials requests from the containers on those instances

We are going to install kube2iam Daemonset with helm (package manager for Kubernetes)
Assuming you created your cluster with RBAC enabled by default we need to provide the helm tiller (the pod issueing the requests we make to helm on our cluster) with the appropriate RBAC credentials to operate

https://itnext.io/kubernetes-hardening-d24bdf7adc25

Launching a Kubernetes cluster hosted on AWS, GCE or DigitalOcean
https://github.com/kubernetes/kops

Bastion provide an external facing point of entry into a network containing private network instances. This host can provide a single point of fortification or audit and can be started and stopped to enable or disable inbound SSH communication from the Internet, some call bastion as the "jump server"
https://github.com/kubernetes/kops/blob/master/docs/bastion.md

kube2iam
Provide IAM credentials to containers running inside a kubernetes cluster based on annotations.
https://github.com/jtblin/kube2iam

  • Generating the Data Encryption Config and Key

Kubernetes stores a variety of data including cluster state, application configurations, and secrets. Kubernetes supports the ability to encrypt cluster data at rest.
https://github.com/kelseyhightower/kubernetes-the-hard-way/blob/master/docs/06-data-encryption-keys.md


Provisioning a CA and Generating TLS Certificates
In this lab you will provision a PKI Infrastructure using CloudFlare's PKI toolkit, cfssl, then use it to bootstrap a Certificate Authority, and generate TLS certificates for the following components: etcd, kube-apiserver, kube-controller-manager, kube-scheduler, kubelet, and kube-proxy.
https://github.com/kelseyhightower/kubernetes-the-hard-way/blob/master/docs/04-certificate-authority.md

  • Hardening Kubernetes from Scratch


Level 0 Security
The following items are to be deployed to fulfill basic Kubernetes cluster functionality. The steps purposefully omit any security-related configuration/hardening.

Level 0 Attacks
At this most basic level, "Level 0", the current configuration offers very little (if any) protection from attacks that can take complete control of the the cluster and its nodes

Enumerate exposed ports on the nodes and identify their corresponding services
Probing Etcd to compromise the data store
Probing the Controller to access the API and other control plane services
Probing the Worker to access the Kubelet and other worker service

Level 1 Hardening
Let's do the very basic steps to prevent the "Level 0" attacks from being so straightforward.
    Improve the security group configuration
    Enable TLS on the externally exposed Kubernetes API

Level 1 Attacks
Without any boundaries in place, deploying too many pods or pods that consume too much CPU/RAM shares can cause serious cluster availability/Denial of Service issues. When the cluster is "full", any new pods will not be scheduled.
    Launch too many pods
    Launch pods that consume too many CPU/RAM shares
    Launch pods that consume all available disk space and/or inodes.

Level 2 Hardening
In order to provide the proper boundaries around workloads and their resources, using separate namespaces and corresponding resource quotas can prevent the "Level 1" issues.

    Separate workloads using Namespaces
    Set specific Request/Limits on Pods
    Enforce Namespace Resource Quotas
    Discuss multi-etcd, multi-controller

Level 2 Attacks
Malicious Image, Compromised Container, Multi-tenant Misuse


    Service Account Tokens
    Dashboard Access
    Direct Etcd Access
    Tiller Access
    Kubelet Exploit
    Application Tampering
    Metrics Scraping
    Metadata API
    Outbound Scanning/pivoting

Level 3 Hardening
    RBAC
    Etcd TLS
    New Dashboard
    Separate Kubeconfigs per user
    Tiller TLS
    Kubelet Authn/z
    Network Policy/CNI
    Admission Controllers
    Logging?

Level 4 Attacks
    Malicious Image, Compromised Container, Multi-tenant Misuse
    Escape the container


    Advanced admission controllers
    Restrict images/sources
    Network Egress filtering
    Vuln scan images
    Pod Security Policy
    Encrypted etcd
    Sysdig Falco


https://github.com/hardening-kubernetes/from-scratch

  • Securing a Cluster


Kubernetes playgrounds:
Minikube
Katacoda
Play with Kubernetes

As Kubernetes is entirely API driven, controlling and limiting who can access the cluster and what actions they are allowed to perform is the first line of defense

Use Transport Level Security (TLS) for all API traffic
Kubernetes expects that all API communication in the cluster is encrypted by default with TLS, and the majority of installation methods will allow the necessary certificates to be created and distributed to the cluster components.

API Authentication
All API clients must be authenticated, even those that are part of the infrastructure like nodes, proxies, the scheduler, and volume plugins. These clients are typically service accounts or use x509 client certificates, and they are created automatically at cluster startup or are setup as part of the cluster installation

API Authorization
Once authenticated, every API call is also expected to pass an authorization check. Kubernetes ships an integrated Role-Based Access Control (RBAC) component that matches an incoming user or group to a set of permissions bundled into roles.It is recommended that you use the Node and RBAC authorizers together, in combination with the NodeRestriction admission plugin.

Controlling access to the Kubelet
Kubelets expose HTTPS endpoints which grant powerful control over the node and containers. By default Kubelets allow unauthenticated access to this API
Production clusters should enable Kubelet authentication and authorization

Controlling the capabilities of a workload or user at runtime
Limiting resource usage on a cluster
Resource quota limits the number or capacity of resources granted to a namespace
Limit ranges restrict the maximum or minimum size of some of the resources
Controlling what privileges containers run with
Pod security policies can limit which users or service accounts can provide dangerous security context settings.
Generally, most application workloads need limited access to host resources so they can successfully run as a root process (uid 0) without access to host information. However, considering the privileges associated with the root user, you should write application containers to run as a non-root user. Similarly, administrators who wish to prevent client applications from escaping their containers should use a restrictive pod security policy
 
Restricting network access
The network policies for a namespace allows application authors to restrict which pods in other namespaces may access pods and ports within their namespaces.
 
Restricting cloud metadata API access
When running Kubernetes on a cloud platform limit permissions given to instance credentials, use network policies to restrict pod access to the metadata API, and avoid using provisioning data to deliver secrets.
 
Controlling which nodes pods may access
As an administrator, a beta admission plugin PodNodeSelector can be used to force pods within a namespace to default or require a specific node selector, and if end users cannot alter namespaces, this can strongly limit the placement of all of the pods in a specific workload

Protecting cluster components from compromise
Restrict access to etcd
Write access to the etcd backend for the API is equivalent to gaining root on the entire cluster, and read access can be used to escalate fairly quickly. Administrators should always use strong credentials from the API servers to their etcd server, such as mutual auth via TLS client certificates, and it is often recommended to isolate the etcd servers behind a firewall that only the API servers may access
Enable audit logging
The audit logger is a beta feature that records actions taken by the API for later analysis in the event of a compromise. It is recommended to enable audit logging and archive the audit file on a secure server
Rotate infrastructure credentials frequently
The shorter the lifetime of a secret or credential the harder it is for an attacker to make use of that credential. Set short lifetimes on certificates and automate their rotation. Use an authentication provider that can control how long issued tokens are available and use short lifetimes where possible. If you use service account tokens in external integrations, plan to rotate those tokens frequently.
Review third party integrations before enabling them
Many third party integrations to Kubernetes may alter the security profile of your cluster.
Encrypt secrets at rest
In general, the etcd database will contain any information accessible via the Kubernetes API and may grant an attacker significant visibility into the state of your cluster. Always encrypt your backups using a well reviewed backup and encryption solution, and consider using full disk encryption where possible.
Receiving alerts for security updates and reporting vulnerabilities
 

https://kubernetes.io/docs/tasks/administer-cluster/securing-a-cluster/

  • Free and open source, Project Calico is designed to simplify, scale, and secure cloud networks

Unlike SDNs that require a central controller, limiting scalability, Calico is built on a fully distributed, scale-out architecture. So it scales smoothly from a single developer laptop to large enterprise deployments.
https://www.projectcalico.org/


HTTP, gRPC, and Kafka Aware Security and Networking for Containers with BPF and XDP

Cilium is open source software for providing and transparently securing network connectivity and loadbalancing between application workloads such as application containers or processes. Cilium operates at Layer 3/4 to provide traditional networking and security services as well as Layer 7 to protect and secure use of modern application protocols such as HTTP, gRPC and Kafka. Cilium is integrated into common orchestration frameworks such as Kubernetes and Mesos
https://github.com/cilium/cilium


  • Benchmark results of Kubernetes network plugins (CNI) over 10Gbit/s network (Updated: April 2019)


Flannel is still one of the fastest and leanest in the CNI competition, but still does not support NetworkPolicies, nor encryption.
Calico announced support of Application Layer Policy on top of Istio, bringing security to the application layer.
Cilium now supports encryption! Cilium is providing encryption with IPSec tunnels and offers an alternative to WeaveNet for encrypted networking. However, WeaveNet is faster than Cilium with encryption enabled. That is due to Cilium 1.4.2 only support CBC encryption, GCM would be better as it can be hardware offloaded by network adapters, but it will be part of 1.5 version of Cilium.


Here is the list of CNIs we will compare :

    Calico v3.6
    Canal v3.6 (which is, in fact, Flannel for network + Calico for firewalling)
    Cilium 1.4.2
    Flannel 0.11.0
    Kube-router 0.2.5
    WeaveNet 2.5.1

Security

When comparing the security of these CNIs, we are talking about two things: their ability to encrypt communications, and their implementation of Kubernetes Network Policies (according to real tests, not from their documentation).
There are only two CNIs that can encrypt communications: Cilium and WeaveNet.
When it comes to the Network Policy implementation, Calico, Canal, Cilium, and WeaveNet are the best of the panel, by implementing both Ingress and Egress rules.

https://itnext.io/benchmark-results-of-kubernetes-network-plugins-cni-over-10gbit-s-network-updated-april-2019-4a9886efe9c4

  • Kubernetes networks solutions comparison


Kubernetes requires networks to follow these rules:

    All pods can communicate with each other without NAT
    All nodes can communicate with pods without NAT, in both directions
    The IP seen by a container is the same as the IP seen by external components

There are two types of network setup:

    Default k8s network,
    Or CNI with its plugins – most frequently used, and which will be the base of our comparison.

CNI with a network plugin
The second solution to setup Kubernetes network is to use the Container Network Interface (CNI) and a network plugin

Linux networking can be defined in two ways: underlay or overlay. Kubernetes makes it possible to use both.

    Underlay is defined at the physical level (switchs, routers…)
    Overlay is a virtual network, composed of vlan, veth (virtual interface) and VxLAN; it encapsulates the network trafic. Overlay is a bit slower than underlay, as it creates tunnels between hosts, which reduces available MTUs.

Comparison of different CNI + plugin solutions on k8s
Three solutions are mainly used: Calico, Flannel and WeaveNet
two others, Cilium and Contiv, provide interesting features too.

The deployment tests have benn done with Kubespray.
In more detail: Calico works in L2 mode by default. It is possible to configure it to use IpinIP (L3). IPinIP is a tunnelled IP, an IP packet encapsulates another IP packet and adds a header field “SourceIP ” which is the entry point of a tunnel and the field “Destination” which is used as an endpoint.

Calico offers two configurations for IPinIP:

    always: all the trafic is encapsulated
    crossSubnet: only the subnetwork trafic is encapsulated

Cilium
It uses L3/L4 for the network part and L7 for the application part.
The L7 support allows adding high-level filter rules for web applications. It supports ipv4 and ipv6. Cilium is the only solution to offer BPF filtering.
BPF – Berkeley Packet Filter
BPF is a packet filter solution which can replace iptables. The filter isn’t performed at application level, but at the kernel level: it’s more efficient and secure.
Cilium uses BPF to create and apply filter rules on packets, no iptable rule is created. Filters are more effective and flexible.

Contiv
Presentation
Contiv is a network solution for Kubernetes distributed by Cisco and using the VxLAN and BGP protocols.
It supports IPv4 and IPv6. It offers Cisco ACI (Application Centric Infrastructure) integration as well, but Cisco offers a specific ACI network solution for Kubernetes. It is based on Open vSwitch for pipelines and uses etcd for key-values storage.

Flannel
Flannel can run using several encapsulation backends, VxLAN being the recommended one (others are more experimental). Only IPv4 is supported.

WeaveNet
Weave net provides VxLAN on layer 2 networking for Kubernetes. It uses kube-proxy and kube-dns. It supports IPv4 and IPv6.

Conclusion
For a POC or if we want to quickly setup the network, it is best to use Flannel or WeaveNet.
Calico, Contiv, and Cilium offer to use an underlay network (including BGP) directly, and avoid VxLAN encapsulation.
Several solutions (Calico, Contiv) offer to add many virtual networks for the whole cluster, pods can connect on a same network from different nodes.
Cilium is more security focused and offers application layer filtering. It uses BPF to filter at the kernel level. BPF filter offers better performances that iptables filters.


https://www.objectif-libre.com/en/blog/2018/07/05/k8s-network-solutions-comparison/

  • Kubernetes secret
Kubernetes secret objects let you store and manage sensitive information, such as passwords, OAuth tokens, and ssh keys.
A Secret is an object that contains a small amount of sensitive data such as a password, a token, or a key. Such information might otherwise be put in a Pod specification or in an image; putting it in a Secret object allows for more control over how it is used, and reduces the risk of accidental exposure.
https://kubernetes.io/docs/concepts/configuration/secret/


  • Running Cilium in Azure

Why do we need another firewall anyway?

Traditional firewalls will inspect traffic on (usually) two layers: 3 and 4. That is networking and transport. With a few add-ons will make firewalling layer 7 traffic possible, what the industry calls “WAF” (Web Application Firewalls)
How would you filter an external traffic hitting a single public IP but being load balanced to various Pods running different microservices?
how would you now filter the traffic (internal to the cluster) so that only certain microservices will be able to reach out to specific resources
Cilium relies on BPF (Berkley Packet Filter)

BPF is a highly flexible and efficient virtual machine-like construct in the Linux kernel allowing to execute bytecode at various hook points in a safe manner. It is used in a number of Linux kernel subsystems, most prominently networking, tracing and security (e.g. sandboxing).
https://medium.com/@dcasati/running-cilium-in-azure-c5a9626d8595

  • Ingress vs. Ingress Controller
Kubernetes provides three service types:

    ClusterIP: adds internal endpoints for in-cluster communication
    NodePort: exposes a static port on each of the Nodes to route external calls to internal services
    LoadBalancer: creates an external load balancer to route external requests to internal services

While an Ingress is not a Kubernetes Service, it can also be used to expose services to external requests
The advantage of an Ingress over a LoadBalancer or NodePort is that an Ingress can consolidate routing rules in a single resource to expose multiple services.
an Ingress is an API object that defines the traffic routing rules (e.g. load balancing, SSL termination, path-based routing, protocol), whereas the Ingress Controller is the component responsible for fulfilling those requests.

With the exception of GKE, which includes GLBC by default, ingress controllers must be installed separately prior to usage.

Cloud-Specific Ingress Controllers
The key advantage of using a cloud provider-specific Ingress Controller is native integration with other cloud services.
On the other hand, if you are going for a hybrid or multi-cloud strategy, using an open-source option listed below will be easier than maintaining multiple solutions per cloud provider.

Open-Source Ingress Controllers
Kubernetes website maintains a list of popular third-party solutions
NGINX-Based Ingress Controllers

ingress-nginx
This is the only open-source Ingress Controller maintained by the Kubernetes team, built on top of NGINX reverse proxy.

NGINX & NGINX Plus Ingress Controller
This is the official Ingress Controller from NGINX Inc (now owned by F5) supporting both the open-source and commercial (NGINX Plus) products.

Kong
Unlike ingress-nginx, Kong insists on not implementing a cross-namespace Ingress Controller, citing privilege escalation as a critical attack vector in those scenarios.


HAProxy-Based Ingress Controllers

HAProxy Ingress
As an Ingress Controller, HAProxy Ingress offers dynamic configuration update via API to address reliance on static configuration files with HAProxy.

Voyager
Voyager highlights both L4 and L7 load balancing for HTTP/TCP as well as seamless SSL integration with LetsEncrypt and AWS Certificate Manager on its website.


Envoy-Based Ingress Controllers

Istio Ingress
Istio makes heavy use of Envoy proxies to mediate all traffic within the service mesh.
If you are already using Istio as the service mesh solution in your cluster, using the default Istio Ingress/Gateway makes the most sense.

Ambassador
Technically, Ambassador is an API Gateway and L7 load balancer with Kubernetes Ingress support.
Although it’s based on Envoy, it connects nicely with other service mesh solutions besides Istio (e.g. Consul, Linkerd).

Contour
Contour was one of the first Ingress Controllers to make use of Custom Resource Definitions (CRDs) to extend the functionality of the Kubernetes Ingress API
The CRD (HTTPProxy — renamed from IngressRoute) primarily addresses the limitations of the native Kubernetes Ingress API in multi-tenant environments. Now that IngressRoute is officially defined in Kubernetes v1.18+

Gloo
Gloo differentiates from other Envoy-based Ingress Controllers by offering what it calls “function-level routing”. This means that Gloo can act as an Ingress and API Gateway to route traffic to not only microservices, but also to serverless functions (e.g. AWS Lambda, Google Cloud Functions, OpenFaaS, Knative).

Others

Skipper
https://medium.com/swlh/kubernetes-ingress-controller-overview-81abbaca19ec

  • Unlike other types of controllers which run as part of the kube-controller-manager binary, Ingress controllers are not started automatically with a cluster.
https://kubernetes.io/docs/concepts/services-networking/ingress-controllers/


  • Differences Between nginxinc/kubernetes-ingress and kubernetes/ingress-nginx Ingress Controllers
Which One Am I Using?
If you are unsure about which implementation you are using, check the container image of the Ingress controller that is running. 
https://github.com/nginxinc/kubernetes-ingress/blob/master/docs/nginx-ingress-controllers.md