Wednesday, January 31, 2018

Administration

  • Autoconf, automake, and libtool are the GNU Autotools family that generate the installation script:

./configure
make
make install

The Makefile generated by Autoconf and automake has more commands that you can run:

    make all Build programs, libraries, documentation, etc. (same as make).

    make install Install what needs to be installed, copying the files from the package’s tree to system-wide directories.

    make install-strip Same as make install, then strip debugging symbols. Some users like to trade space for useful bug reports…

    make uninstall The opposite of make install: erase the installed files. (This needs to be run from the same build tree that was installed.)

    make clean Erase from the build tree the files built by make all.

    make maintainer-clean Erase files that generated by autoconf.

    make distclean Additionally erase anything ./configure created.

    make check Run the test suite if any.

    make installcheck Check the installed programs or libraries if supported.

    make dist Recreate package-version.tar.gz from all the source files.


http://www.idryman.org/blog/2016/03/10/autoconf-tutorial-1/


  • 2.2.2 Standard Makefile Targets

So far we have come across four ways to run make in the GNU Build System: make, make check, make install, and make installcheck. The words check, install, and installcheck, passed as arguments to make, are called targets. make is a shorthand for make all, all being the default target in the GNU Build System.
https://www.gnu.org/software/automake/manual/html_node/Standard-Targets.html#Standard-Targets


  • This tutorial looks at the GNU Build System. From an end-user's perspective, it first describes how to build the binary executable of a GNU free and open source software package from the available source code and install it on your system. Then, from a programmer's perspective it looks at the GNU Build System for generating the scripts and makefiles which provide the infrastructure that enables the end user to build and install the GNU software executables.

https://www.softprayog.in/tutorials/understanding-gnu-build-system

  • "Owl" (or "Openwall GNU/*/Linux"; please, note that only the "O" is capitalized in either case) is a security-enhanced operating system with Linux and GNU software as its core, compatible with other major distributions of GNU/*/Linux. It is intended as a server platform

Owl can be used as a base for installing whatever software is generally available for GNU/*/Linux systems.
the same CDs and ISOs also contain packages to be installed on a hard drive (using the included installer program called "settle") and full source code.

Owl includes a complete build environment capable to re-build the entire system from a source with one simple command ("make buildworld")
However, the implementation of "make buildworld" on Owl is very different from that available with *BSD. It is in fact more similar to *BSD ports/packages, covering the entire Owl userland (that is, everything but the Linux kernel).

In particular, in most cases it is possible to install applications packaged for a certain version of Red Hat Enterprise Linux, CentOS, or Fedora on Owl.
http://www.openwall.com/Owl/CONCEPTS.shtml
  • The key idea of the AppImage format is one app = one file. Every AppImage contains an app and all the files the app needs to run. In other words, each AppImage has no dependencies other than what is included in the targeted base operating system (s).

https://askubuntu.com/questions/774490/what-is-an-appimage-how-do-i-install-it

  • Free Thinomenon Remote Desktop Client allows running Windows® applications from various access devices including laptops, desktops, tablets and smartphones. Use Thinomenon's free RDP client for access from legacy Windows, Apple OS X and iOS, Google Android, Linux and other platforms.

http://www.thinomenon.com/products/RemoteDesktopClient/linux.aspx


  • What is WinConn

WinConn simplifies creation, management and desktop integration of remote windows applications in Ubuntu Linux. It uses RemoteApp technology, implemented by FreeRDP project to provide seamless user experience. The applications run in their own window and can be used like any other locally installed Ubuntu application, without bringing the full windows desktop to the user.
http://stanev.org/winconn/

  • Cmder is a software package created out of pure frustration over absence of usable console emulator on Windows. It is based on ConEmu with major config overhaul, comes with a Monokai color scheme, amazing clink (further enhanced by clink-completions) and a custom prompt layout.

https://github.com/cmderdev/cmder?lipi=urn%3Ali%3Apage%3Ad_flagship3_pulse_read%3BPFIXAkvnT%2Fq%2B3GqxhjgNdA%3D%3D


  • Gow (Gnu On Windows) is the lightweight alternative to Cygwin. It uses a convenient NSIS installer that installs over 100 extremely useful open source UNIX applications compiled as native win32 binaries.

https://github.com/bmatzelle/gow/wiki?lipi=urn%3Ali%3Apage%3Ad_flagship3_pulse_read%3BPFIXAkvnT%2Fq%2B3GqxhjgNdA%3D%3D


  • Functionally, vim is almost a proper superset of vi. Therefore, everything that is in vi is available in vim.


Vim adds onto those features. Here are some extended vim features:

    Vim has been ported to a much wider range of OS's than vi.
    Vim includes support (syntax highlighting, code folding, etc) for several popular programming languages (C/C++, Python, Perl, shell, etc).
    Vim integrates with cscope.
    Vim can be used to edit files using network protocols like SSH and HTTP.
    Vim includes multilevel undo/redo.
    Vim allows the screen to be split for editing multiple files.
    Vim can edit files inside a compressed archive (gzip, zip, tar, etc).
    Vim includes a built in diff for comparing files (vimdiff).
    Vim includes support for plugins, and finer control over config and startup files.
    Vim can be scripted with vimscript, or with an external scripting language (e.g. python, perl, shell)
https://askubuntu.com/questions/418396/what-is-the-difference-between-vi-and-vim

  • The ancestral vi is long gone, replaced eons ago by Vim -- vi IMproved.
Vim includes extensive documentation, unless your distro installs only vim-tiny, which strips out the documentation and other fripperies, which is another reason to know the basics without having to look them up.
Most distros symlink vi to Vim, so you should be able to start it with either vi or vim.
https://www.linux.com/learn/intro-to-linux/2017/2/vim-sysadmins

  • X-based VNC server
Xvnc is the Unix VNC server, which is based on a standard X server.  Applications can display themselves on it as if it were a normal X display, but they will actually appear on any connected VNC viewers rather than on a physical screen.
http://www.hep.phy.cam.ac.uk/vnc_docs/xvnc.html


  • An open source remote desktop protocol(rdp) server.
http://www.xrdp.org/


  • Understand Linux Load Averages and Monitor Performance of Linux

Multi-processor Vs Multi-core
Multi-processor – is where two or more physical CPU’s are integrated into a single computer system.
Multi-core processor – is a single physical CPU which has at least two or more separate cores (or what we can also refer to as processing units) that work in parallel. Meaning a dual-core has 2 two processing units, a quad-core has 4 processing units and so on.

Furthermore, there is also a processor technology which was first introduced by Intel to improve parallel computing, referred to as hyper threading.
Under hyper threading, a single physical CPU core appears as two logical CPUs core to an operating system (but in reality, there is one physical hardware component).
Present-day Intel CPUs use a combination of both multiple cores and hyper-threading technology.

Let’s say we have load averages below
On a single core system this would mean:

    The CPU was fully (100%) utilized on average; 1 processes was running on the CPU (1.00) over the last 1 minute.
    The CPU was idle by 60% on average; no processes were waiting for CPU time (0.40) over the last 5 minutes.
    The CPU was overloaded by 235% on average; 2.35 processes were waiting for CPU time (3.35) over the last 15 minutes.

On a dual-core system this would mean:

    The one CPU was 100% idle on average, one CPU was being used; no processes were waiting for CPU time(1.00) over the last 1 minute.
    The CPUs were idle by 160% on average; no processes were waiting for CPU time. (0.40) over the last 5 minutes.
    The CPUs were overloaded by 135% on average; 1.35 processes were waiting for CPU time. (3.35) over the last 15 minutes.

https://www.tecmint.com/understand-linux-load-averages-and-monitor-performance/
vbox networking

NAT - Your host will act as a router (firewall) and your guests will be on a private subnet. Use this if you are not running servers on the guests.

Bridged - Your guests will get a ip address on the same subnet as your host.

Internal networking

    This can be used to create a different kind of software-based network which is visible to selected virtual machines, but not to applications running on the host or to the outside world.
Host-only networking

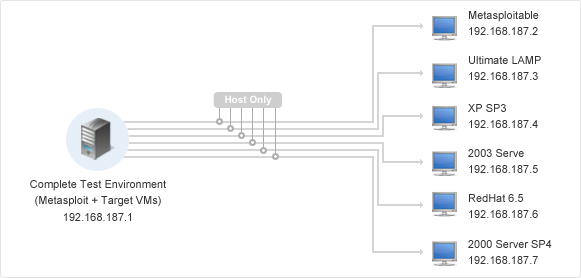
    This can be used to create a network containing the host and a set of virtual machines, without the need for the host's physical network interface. Instead, a virtual network interface (similar to a loopback interface) is created on the host, providing connectivity among virtual machines and the host.
   

Testing Lab

  • Setting Up A Penetration Testing Lab


Setting up a test lab on a single machine
If you have limited resources, the best way thing to do is use a single machine to set up your virtual machines and Metasploit Framework box.


Setting up a test lab on multiple machines

In this type of test lab environment, you will want to keep your vulnerable machines unavailable to any machine except for your penetration testing box; therefore, it’s important to make the vulnerable machine dependent on the Metasploit Framework box for connectivity. In the section below, we’ll show you how to set up the access to go out on eth0 for the Metasploit Framework box and access to go to the target box on eth1.

The Metasploitable and UltimateLAMP vulnerable VMs are Ubuntu machines running vulnerable services and containing weak accounts.
The Metasploitable VM focuses on network-layer vulnerabilities, while the UltimateLAMP VM is primarily focused on web vulnerabilities.
The Metasploitable VM also contains a weak system account with the username user and the password user.
The default login is msfadmin:msfadmin. Several vulnerable applications have been installed on the VM.


The UltimateLAMP VM's default credentials are: root:vmware. Each application is available by browsing to :80 on the VM's assigned IP address.

https://kb.help.rapid7.com/v1.0/docs/setting-up-a-penetration-testing-lab


  • Features

UltimateLAMP includes a long list of popular LAMP stack applications. For more information take a look a the UltimateLAMP products list.
With the success of this first product, research has already commenced in our next two products UltimateLAMJ (Open Source Java Based Applications) and UltimateLAMR (Open Source Ruby Applications).
https://www.vulnhub.com/entry/ultimatelamp_02,36/


  • Metasploitable is a virtual machine based on Linux that contains several intentional vulnerabilities for you to exploit. Metasploitable is essentially a penetration testing lab in a box, available as a VMware virtual machine (VMX). (The Metasploitable login is “msfadmin”; the password is also “msfadmin”.)

https://information.rapid7.com/metasploit-framework.html

  • Metasploit and Metasploitable 2 installation
Username: msfadmin
Password: msfadmin
Metasploitable 2 is an intentionally vulnerable Linux machine which can be downloaded and setup as a virtual machine in any hypervisor such as VMware Player and Virtual box. In the Metasploitable 2 tutorial we will be setting up the vulnerable Linux machine in VMware Player.
https://www.hackingtutorials.org/metasploit-tutorials/metasploit-metasploitable-2-installation/

  • The Samurai Web Testing Framework is a virtual machine, supported on VirtualBox and VMWare, that has been pre-configured to function as a web pen-testing environment. The VM contains the best of the open source and free tools that focus on testing and attacking websites.


We have included the tools used in all four steps of a web pen-test.
reconnaissance tools such as the Fierce domain scanner and Maltego.
mapping tools such as WebScarab and ratproxy.
discovery
w3af and burp
exploitation
BeEF, AJAXShell
http://www.samurai-wtf.org/


  • Emulab is a network testbed, giving researchers a wide range of environments in which to develop, debug, and evaluate their systems.

https://www.emulab.net


  • ORBIT is a two-tier wireless network emulator/field trial designed to achieve reproducible experimentation, while also supporting realistic evaluation of protocols and applications. 

http://www.orbit-lab.org/


  • PlanetLab is a global research network that supports the development of new network services.

https://www.planet-lab.org/

  • These virtual machine hacking challenges, more commonly known as boot2roots, are relatively easy to make
It begins with an idea; think of a challenge (or a set of challenges), that you’d like a player to solve. A goal should be set, such as obtaining root access on the virtual machine, or getting access to a flag. The challenges that you come up with, will define the difficulty level of the boot2root
I prefer creating my boot2roots using VMware ESXi and exporting it into an OVA file. OVAs can be imported by all incarnations of VMware, and by VirtualBox
Whatever hypervisor you choose, you should try to test it on the popular ones such as VMware Player and VirtualBox - both of which are free.
When you’re satisfied with everything, it’s time to make your boot2root public! Announce it on Twitter, your blog, IRC, whatever. VulnHub makes a slew of boot2roots available so you should definitely consider having it hosted there.
https://blog.techorganic.com/2013/12/10/creating-a-virtual-machine-hacking-challenge/

  • when we connect to an IP address, the device provides a banner identifying itself and some of its parameters.
This information can be VERY useful for searching for vulnerable or unprotected devices.
It was developed by John Matherly in 2009 and it is named Shodan. You can find it at www.shodan.io
Matherly's crawler scans each IP address (there are 4.3B IPv4 IP addresses) and attempts to pull and collect the banner information from each device.
This information in the banner usually includes the manufacturer of the device and some key parameters.
It's important to note here that Shodan indexes the data that is presented in the banner.
It has no way of knowing whether the banner is accurate.
Some firms that are vigilant about security actually replace these banners with fake or bogus banners to throw off Shodan or attackers.
https://www.hackers-arise.com/single-post/2016/06/22/Using-Shodan-The-Worlds-Most-Dangerous-Search-Engine


  • CHECK POINT THREAT ALERT: SHODAN
Shodan can identify the physical location of any Internet-connected equipment, as well as its IP address, and often even what type of software it’s running.. This provides sufficient information for hackers to carry out targeted attacks.
https://blog.checkpoint.com/2016/01/04/check-point-threat-alert-shodan/


  • information disclosure in server banner. In Apache 2.4, there is a default setting “ServerTokens Full” which means Server response header field which is sent back to clients includes a description of the generic OS-type of the server as well as information about compiled-in modules.
To prevent the disclosure of configuration information by your Apache instance, the best general-purpose strategy is to implement the CIS Benchmark for establishing a secure configuration posture for Apache HTTP Server. In CIS Apache HTTP Server 2.4 Benchmark, more than 15% of the recommendations relate to prohibiting unnecessary but sensitive information disclosure, and provide a good baseline for most environments
https://blog.qualys.com/securitylabs/2015/01/26/protect-your-applications-from-hacker-research


Monday, January 29, 2018

TAP vs SPAN

  • To TAP or SPAN?
(Test Access Point)
A simple hardware device that copies all network  traffic for monitoring, analysis, and security

(Switch Port Analyzer / Mirror)
Software built into switches and routers that copies
selected packets passing through the device

To summarize, here are the top 10 reasons why network TAPs are preferred over SPAN ports:
TAPs create an exact copy of the bi-directional network  traffic at full line rate, providing full fidelity for network monitoring, analytics and security.
https://www.gigamon.com/content/dam/resource-library/english/white-paper/wp-tap-vs-span.pdf

update,build,compile freebsd

  • FreeBSD source code is located in /usr/src/.
# svn info /usr/src
If the output says '/usr/src' is not a working copy, the files there are missing or were installed with a different method. A new checkout of the source is required

https://www.freebsd.org/doc/handbook/makeworld.html

  • A checkout from a given repository is performed with a command like this:
# svn checkout https://svn.FreeBSD.org/repository/branch lwcdir


branch depends on the repository used. ports and doc are mostly updated in the head branch, while base maintains the latest version of -CURRENT under head and the respective latest versions of the -STABLE branches under stable/9 (9.x) and stable/10 (10.x).
lwcdir is the target directory where the contents of the specified branch should be placed. This is usually /usr/ports for ports, /usr/src for base, and /usr/doc for doc


This example checks out the Ports Collection from the FreeBSD repository using the HTTPS protocol, placing the local working copy in /usr/ports. If /usr/ports is already present but was not created by svn, remember to rename or delete it before the checkout.
# svn checkout https://svn.FreeBSD.org/ports/head /usr/ports

After the initial checkout, the local working copy can be updated by running
# svn update lwcdir

To update /usr/ports created in the example above, use:
# svn update /usr/ports

An alternate way of updating the local working copy after checkout is provided by the Makefile in the /usr/ports, /usr/src, and /usr/doc directories.
Set SVN_UPDATE and use the update target. For example, to update /usr/src:
# cd /usr/src
# make update SVN_UPDATE=yes


https://www.freebsd.org/doc/handbook/svn.html

  • Step 1 – Install Subversion

From ports
# cd /usr/ports/devel/subversion
# make install

From packages
# pkg_add -r subversion

Step 2 – Check Out FreeBSD Source
if you want patches since release, you are likely wanting to do Release Engineering

Release
svn checkout http://svn.freebsd.org/base/release/9.0.0/ /usr/src

Release Engineering
svn checkout http://svn.freebsd.org/base/releng/9.0/ /usr/src

Stable
# svn checkout http://svn.freebsd.org/base/stable/9 /usr/src

Currrent
# svn checkout http://svn.freebsd.org/base/head /usr/src

https://www.rhyous.com/2009/12/25/how-to-download-freebsd-source-using-svn/


  • lib32 - Compatibility libraries for running 32-bit applications on a 64-bit version of FreeBSD.
ports - The FreeBSD Ports Collection is a collection of files which automates the downloading, compiling and installation of third-party software packages
https://www.freebsd.org/doc/en_US.ISO8859-1/books/handbook/using-bsdinstall.html

  • Linux® users are often surprised to find that Bash is not the default shell in FreeBSD. In fact, Bash is not included in the default installation. Instead, FreeBSD uses tcsh(1) as the default root shell, and the Bourne shell-compatible sh(1) as the default user shell. sh(1) is very similar to Bash but with a much smaller feature-set. Generally shell scripts written for sh(1) will run in Bash, but the reverse is not always true.
https://www.freebsd.org/doc/en/articles/linux-users/shells.html

  • FreeBSD provides two methods for installing applications: binary packages and compiled ports. Each method has its own benefits:
Binary Packages

    Faster installation as compared to compiling large applications.
    Does not require an understanding of how to compile software.
    No need to install a compiler.

Ports

    Ability to customize installation options.
    Custom patches can be applied.

If an application installation does not require any customization, installing the package is sufficient. Compile the port instead whenever an application requires customization of the default options. If needed, a custom package can be compiled from ports using make package.
https://www.freebsd.org/doc/en_US.ISO8859-1/articles/linux-users/software.html

  • By default, a FreeBSD jail is created. This provides a very light-weight, operating system-level virtualization
Consider it as another independent instance of FreeBSD running on the same hardware, without all of the overhead usually associated with virtualization.
The jail will install the FreeBSD software management utilities so FreeBSD ports can be compiled and FreeBSD packages can be installed from the command line of the jail.
It is important to understand that any users, groups, installed software, and configurations within a jail are isolated from both the FreeNAS® operating system and any other jails running on that system. During creation, the VIMAGE option can be selected to provide the jail with an independent networking stack. The jail can then do its own IP broadcasting, which is required by some applications.
http://doc.freenas.org/11/jails.html

  • FreeBSD provides two methods for installing applications: binary packages and compiled ports. Each method has its own benefits:
Binary Packages

    Faster installation as compared to compiling large applications.
    Does not require an understanding of how to compile software.
    No need to install a compiler.

Ports

    Ability to customize installation options.
    Custom patches can be applied.
   
https://www.freebsd.org/doc/en_US.ISO8859-1/articles/linux-users/software.html

  • The Ports Collection is a set of Makefiles, patches, and description files.
Each set of these files is used to compile and install an individual application on FreeBSD, and is called a port.
By default, the Ports Collection itself is stored as a subdirectory of /usr/ports.
Before an application can be compiled using a port, the Ports Collection must first be installed

Procedure 4.1. Portsnap Method
The base system of FreeBSD includes Portsnap. This is a fast and user-friendly tool for retrieving the Ports Collection and is the recommended choice for most users. This utility connects to a FreeBSD site, verifies the secure key, and downloads a new copy of the Ports Collection. The key is used to verify the integrity of all downloaded files.

Procedure 4.2. Subversion Method
If more control over the ports tree is needed or if local changes need to be maintained, Subversion can be used to obtain the Ports Collection.


https://www.freebsd.org/doc/en/books/handbook/ports-using.html

subversion

  • Installing security/ca_root_nss allows Subversion to verify the identity of HTTPS repository servers. The root SSL certificates can be installed from a port:
# cd /usr/ports/security/ca_root_nss
# sudo make install clean

# cd /usr/ports/devel/subversion
# sudo make install clean

Subversion uses URLs to designate a repository, taking the form of protocol://hostname/path. The first component of the path is the FreeBSD repository to access. There are three different repositories, base for the FreeBSD base system source code, ports for the Ports Collection, and doc for documentation. For example, the URL https://svn.FreeBSD.org/ports/head/ specifies the main branch of the ports repository, using the https protocol.

repository is one of the Project repositories: base, ports, or doc.
branch depends on the repository used. ports and doc are mostly updated in the head branch, while base maintains the latest version of -CURRENT under head and the respective latest versions of the -STABLE branches under stable/9 (9.x) and stable/10 (10.x).

lwcdir is the target directory where the contents of the specified branch should be placed. This is usually /usr/ports for ports, /usr/src for base, and /usr/doc for doc.

https://www.freebsd.org/doc/en_US.ISO8859-1/books/handbook/svn.html

  • Upgrading to the latest -STABLE version provides all this new code without breaking installed programs.
The name "-STABLE" is frequently misunderstood. It does not mean solid or steady. -STABLE means that while code can change, the ABI (Application Binary Interface) will remain stable and not change. Programs compiled to run on FreeBSD 10.0-RELEASE, or 10.1-RELEASE, or 10.2-RELEASE will continue to work on FreeBSD 10-STABLE. Effectively, -STABLE is the latest version of FreeBSD you can get without breaking installed software.
http://www.wonkity.com/~wblock/docs/html/stable.html

Tuesday, January 23, 2018

convert VMware to VirtualBox

  • VMware to VirtualBox
Before migrating a virtual machine from VMware to VirtualBox, ensure it’s “powered off” in VMware – not suspended.
browse to the OVFTool folder. If you’re using VMware Player, you’ll find it at C:\Program Files (x86)\VMware\VMware Player\OVFTool
https://www.howtogeek.com/125640/how-to-convert-virtual-machines-between-virtualbox-and-vmware/