- Office 365 Security overview
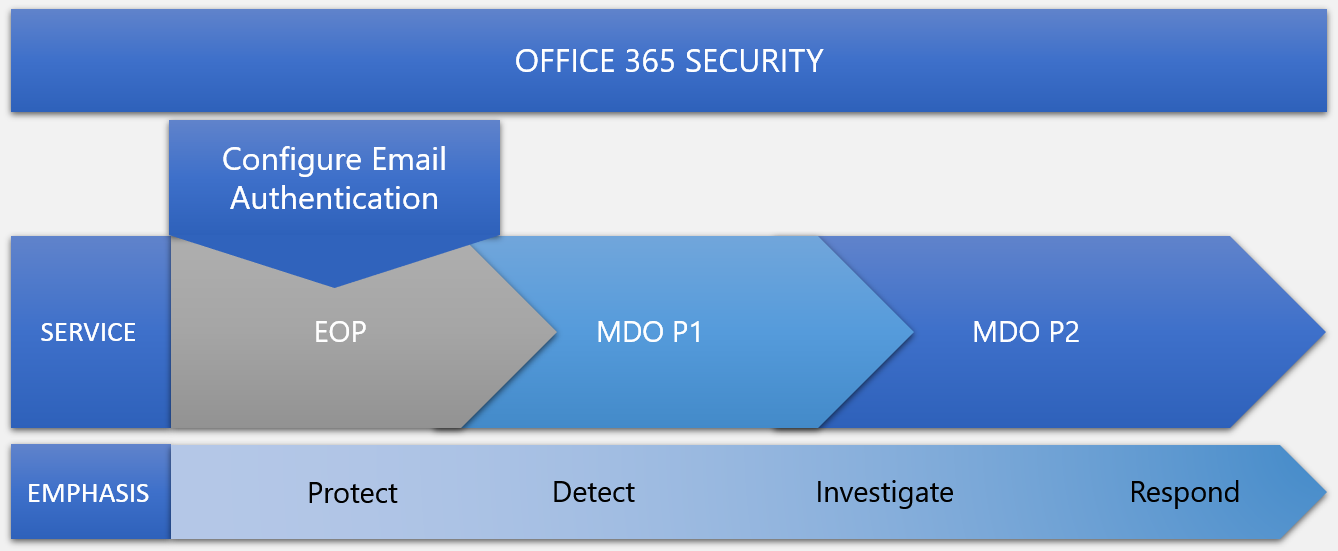
In Office 365 security, there are three main security services (or products) tied to your subscription type:
Exchange Online Protection (EOP)
Microsoft Defender for Office 365 Plan 1 (Defender for Office P1)
Microsoft Defender for Office 365 Plan 2 (Defender for Office P2)
EOP
Prevents broad, volume-based, known attacks
Microsoft Defender for Office 365 P1
Protects email and collaboration from zero-day malware, phish, and business email compromise.
Microsoft Defender for Office 365 P2
Adds post-breach investigation, hunting, and response, as well as automation, and simulation (for training).
https://docs.microsoft.com/en-us/microsoft-365/security/office-365-security/overview?view=o365-worldwide
- Exchange Online Protection overview
Exchange Online Protection (EOP) is the cloud-based filtering service that protects your organization against spam, malware, and other email threats. EOP is included in all Microsoft 365 organizations with Exchange Online mailboxes.
EOP is also available by itself to protect on-premises mailboxes and in hybrid environments to protect on-premises Exchange mailboxes.
How EOP works
When an incoming message enters EOP, it initially passes through connection filtering, which checks the sender's reputation. The majority of spam is stopped at this point and rejected by EOP.
Then the message is inspected for malware. If malware is found in the message or the attachment(s) the message is routed to an admin only quarantine store
The message continues through policy filtering, where it's evaluated against any mail flow rules (also known as transport rules) that you've created. For example, a rule can send a notification to a manager when a message arrives from a specific sender.
The message passes through content filtering (anti-spam and anti-spoofing) where harmful messages are identified as spam, high confidence spam, phishing, high confidence phishing, or bulk (anti-spam policies) or spoofing (spoof settings in anti-phishing policies). You can configure the action to take on the message based on the filtering verdict (quarantine, move to the Junk Email folder, etc.).
A message that successfully passes all of these protection layers is delivered to the recipients.
EOP datacenters
In Europe, the Middle East, and Africa (EMEA), all Exchange Online mailboxes are located in EMEA datacenters, and all messages are routed through EMEA datacenters for EOP filtering.
EOP features
EOP uses several URL block lists that help detect known malicious links within messages.
EOP uses a vast list of domains that are known to send spam.
EOP uses multiple anti-malware engines help to automatically protect our customers at all times.
EOP inspects the active payload in the message body and all message attachments for malware.
https://docs.microsoft.com/en-us/microsoft-365/security/office-365-security/exchange-online-protection-overview?view=o365-worldwide
- Configure connection filtering
If you're a Microsoft 365 customer with mailboxes in Exchange Online or a standalone Exchange Online Protection (EOP) customer without Exchange Online mailboxes, you use connection filtering in EOP (specifically, the default connection filter policy) to identify good or bad source email servers by their IP addresses.
The IP Allow List, safe list, and the IP Block List are one part of your overall strategy to allow or block email in your organization.
What do you need to know before you begin?
You open the Security & Compliance Center at https://protection.office.com/. To go directly to the Anti-spam settings page, use https://protection.office.com/antispam.
To connect to Exchange Online PowerShell, see Connect to Exchange Online PowerShell.
You need to be assigned permissions in Exchange Online before you can do the procedures in this article:
To modify the default connection filter policy, you need to be a member of the Organization Management or Security Administrator role groups.
For read-only access to the default connection filter policy, you need to be a member of the Global Reader or Security Reader role groups.
https://docs.microsoft.com/en-us/microsoft-365/security/office-365-security/configure-the-connection-filter-policy?view=o365-worldwide
- Anti-spam protection in EOP
In Microsoft 365 organizations with mailboxes in Exchange Online or standalone Exchange Online Protection (EOP) organizations without Exchange Online mailboxes, email messages are automatically protected against spam (junk email) by EOP.
Anti-spam technologies in EOP
The anti-spam settings in EOP are made of the following technologies:
Connection filtering: Identifies good and bad email source servers early in the inbound email connection via the IP Allow List, IP Block List, and the safe list (a dynamic but non-editable list of trusted senders maintained by Microsoft). You configure these settings in the connection filter policy.
Spam filtering (content filtering): EOP uses the spam filtering verdicts Spam, High confidence spam, Bulk email, Phishing email and High confidence phishing email to classify messages. You can configure the actions to take based on these verdicts, and you can configure the end-user notification options for messages that were quarantined instead of delivered.
Manage errors in spam filtering
It's possible that good messages can be identified as spam (also known as false positives), or that spam can be delivered to the Inbox.
Here are some best practices that apply to either scenario:
Always submit misclassified messages to Microsoft.
Examine the anti-spam message headers: These values will tell you why a message was marked as spam, or why it skipped spam filtering.
Point your MX record to Microsoft 365: In order for EOP to provide the best protection, we always recommend that you have email delivered to Microsoft 365 first.
If the MX record points to some other location (for example, a third-party anti-spam solution or appliance), it's difficult for EOP to provide accurate spam filtering. In this scenario, you need to configure Enhanced Filtering for connectors (also known as skip listing).
Use email authentication: If you own an email domain, you can use DNS to help insure that messages from senders in that domain are legitimate. To help prevent spam and unwanted spoofing in EOP, use all of the following email authentication methods:
SPF: Sender Policy Framework verifies the source IP address of the message against the owner of the sending domain.
DKIM: DomainKeys Identified Mail adds a digital signature to the message header of messages sent from your domain
DMARC: Domain-based Message Authentication, Reporting, and Conformance helps destination email systems determine what to do with messages that fail SPF or DKIM checks and provides another level of trust for your email partners.
Verify your bulk email settings: The bulk complaint level (BCL) threshold that you configure in anti-spam policies determines whether bulk email (also known as gray mail) is marked as spam. The PowerShell-only setting MarkAsSpamBulkMail that's on by default also contributes to the results.
Prevent the delivery of spam to the Inbox
Verify your organization settings: Watch out for settings that allow messages to skip spam filtering (for example, if you add your own domain to the allowed domains list in anti-spam policies)
Verify the junk email rule is enabled in the user's mailbox: It's enabled by default, but if it's disabled, messages marked as junk can't be moved into the Junk Email folder
Use the available blocked sender lists:
Unsubscribe from bulk email If the message was something that the user signed up for (newsletters, product announcements, etc.) and contains an unsubscribe link from a reputable source, consider asking them to simply unsubscribe.
Standalone EOP: create mail flow rules in on-premises Exchange for EOP spam filtering verdicts: In EOP environments where EOP protects on-premises Exchange mailboxes, you need to configure mail flow rules (also known as transport rules) in on-premises Exchange to translate the EOP spam filtering verdict so the junk email rule can move the message to the Junk Email folder.
Prevent good email from being identified as spam
Here are some steps that you can take to help prevent false positives:
Verify the user's Outlook Junk Email Filter settings:
Verify the Outlook Junk Email Filter is disabled: When the Outlook Junk Email Filter is set to the default value No automatic filtering, Outlook doesn't attempt to classify massages as spam. When it's set to Low or High, the Outlook Junk Email Filter uses its own SmartScreen filter technology to identify and move spam to the Junk Email folder, so you could get false positives. Note that Microsoft stopped producing spam definition updates for the SmartScreen filters in Exchange and Outlook in November, 2016. The existing SmartScreen spam definitions were left in place, but their effectiveness will likely degrade over time.
Verify the Outlook 'Safe Lists Only' setting is disabled: When this setting is enabled, only messages from senders in the user's Safe Senders list or Safe Recipients list are delivered to the Inbox; email from everyone else is automatically moved to the Junk Email folder.
Use the available safe sender lists
Verify users are within the sending and receiving limits
Standalone EOP: use directory synchronization: If you use standalone EOP to help protect your on-premises Exchange organization, you should sync user settings with the service by using directory synchronization.
Anti-spam legislation
https://docs.microsoft.com/en-us/microsoft-365/security/office-365-security/anti-spam-protection?view=o365-worldwide
- Anti-malware protection in EOP
Some of the major categories of malware are:
Viruses that infect other programs and data, and spread through your computer or network looking for programs to infect.
Spyware that that gathers your personal information, such as sign-in information and personal data, and sends it back to its author.
Ransomware that encrypts your data and demands payment to decrypt it. Anti-malware software doesn't help you decrypt encrypted files, but it can detect and remove the malware payload that's associated with the ransomware.
EOP offers multi-layered malware protection that's designed to catch all known malware traveling into or out of your organization. The following options help provide anti-malware protection:
Layered defenses against malware: Multiple anti-malware scan engines help protect against both known and unknown threats.
Real-time threat response: During some outbreaks, the anti-malware team may have enough information about a virus or other form of malware to write sophisticated policy rules that detect the threat, even before a definition is available from any of the scan engines used by the service.
Fast anti-malware definition deployment: The anti-malware team maintains close relationships with partners who develop anti-malware engines. As a result, the service can receive and integrate malware definitions and patches before they're publicly released
In EOP, messages that are found to contain malware in any attachments are quarantined, and can only be released from quarantine by an admin.
Anti-malware policies
Anti-malware policies control the settings and notification options for malware detections.
Recipient notifications: By default, a message recipient isn't told that a message intended for them was quarantined due to malware. But, you can enable recipient notifications in the form of delivering the original message with all attachments removed and replaced by a single file named Malware Alert Text.txt
You can replace the default text in the Malware Alert Text.txt file with your own custom text.
Common attachments filter: There are certain types of files that you really shouldn't send via email (for example, executable files). Why bother scanning these type of files for malware, when you should probably block them all, anyway? That's where the common attachments filter comes in. It's disabled by default, but when you enable it, the file types you specify are automatically treated as malware. You can use the default list of file types or customize the list. The default file types are: .ace, .ani, .app, .docm, .exe, .jar, .reg, .scr, .vbe, .vbs.
Zero-hour auto purge (ZAP) for malware: ZAP for malware quarantines messages that are found to contain malware after they've been delivered to Exchange Online mailboxes. By default, ZAP for malware is turned on
Sender notifications: By default, a message sender isn't told that their message was quarantined due to malware. But, you can enabled notification messages for senders based on whether the sender is internal or external.
Recipient filters: For custom anti-malware policies, you can specify recipient conditions and exceptions that determine who the policy applies to. You can use these properties for conditions and exceptions:
The recipient is
The recipient domain is
The recipient is a member of
Recipient filters: For custom anti-malware policies, you can specify recipient conditions and exceptions that determine who the policy applies to. You can use these properties for conditions and exceptions:
The recipient is
The recipient domain is
The recipient is a member of
Priority: If you create multiple custom anti-malware policies, you can specify the order that they're applied. No two policies can have the same priority, and policy processing stops after the first policy is applied.
Anti-malware policies in the Microsoft 365 security center vs PowerShell
The basic elements of an anti-malware policy are:
The malware filter policy: Specifies the recipient notification, sender and admin notification, ZAP, and the common attachments filter settings.
The malware filter rule: Specifies the priority and recipient filters (who the policy applies to) for a malware filter policy.
The difference between these two elements isn't obvious when you manage anti-malware polices in the security center:
When you create an anti-malware policy, you're actually creating a malware filter rule and the associated malware filter policy at the same time using the same name for both.
When you modify an anti-malware policy, settings related to the name, priority, enabled or disabled, and recipient filters modify the malware filter rule. Other settings (recipient notification, sender and admin notification, ZAP, and the common attachments filter) modify the associated malware filter policy.
When you remove an anti-malware policy, the malware filter rule and the associated malware filter policy are removed.
In Exchange Online PowerShell or standalone EOP PowerShell, the difference between malware filter policies and malware filter rules is apparent.
You manage malware filter policies by using the *-MalwareFilterPolicy cmdlets, and you manage malware filter rules by using the *-MalwareFilt7erRule cmdlets.
In PowerShell, you create the malware filter policy first, then you create the malware filter rule that identifies the policy that the rule applies to.
In PowerShell, you modify the settings in the malware filter policy and the malware filter rule separately.
When you remove a malware filter policy from PowerShell, the corresponding malware filter rule isn't automatically removed
Default anti-malware policy
Every organization has a built-in anti-malware policy named Default that has these properties:
The policy is applied to all recipients in the organization, even though there's no malware filter rule (recipient filters) associated with the policy.
The policy has the custom priority value Lowest that you can't modify (the policy is always applied last). Any custom anti-malware policies that
you create always have a higher priority than the policy named Default.
The policy is the default policy (the IsDefault property has the value True), and you can't delete the default policy.
https://docs.microsoft.com/en-us/microsoft-365/security/office-365-security/anti-malware-protection?view=o365-worldwide
- Configure anti-phishing policies in EOP
In Microsoft 365 organizations with mailboxes in Exchange Online or standalone Exchange Online Protection (EOP) organizations without Exchange Online mailboxes, there's a default anti-phishing policy that contains a limited number of anti-spoofing features that are enabled by default
Admins can view, edit, and configure (but not delete) the default anti-phishing policy. For greater granularity, you can also create custom anti-phishing policies that apply to specific users, groups, or domains in your organization. Custom policies always take precedence over the default policy, but you can change the priority (running order) of your custom policies
Organizations with Exchange Online mailboxes can configure anti-phishing policies in the Security & Compliance Center or in Exchange Online PowerShell.
The basic elements of an anti-phishing policy are:
The anti-phish policy: Specifies the phishing protections to enable or disable, and the actions to apply options.
The anti-phish rule: Specifies the priority and recipient filters (who the policy applies to) for an anti-phish policy
The difference between these two elements isn't obvious when you manage anti-phishing policies in the Security & Compliance Center:
When you create an anti-phishing policy, you're actually creating an anti-phish rule and the associated anti-phish policy at the same time using the same name for both.
When you modify an anti-phishing policy, settings related to the name, priority, enabled or disabled, and recipient filters modify the anti-phish rule. All other settings modify the associated anti-phish policy.
When you remove an anti-phishing policy, the anti-phish rule and the associated anti-phish policy are removed.
In Exchange Online PowerShell, you manage the policy and the rule separately.
Every organization has a built-in anti-phishing policy named Office365 AntiPhish Default that has these properties:
The policy is applied to all recipients in the organization, even though there's no anti-phish rule (recipient filters) associated with the policy.
The policy has the custom priority value Lowest that you can't modify (the policy is always applied last). Any custom policies that you create always have a higher priority.
The policy is the default policy (the IsDefault property has the value True), and you can't delete the default policy.
https://docs.microsoft.com/en-us/microsoft-365/security/office-365-security/configure-anti-phishing-policies-eop?view=o365-worldwide
- Recommended settings for EOP and Microsoft Defender for Office 365 security
Applies to
Exchange Online Protection
Microsoft Defender for Office 365 plan 1 and plan 2
Microsoft 365 Defender
Exchange Online Protection (EOP) is the core of security for Microsoft 365 subscriptions and helps keep malicious emails from reaching your employee's inboxes.
Anti-spam, anti-malware, and anti-phishing protection in EOP
EOP anti-spam policy settings
EOP outbound spam policy settings
EOP anti-malware policy settings
EOP default anti-phishing policy settings
https://docs.microsoft.com/en-us/microsoft-365/security/office-365-security/recommended-settings-for-eop-and-office365?view=o365-worldwide