- Docker is designed to have all containers share the same kernel and the host. This provides convenience but also amplifies the impact of any vulnerabilities present in the kernel. System administrators should ensure that the host environment is properly hardened and patched to reduce the likelihood of privilege escalation, arbitrary code execution, and denial of services.
https://www.cimcor.com/blog/the-top-5-security-risks-in-docker-container-deployment
- Docker Security ● Docker uses several mechanisms for security:
○ Linux kernel namespaces
○ Linux Control Groups (cgroups)
○ Linux capabilities (libcap)
○ Linux security mechanisms like AppArmor or SELinux
Docker Security ● Namespaces:
provides an isolated view of the system where processes cannot see other processes in other containers ● Each container also gets its own network stack. ● A container doesn’t get privileged access to the sockets or interfaces of another container.
Docker Security ● Cgroups: kernel feature that limits and isolates the resource usage(CPU,memory,network) of a collection of processes.
Docker Security ● Linux Capabilities: divides the privileges of root into distinct units and smaller groups of privileges.
Images are extracted in a chrooted sub process, being the first-step in a wider effort toward privilege separation. ● From Docker 1.10, all images are stored and accessed by the cryptographic checksums of their contents, limiting the possibility of an attacker causing a collision with an existing image Docker Content Trust.
Docker Content Trust ● Protects against untrusted images ● Can enable signing checks on every managed host ● Signature verification transparent to users ● Guarantee integrity of your images when pulled ● Provides trust from publisher to consumer ● export DOCKER_CONTENT_TRUST=1 ● ~/.docker/trust/trusted-certificates/
14. DockerFile Security ●
● Do not write secrets(users and passwords).
● Remove unnecessary setuid, setgid permissions (Privilege escalation)
● Download packages securely using GPG and certificates
● Try to restrict an image or container to one service
Security best practices ● To disable setuid rights, add the following to the Dockerfile of your image
RUN find / -perm +6000 -type f -exec chmod a-s {} \;\||true
● Don’t run containers with --privileged flag
● The --privileged flag gives all capabilities to the container.
● docker run --privileged ...
● docker run --cap-drop=ALL --cap-add=CAP_NET_ADMIN
How do we add/remove capabilities?
● Use cap-add and cap-drop with docker run/create
● Drop all capabilities which are not required
● docker run --cap-drop ALL --cap-add $CAP
Security best practices capabilities
● Manual management within the container: docker run --cap-add ALL
● Restricted capabilities with root: docker run --cap-drop ALL --cap-add $CAP
● No capabilities: docker run --user
Security best practices ● Set a specific user. ● Don’t run your applications as root in containers.
https://docs.docker.com/engine/security/security/
- It was initially developed by the US National Security Agency to protect computer systems from malicious intrusion and tampering
SELinux implements what's known as MAC (Mandatory Access Control).
This is implemented on top of what's already present in every Linux distribution, the DAC (Discretionary Access Control).
To understand DAC, let's first consider how traditional Linux file security works.
In a traditional security model, we have three entities: User, Group, and Other (
u,g,o) who can have a combination of Read, Write, and Execute
(r,w,x) permissions on a file or directory. If a user jo creates a file in their home directory, that user will have read/write access to it, and so will the jo group. The "other" entity
will possibly have no access to it
-
rwxrw-
r--. 1 jo jo 41 Aug 6 22:45
myscript.
sh
Now jo can change this access.
jo can grant (and restrict) access to this file to other users and groups or change the owner of the file. These actions can leave critical files exposed to accounts who don't need this access.
jo can also restrict to be more secure, but that's discretionary: there's no way for the system administrator to enforce it for every single file in the system.
Consider another case: when a Linux process runs, it may run as the root user or another account with
superuser privileges. That means if a black-hat hacker takes control of the application, they can use that application to get access to whatever resource the user account has access to.
With
SELinux, you can define what a user or process can do. It confines every process to its own domain so the process can interact with only certain types of files and other processes from allowed domains.
At any one time,
SELinux can be in any of three
possible modes:
Enforcing
Permissive
Disabled
In enforcing mode
SELinux will enforce its policy on the Linux system and make sure
any unauthorized access attempts by users and processes are denied
Permissive mode is like a semi-enabled state.
SELinux doesn't apply its policy in permissive mode, so
no access is denied.
However any policy violation
is still logged in the audit logs. It's a great way to test
SELinux before enforcing it.
The disabled mode is self-explanatory
– the system won't be running with enhanced security.
The default value is targeted. With a targeted policy,
SELinux allows you to customize and fine tune access control permissions. The other
possible value is "MLS" (multilevel security), an advanced mode of protection. Also with MLS, you need to install an additional package.
https://www.digitalocean.com/community/tutorials/an-introduction-to-selinux-on-centos-7-part-1-basic-concepts
- You’ll need to run the program while AppArmor is watching it and walk through all its normal functions
Basically,
you should use the program as
it would be used in normal use: start the program, stop it, reload it, and use all its features
You should design a test plan that goes through the functions the program needs to perform
https://www.howtogeek.com/118328/how-to-create-apparmor-profiles-to-lock-down-programs-on-ubuntu/
- The state of each profile can be switched between enforcing and complaining with calls to aa-enforce and aa-complain giving as parameter either the path of the executable or the path to the policy file
Additionaly a profile can
be entirely disabled with
aa-disable or put in audit mode (to log accepted system calls too) with
aa-audit.
Even though creating an AppArmor profile is rather easy, most programs do not have one. This section will show you how to create a new profile from scratch just by using the target program and letting AppArmor monitor the system call it makes and the resources it accesses.
The most important programs that need to
be confined are the network facing programs as those are the most likely targets of remote attackers.
https://debian-handbook.info/browse/stable/sect.apparmor.html
- SELinux (Security Enhanced Linux) is a Mandatory Access Control system built on Linux's LSM (Linux Security Modules) interface.
In practice, the kernel queries
SELinux before each system call to know whether
the process is authorized to do the
given operation.
https://debian-handbook.info/browse/stable/sect.selinux.html
- AppArmor, like most other LSMs, supplements rather than replaces the default Discretionary Access Control (DAC). As such it's impossible to grant a process more privileges than it had in the first place.
Ubuntu, SUSE and
a number of other distributions use it by default. RHEL (and its variants) use SELinux which requires good
userspace integration to work properly. SELinux attaches labels to all files, processes and objects and is therefore very flexible. However configuring SELinux
is considered to be very complicated and requires a supported filesystem.
AppArmor on the other hand works using file paths and its configuration can be easily adapted.
Security policies completely define what system resources individual applications can access, and with what privileges.
Access
is denied by default if no profile says otherwise
Every breach of policy triggers a message in the system log, and
AppArmor can be configured to notify users with real-time violation warnings popping up on the desktop.
https://wiki.archlinux.org/index.php/AppArmor
- Enforce – In the enforce mode, system begins enforcing the rules and report the violation attempts in syslog or auditd (only if auditd is installed) and operation will not be permitted.
Complain
– In the complain mode, system
doesn’t enforce any rules. It will only log the violation attempts.
The following are the different
types of rules that
are used in profiles.
Path entries: This has information on which
files the application is allowed to access.
Capability entries: determines the privileges
a confined process is allowed to use.
Network entries: determines the connection-type. For example: tcp. For a packet-analyzer network can be raw or packet
etc.
https://www.thegeekstuff.com/2014/03/apparmor-ubuntu
- The docker-default profile is the default for running containers. It is moderately protective while providing wide application compatibility. The profile is generated from the following template.
https://docs.docker.com/engine/security/apparmor
- only trusted users should be allowed to control your Docker daemon. This is a direct consequence of some powerful Docker features. Specifically, Docker allows you to share a directory between the Docker host and a guest container; and it allows you to do so without limiting the access rights of the container. This means that you can start a container where the /host directory is the / directory on your host; and the container can alter your host filesystem without any restriction. This is similar to how virtualization systems allow filesystem resource sharing. Nothing prevents you from sharing your root filesystem (or even your root block device) with a virtual machine.
for example, if you instrument Docker from a web server to provision containers through an API, you should be even more careful than usual with parameter checking, to make sure that a malicious user cannot pass crafted parameters causing Docker to create arbitrary containers.
For this reason, the REST API endpoint (used by the Docker CLI to communicate with the Docker daemon) changed in Docker 0.5.2, and now uses a UNIX socket instead of a TCP socket bound on 127.0.0.1 (the latter being prone to cross-site request forgery attacks if you
happen to run Docker directly on your local machine, outside of a VM). You can then use traditional UNIX permission checks to limit access to the control socket
You can also expose the REST API over HTTP if you explicitly
decide to do so. However, if you do that,
be aware of the
above mentioned security implications. Ensure that it is reachable only from a trusted network or VPN or protected with a mechanism such as
stunnel and client SSL certificates. You can also secure API endpoints with HTTPS and certificates.
The daemon is also potentially vulnerable to other inputs, such as image loading from either disk with
docker load, or from the network with docker
pull. As of Docker 1.3.2,
images are now extracted in a
chrooted subprocess on Linux/Unix platforms, being the first-step in a wider effort toward privilege separation. As of Docker 1.10.0, all images
are stored and accessed by the cryptographic checksums of their contents, limiting the possibility of an attacker causing a collision with an existing image.
https://docs.docker.com/engine/security/security/#docker-daemon-attack-surface
- Isolate containers with a user namespace
Linux
namespaces provide isolation for running processes, limiting their access to system resources without the running process being aware of the limitations
The best way to prevent privilege-escalation attacks from within a container is to configure your container’s applications to run as unprivileged users
For containers whose processes must run as the root user within the container, you can re-map this user to a less-privileged user on the Docker host.
The mapped user is assigned a range of UIDs which function within the
namespace as normal
UIDs from 0 to 65536, but have no privileges on the host machine itself.
The remapping
itself is handled by two files: /etc/
subuid and /etc/
subgid
It is very important that the ranges not overlap, so that a process cannot gain access in a different
namespace
introduces some configuration complexity in situations where the container needs access to resources on the Docker host, such as bind mounts into areas of the filesystem that the system user cannot write to. From a security standpoint, it is best to avoid these situations.
https://docs.docker.com/engine/security/userns-remap
- Secure computing mode (seccomp) is a Linux kernel feature. You can use it to restrict the actions available within the container. The seccomp() system call operates on the seccomp state of the calling process. You can use this feature to restrict your application’s access.
This feature is available only if Docker has
been built with
seccomp and
the kernel is configured with CONFIG_SECCOMP enabled
The default
seccomp profile provides a sane default for running containers with
seccomp and disables around 44 system calls out of 300+. It is moderately protective while providing wide application compatibility
In effect, the profile is a whitelist which denies access to system calls by default, then whitelists specific system calls.
seccomp is instrumental for running Docker containers with least privilege.
It is not recommended to change the default
seccomp profile.
https://docs.docker.com/engine/security/seccomp
Unlike in a VM,
the kernel is shared among all containers and
the host, magnifying the importance of any vulnerabilities
present in the kernel
.In VMs, the situation is much
better: an attacker would have to route an attack through both
the VM kernel and the
hypervisor before being able to touch the
host kernel.
Denial-of-service attacks
All containers share kernel resources. If one container can
monopolize access to certain resources—including memory and
more esoteric resources such as user IDs (UIDs)—it can starve
out other containers on the host, resulting in a denial-of-service
(DoS), whereby legitimate users
are unable to access part or all
of the system.
Container breakouts
An attacker who gains access to a container should not be able
to gain access to other containers or the host. By default, users
are not
namespaced, so any process that breaks out of the con‐
tainer will have the same privileges on the host as it did in the
container; if you were
root in the container, you will be root on the host. This also means
that you need to worry about
poten‐
tial privilege escalation attacks—whereby a user gains elevated privileges such as those of the root
user, often through a bug in application code that needs to run with extra privileges.
Poisoned images
If an attacker can trick you into running his image, both the host and your data are at risk
Compromising secrets
When a container accesses a database or service, it will
likely require a secret, such as an API key or username and password
.An attacker who can get access to this secret will also have
access to the service
.This problem becomes more acute in a
microservice architecture in which containers are constantly stopping and starting, as compared to an architecture with
small numbers of long-lived VMs.
do not consider containers to offer the same level of security guarantees as VMs.
The defenses for your system should also
consist of multiple layers
.For example, your containers will most likely run in VMs so that if a
container breakout occurs, another level of defense can prevent the attacker from getting to the host or other containers. Monitoring
systems should be in place to alert admins
in the case of unusual behavior. Firewalls should restrict network access to containers, limiting the external attack surface
In regards to least privilege, you can take many steps to reduce the
capabilities of containers:
Ensure that processes in containers do not run as root, so that exploiting a vulnerability present in a process does not give the
attacker root access.
Run filesystems as read-only so that attackers cannot overwrite data or save malicious scripts to file
Cut down on the kernel calls that a container can make to reduce the potential attack surface
Limit the resources that a container can use to avoid DoS attacks whereby a compromised container or application consumes enough resources (such as memory or CPU) to bring the
host to a halt.
Similarly, if you have containers that process or store sensitive information, keep them on a
host separate from containers handling
less-sensitive information and, in particular, away from containers running applications directly exposed to end users. For example,
containers processing credit-card details should
be kept separate from containers running the Node.js
frontend.
the vast majority of container deployments will involve VMs. Although this isn’t an ideal situation, it
does mean you can combine the efficiency of containers with the
security of VMs.
Applying Updates
Identify images that require updating.
This includes both base
images and any dependent images.
Get or create an updated version of each base image.
Push this version to your registry or download site.
For each dependent image, run docker build with the
--no-cache argument. Again, push these images.
On each Docker host, run docker pull to ensure that it has up-to-date images
Once you’ve
ascertained that everything is functioning correctly, remove the old images from the hosts. If you can, also
remove them from your registry.
If you use Docker Hub to build your images, note
that you
can setup repository links, which will kick off a build of your image when
any linked image changes.
By setting a link to the base image, your image will automatically get rebuilt if the base image changes.
In the past,
providers have been criticized for being slow to respond.
In such a situation,
you can either wait or prepare your own image. Assuming
that you have
access to the
Dockerfile and source for the image, rolling your image may be a simple and effective temporary solution.
To safely use images, you need to have guarantees about their provenance: where they came from and who created them.
The primary tool in establishing the provenance of software or data is the
securehash.
What’
s to stop an attacker from modifying both the data and the hash? The best a
nswer to this is cryptographic signing and public/private key pairs.
Secure hashes are known as digests in Docker parlance. A digest is a SHA256 hash of a filesystem layer or manifest, where a manifest is
metadata file describing the constituent parts of a Docker image.
This is Docker’s mechanism for allowing
publishers to sign their content, completing the trusted distribution mechanism.
When a user pulls an image from a repository, she receives a certificate that includes the publisher’s public
key, allowing her to verify that the image came from the publisher.
When content trust
is enabled, the Docker engine will only operate on images that have
been signed and will refuse to run any images
whose signatures or digests do not match.
By running both a registry and a
Notary server, organizations can provide trusted images to users.
https://theswissbay.ch/pdf/_to_sort/O%27Reilly/docker-security.pdf
- The Update Framework (TUF) helps developers maintain the security of a software update system, even against attackers that compromise the repository or signing keys. TUF provides a flexible framework and specification that developers can adopt into any software update system.
https://github.com/theupdateframework/tuf
- Notary aims to make the internet more secure by making it easy for people to publish and verify content. We often rely on TLS to secure our communications with a web server, which is inherently flawed, as any compromise of the server enables malicious content to be substituted for the legitimate content.
https://github.com/theupdateframework/notary
- This document describes basic use of the Notary CLI as a tool supporting Docker Content Trust. For more advanced use cases, you must run your own Notary service. Read the use the Notary client for advanced users documentation.
What is Notary
Notary is a tool for publishing and managing trusted collections of content. Publishers can digitally sign collections and consumers can verify integrity and origin of content.
This ability is built on a straightforward key management and signing interface to create signed collections and configure trusted publishers.
With Notary anyone can provide
trust over arbitrary collections of data. Using The Update Framework (TUF) as the underlying security framework, Notary takes care of the operations necessary to create, manage, and distribute the metadata necessary to ensure the integrity and freshness of your content
https://docs.docker.com/notary/getting_started/
- Use Case Examples of Notary:
Docker uses Notary to implement Docker Content Trust and
all of the docker trust
subcommands.
Quay is using Notary as a library, wrapping it and extending it to suit their needs. For Quay, Notary is flexible rather than single-purpose.
CloudFlare’s PAL tool uses Notary for container identity, allowing one to associate metadata such as secrets to running containers
in a verifiable manner.
LinuxKit is using Notary to distribute its kernels and system packages.
https://www.cncf.io/announcement/2017/10/24/cncf-host-two-security-projects-notary-tuf-specification/
- The Docker Bench for Security is a script that checks for dozens of common best-practices around deploying Docker containers in production. The tests are all automated, and are inspired by the CIS Docker Community Edition Benchmark v1.1.0. We are releasing this as a follow-up to our Understanding Docker Security and Best Practices blog post.
https://github.com/docker/docker-bench-security
- Clair is an open source project for the static analysis of vulnerabilities in appc and docker containers.
https://coreos.com/clair/docs/latest/
- A service that analyzes docker images and applies user-defined acceptance policies to allow automated container image validation and certification. The Anchore Engine is an open source project that provides a centralized service for inspection, analysis, and certification of container images. The Anchore engine is provided as a Docker container image that can be run standalone (a docker-compose file is provided), or on an orchestration platform such as Kubernetes, Docker Swarm, Rancher or Amazon ECS
https://github.com/anchore/anchore-engine
- a tool to perform static analysis of known vulnerabilities, trojans, viruses, malware & other malicious threats in docker images/containers and to monitor the docker daemon and running docker containers for detecting anomalous activities.
In order to fulfill its mission, first the known vulnerabilities as CVEs (Common Vulnerabilities and Exposures), BIDs (
Bugtraq IDs), RHSAs (Red Hat Security Advisories) and RHBAs (Red Hat Bug Advisories), and the known exploits from Offensive Security database
are imported into a MongoDB to facilitate the search of these vulnerabilities and exploits when your analysis are in progress.
https://github.com/eliasgranderubio/dagda
- An open artifact metadata API to audit and govern your software supply chain
Grafaes can
greatly help you create your own container security scanning projects
Developers can use
use Grafaes, described as a "component metadata API," to define
metadata for virtual machines and containers. IBM’s Vulnerability Advisor
is also integrated into the project.
https://grafeas.io/
- Falco is a behavioral activity monitor designed to detect anomalous activity in your applications. Powered by sysdig’s system call capture infrastructure, Falco lets you continuously monitor and detect container, application, host, and network activity
Falco
is hosted by the Cloud Native Computing Foundation (CNCF) as a sandbox level project.
https://github.com/falcosecurity/falco
- Build rules specific to your Kubernetes clusters to enforce policy across all your containers & microservices.
Runtime Security built for containers.
https://sysdig.com/opensource/falco
Banyan Collector: A framework to peek inside containers
A framework for Static Analysis of Docker container images
Have you wondered what your container images really contain? If they have the
very packages
that are susceptible to all kinds of attacks? Or, if they have the configuration you expect when they are run? Banyan Collector provides a powerful, extensible framework to answer all these questions and more.
https://github.com/banyanops/collector
- Scan Docker installations for security issues and vulnerabilities.
plugin based system for discovery, audit and reporting
able to scan local and remote docker installations
plugins are easy to write
https://github.com/kost/dockscan
- hub-detect-ws is container-based Web Service for scanning (via the file signature-based iScan) and inspecting (via the Linux package manager-based image inspector) Docker images.
https://github.com/blackducksoftware/hub-detect-ws
- batten is an auditing framework that contains some tools to help audit and harden your Docker deployments.
Identify potential security
issues, and harden your existing Docker containers using a configurable policy.
https://github.com/dockersecuritytools/batten
- InSpec: Auditing and Testing Framework
InSpec is an open-source testing framework for infrastructure with a human- and machine-readable language for specifying compliance, security and policy requirements.
https://github.com/inspec/inspec
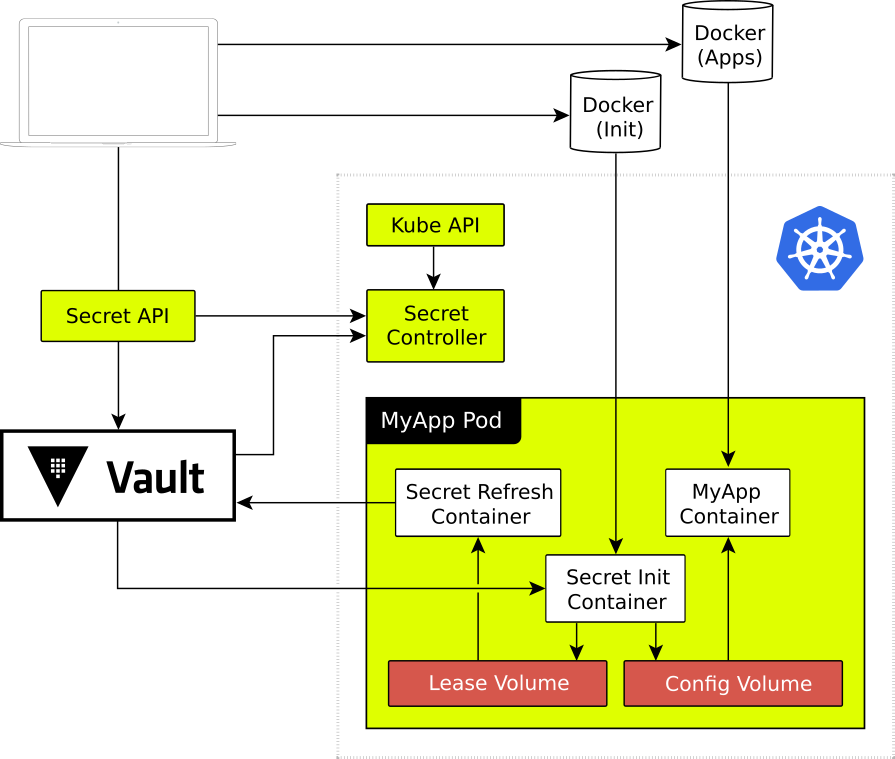
- In a containerized deployment, how do you safely pass secrets—passwords, certificates, etc.—between containers in a cluster without compromising their safety? HashiCorp Vault to securely manage the secrets used by containers.
https://www.hashicorp.com/resources/securing-container-secrets-vault
- HashiCorp Vault and Terraform on Google Cloud — Security Best Practices
Vault is not always an ideal solution for secrets management. If only
static secrets are needed in certain contexts,
you should consider Cloud KMS to encrypt secrets and store them in source code or GCS buckets. It’s perfectly fine to store secrets in source code if
they are encrypted. Vault is an ideal solution for disparate teams storing secrets at a large scale or when you need some of Vault’s dynamic secret generation capability.
Vault Security Best Practices
Isolate the installation with
single tenancy. You can host Vault on Google
Kubernetes Engine (GKE) or Compute Engine, but it should
be completely isolated in its own project, cluster, and/or private VPC/subnet. If running on Compute Engine, Vault should be the only main process running on a machine. This reduces the risk that
another process running on the same machine could be compromised and interact with Vault
Use a bastion host for Admin Access. Vault must be accessible by humans via API, but never by SSH or RDP
.Once you situate Vault on a private subnet, you can access it using a Bastion host. This allows you to disable SSH access to the Vault nodes altogether.
Restrict storage access. Vault encrypts all data at rest, regardless of which storage backend you use
.To avoid unauthorized access or operations, restrict access to the storage backend to only Vault
.Run in high availability mode. If using GKE,
you should expose the Vault nodes via an internal load balancer. With Compute Engine however, you can use server-side redirection and avoid a load balancer altogether. In either case,
Vault should be situated on a private subnet behind a Bastion host.
https://medium.com/@jryancanty/hashicorp-vault-and-terraform-on-google-cloud-security-best-practices-3d94de86a3e9
The overall goal of Vault's security model is to provide confidentiality, integrity, availability, accountability, authentication.
This means that data at rest and in transit must be secure from eavesdropping or tampering.
Threat Model
Eavesdropping
Client communication with Vault should be secure from eavesdropping
as well as communication from Vault to its storage backend.
Tampering with data at rest or in transit.
Any tampering should be detectable
Access to data or controls without authentication or authorization
All requests must be proceeded by the applicable security policies.
Access to data or controls without accountability.
If audit logging
is enabled,
requests and responses must be logged before the client receives any secret material
Confidentiality of stored secrets.
In practice, this means all data at rest must
be encrypted.
Availability of secret material in the face of failure.
running in a highly available configuration to avoid loss of availability.
The following are not parts of the Vault threat model
Protecting against arbitrary control of the storage backend.
As an example, an attacker could delete or corrupt all the contents of the storage backend causing total data loss for Vault. The ability to control reads would allow an attacker to snapshot in a well-known state and rollback state changes if that would be beneficial to them.
Protecting against the leakage of the existence of secret material. An attacker that can read from the storage backend may observe that secret material exists and
is stored, even if it
is kept confidential.
Protecting against memory analysis of a running Vault. If an attacker
is able to inspect the memory state of a running Vault
instance then
the confidentiality of data may be compromised.
External Threat Overview
there are 3 distinct systems
the
client, which is speaking to Vault over an API
Vault or the server more accurately, which is providing an API and serving requests.
the storage backend, which the server is
utilizing to read and write data.
There is no mutual trust between the Vault client and server.
Clients use TLS to verify the identity of the server and to establish a secure communication channel.
Servers require that a client provides a client token for every request which is used to identify the client.
The storage
backends used by Vault are also untrusted by design
Vault uses a security barrier for all requests made to the backend.
The security barrier automatically encrypts all data leaving Vault using a 256-bit Advanced Encryption Standard (AES) cipher in the Galois Counter Mode (GCM) with 96-bit nonces.
The nonce is randomly generated for every encrypted object.
When data
is read from the security
barrier the GCM authentication tag is verified during the decryption process to detect any tampering.
Internal Threat Overview
Within the Vault system, a critical security concern is an attacker attempting to gain access to secret material
they are not authorized to.
For example, GitHub users in the "engineering" team may
be mapped to the "engineering" and "ops" Vault policies.
Vault then generates a client token which is a randomly generated, serialized value and maps it to the policy list.
This client token is then returned to the client.
On each request a client provides this token.
Vault then uses it to check that the token is valid and has not
been revoked or
expired, and generates an ACL based on the associated policies.
Vault uses a strict default deny or whitelist enforcement.
Each policy specifies a level of access granted to a path in Vault.
Although clients could
be provided with root tokens or associated with the root policy, instead Vault supports the notion of "
sudo" privilege.
As part of a policy,
users may be granted "
sudo" privileges to certain paths, so
that they can still perform security sensitive operations without being granted global root access to Vault.
Lastly, Vault supports using a Two-man rule for unsealing using Shamir's Secret Sharing technique.
When Vault
is started, it starts in a sealed state.
This means that the encryption key needed to read and write from the storage backend
is not yet known.
The process of unsealing requires providing the master key so that
the encryption key can be retrieved
The risk of distributing the master key is that a single malicious actor with access to it can decrypt the entire Vault.
Instead, Shamir's technique allows us to split the master key into multiple shares or parts.
The number of shares and the threshold needed is configurable, but by default Vault generates 5 shares, any 3 of which must
be provided to reconstruct the master key
By using a secret sharing technique, we avoid the need to place absolute trust in the
holder of the master key, and avoid storing the master key at all.
The master key is only retrievable by reconstructing the shares.
The shares are not useful for making any requests to Vault, and can only
be used for unsealing.
Once unsealed
the standard ACL mechanisms are used for all requests.
Opening the bank vault requires two-factors: the key and the combination.
Similarly, Vault requires multiple shares
be provided to reconstruct the master key.
Once unsealed, each security deposit boxes still requires the owner provide a key, and similarly the Vault ACL system protects all the secrets stored.
https://www.vaultproject.io/docs/internals/security.html
The two-man rule is a control mechanism designed to achieve a high level of security for especially critical material or operations. Under this rule all access and actions require
the presence of two
authorized people at all times.
No-lone zone
A no-lone zone is an area that must
be staffed by two or more qualified or cleared individuals. Each individual must be within visual contact of each other and in visual contact with the critical component that requires a no-lone-zone area designation. A no-lone zone may contain a cryptographic component, weapon system hardware under test, a nuclear weapon or active nuclear weapon controls.
https://en.wikipedia.org/wiki/Two-man_rule
Shamir's Secret Sharing is an algorithm in cryptography created by Adi Shamir. It is
a form of secret sharing, where a secret
is divided into parts, giving each participant its own unique part.
To reconstruct the original secret,
a minimum number of parts is required. In the threshold scheme this number is less than the total number of parts. Otherwise all participants
are needed to reconstruct the original secret.
https://en.wikipedia.org/wiki/Shamir's_Secret_Sharing
- How our security team handle secrets
We were distributing our secrets using
Kubernetes and
Hashicorp Vault
Kubernetes stores the data in plaintext in
etcd, a database where it stores all configuration data.
It gives the secrets to applications running on our servers as a file.
At Monzo, only a handful of engineers have access to Vault, and they tightly control who else can use it.
These were
some of the issues:
1. Having two mechanisms created confusion, but neither one was perfect
2. The way we were using
Kubernetes secrets didn't work well
The secrets were readable to anyone with access to our
etcd nodes. Getting into these nodes is
really hard, so we didn't consider this a big problem in the past
Creating secrets and adding them to your service requires messing around with
Kubernetes configuration files. Unlike deployments, we don't have any nice tooling for this.
Reading them into your service is a little fiddly, and we were lacking libraries to standardise it.
3. The way we were using Vault also had issues
It was impossible to configure or even inspect without a key ceremony (where a few engineers who have access to Vault get together and configure it). A key ceremony takes about three hours of work.
We didn't have any ways to configure Vault using code, so
were using
ad-hoc scripts, which takes time and is prone to errors
To let a service read from Vault, you'd have to generate a secret key for that service, which we'd then manually store as Kubernetes secret. Every time you create a Vault secret for a new service, you also have to create a Kubernetes secret
To address these issues
1. Secrets
are encrypted wherever they're stored
2. It's impossible to read all the secrets at once, but easy to let services read specific secrets
3. It's easy to add brand new secrets, and hard to overwrite existing ones.
5. It's auditable.
6. It's inspectable.
Authenticating to Vault
To make sure we can access secret information securely, but without having to create new secrets that add unnecessary complexity, we
decided to use its
Kubernetes auth mechanism.
This lets Kubernetes applications present their service account token (like a password, attached by default to all applications in Kubernetes) to Vault. Vault will then issue its own token with permissions that
are configured for that application.
In our case, we
chose to let all applications get a token with a default Vault policy defining what
actions are allowed.
We called this policy
kubernetes-reader
Service account tokens are
Kubernetes secrets.
This means they're still not as secure as we'd like, because they're stored
unencrypted in
etcd.
But, given that the Kubernetes secret is just a token which allows access to Vault, this reduces how dangerous it is to access Kubernetes secrets; you'd now need to talk to Vault
as well,
which means that you'd need an active presence inside our network.
We also decided that we could improve the security of Kubernetes secrets by encrypting them at rest using an experimental Kubernetes feature. We generated an AES key (a very strong key for encrypting data fast), stored inside Vault, which we
use to encrypt and decrypt Kubernetes secrets on the fly;
the encrypted version is stored in
etcd, and the
unencrypted version only ever exists in the service that uses it
We wanted to avoid
the issue of having to create a second
Kubernetes secret for every new Vault secret, reducing complexity for our engineers.
Human interactions with Vault
We have an internal authentication mechanism which allow staff members to prove their identity, and perform various actions,
like replacing a card for a customer.
We soon intend to do this via a custom Vault auth plugin, which is a little safer and easier to work with, but to save time during this project, we instead used a web service in front of Vault which intercepts its requests.
Computer interactions with Vault
We designed the default
kubernetes-reader policy to allow applications to do a variety of safe actions. As manually configuring Vault requires a key ceremony, we wanted to cover as many use cases as possible for a service by default
Essentially, Vault allows you to interpolate the details of the authenticated user (eg their service account name) into the policy automatically, including into the allowed paths. This means that we can give every service a special path in Vault that they can read by default. In combination with the fact that all engineers can now create new secrets in Vault, we have already solved the problem of allowing engineers to create secrets for their services.
Libraries
We wrote some new library code to make it super easy for engineers to read secrets into their services. Our tooling encourages engineers to only have one key in their Vault secrets (which are actually each a key-value store), named data.
We'd like to get Vault to issue short lived credentials for our services which further restrict their access to Cassandra, our database, so we have more guarantees that an attacker couldn't write to the database.
It would also be great to issue AWS credentials out of
Vault, and keep them updated. Right now we store these as static secrets in Vault, so they never change. In security we like to rotate things so that if
they are ever stolen, they aren't useful for long.
https://monzo.com/blog/2019/10/11/how-our-security-team-handle-secrets?source=hashibits&utm_source=hc-newsletter&utm_medium=email&utm_campaign=november2019newsletter&utm_section=community&mkt_tok=eyJpIjoiTURCbVpqRTJOVEUzWVRabSIsInQiOiJSK1E3T0JcL2RzSUZ0R296alBXMjIzdHVUa0lnb1pTMXB1a1RNelVPME41a1wvKzVlbU16cUcyQWNIeWV5bWtcLzRcL0FQMDFcLzhuQWFCM005WmxcL2pFZFFzWkNiR0RpTkRZOVA1dDFmR2N6QUd1aGE1U0VHdTdMckd5OVBFQVZTbkdwNCJ9
- use HashiCorp Consul for service discovery, service registration, and service mesh for Kubernetes and non-Kubernetes environments.
At
KubeCon Barcelona, we announced our participation in Microsoft’s new Service Mesh Interface (SMI). Our integration enables
Kubernetes users to manage HashiCorp Consul service mesh intentions directly through tools like
kubectl, helm, or Terraform.
Consul supports both standalone Kubernetes and managed Kubernetes (Microsoft AKS, AWS EKS, Google Cloud GKE, and
RedHat Openshift) in
a number of different ways.
This makes it easier for organizations to
start incorporating Kubernetes into their existing
infrastrastructure and manage all their services with a single control plane.
Upon installation,
Consul can be used as a central service registry, help secure and facilitate service-to-service communication, and enhance observability over
network and service health. Tools like Helm or Shipyard can help you get started with Consul on
Kubernetes.
Through integrations with popular network middleware solutions like F5 BIG-IP and
HAProxy, service discovery and health checks can
be done across multiple environments.
The way Consul interacts with network middleware is based on
the idea of managing east-west communication (internal service to service) versus north-south (external users to internal services).
the need for static IPs may slow down service deployments and doesn’t scale
in a way we might need
to fully migrate to
microservices. To
alleviate this challenge, Consul can dynamically provide service data and health status back to a load balancer, making it visible to the operators that are managing the network health.
Envoy Proxy and Ambassador API Gateway
Proxies are very beneficial to managing
microservices at scale by reducing latency in service calls, enabling greater security using
mTLS, and helping monitor system resources for the services
they are attached to. Consul offers a built-in L4 communication proxy for testing and development, but for
proxying L4 and L7 communication in production, Consul service mesh leverages Envoy.
https://www.hashicorp.com/blog/exploring-the-hashicorp-consul-ecosystem-for-kubernetes/?
source=hashibits&utm_source=hc-newsletter&utm_medium=email&utm_campaign=november2019newsletter&utm_section=hashicorp&mkt_tok=eyJpIjoiTURCbVpqRTJOVEUzWVRabSIsInQiOiJSK1E3T0JcL2RzSUZ0R296alBXMjIzdHVUa0lnb1pTMXB1a1RNelVPME41a1wvKzVlbU16cUcyQWNIeWV5bWtcLzRcL0FQMDFcLzhuQWFCM005WmxcL2pFZFFzWkNiR0RpTkRZOVA1dDFmR2N6QUd1aGE1U0VHdTdMckd5OVBFQVZTbkdwNCJ9
best practices for a production hardened deployment of Vault.
The recommendations are based on the security model and focus on defense in depth.
Recommendations
End-to-End TLS.
If intermediate load balancers or reverse proxies are used to front Vault, they should not
terminate TLS. This way traffic
is always encrypted in transit to Vault and minimizes risks introduced by intermediate layers.
Single Tenancy.
Vault should be the only main process running on a machine.
This reduces the risk that another process running on the same machine
is compromised and can interact with Vault.
Similarly, running on bare metal should
be preferred to a VM, and a VM preferred to a container.
This reduces the surface area introduced by additional layers of abstraction and other tenants of the hardware.
Firewall traffic.
Vault listens on
well known ports, use a local firewall to restrict all incoming and outgoing traffic to Vault and essential system services like NTP.
Disable SSH / Remote Desktop.
When running a Vault as a single tenant application, users should never access the machine directly. Instead, they should access Vault through its API over the network.
Disable Swap.
Vault encrypts data in transit and at rest, however it must still have sensitive data in memory to function.
Risk of exposure should be minimized by disabling swap to prevent the operating system from
paging sensitive data to disk
Vault attempts to "memory lock" to physical memory automatically, but disabling swap adds another layer of defense.
Don't Run as Root.
Vault is designed to run as an unprivileged user, and there is no reason to run Vault with root or Administrator privileges, which can expose the Vault process memory and allow access to Vault encryption keys
Turn Off Core Dumps.
A user or administrator that can force a core dump and has access to the resulting file
can potentially access Vault encryption keys. Preventing core dumps is a platform-specific process
Immutable Upgrades.
Avoid Root Tokens.
Vault provides a root token when it is first initialized.
We recommend treating Vault configuration as
code, and using version control to manage policies.
Once setup, the root token should
be revoked to eliminate the risk of exposure.
Root tokens can
be generated when needed, and should
be revoked as soon as possible
Enable Auditing.
Enabling auditing provides a history of all operations performed by Vault and provides a forensics trail
in the case of misuse or compromise.
Audit logs securely
hash any sensitive data, but access should still
be restricted to prevent any unintended disclosures.
Upgrade Frequently.
Configure SELinux / AppArmor
Using additional mechanisms like
SELinux and
AppArmor can help provide additional layers of security when using Vault.
Restrict Storage Access
Vault encrypts all data at rest, regardless of
which storage backend is used.
Although the data
is encrypted, an attacker with arbitrary control can cause data corruption or loss by
modifying or deleting keys.
Access to the storage backend should be restricted to only Vault to avoid unauthorized access or operations
Disable Shell Command History.
vault command itself to not appear in history at all.
Tweak
ulimits.
Consider
to review ulimits for
maximum amount of open files, connections, etc. before going into production
Docker Containers.
To leverage the "memory lock" feature inside the Vault container you will
likely need to use the overlayfs2 or another supporting driver.
https://www.vaultproject.io/guides/operations/production
- HashiCorp Vault secures, stores, and tightly controls access to tokens, passwords, certificates, API keys, and other secrets in modern computing. Vault handles leasing, key revocation, key rolling, and auditing. Through a unified API, users can access an encrypted Key/Value store and network encryption-as-a-service, or generate AWS IAM/STS credentials, SQL/NoSQL databases, X.509 certificates, SSH credentials, and more.
https://www.vaultproject.io/
- Security Best Practices for Building Docker Images
Installation of external software components
Copying files
When adding files into the image,
the COPY statement is preferred.
To ensure proper usage of the cache, separate COPY statements (opposed to package installation activities). This helps in performance, by invalidating just some parts of the cache.
Downloading files
Use
cURL/
wget instead of ADD
To limit the size of an image, the usage of
cURL or
wget is preferred. By using ADD files will
be extracted into the image, increasing size.
Additionally, the command can
be appended directly with an integrity check, which is not possible when using ADD
Disk, Directories and Mounts
The Docker build file allows defining storage areas for your application with the help of the VOLUME statement
Working directory
Instead of using the combination of “cd /data &&
./
runscript.
sh”, the WORKDIR statement changes the current work directory.
Running Processes
Processes can be started with the CWD statement. For example starting
Lynis
CMD [
“lynis”, “-c”, “-Q”]
Environment settings
ENV PATH /
usr/local/
yourpackage/
bin:$PATH
Active User
With the USER statement,
the permissions can be dropped from root to a non-privileged user.
Auditing tool for Docker
lynis audit
dockerfile <file>
https://linux-audit.com/security-best-practices-for-building-docker-images/
- Open-AudIT is an application to tell you exactly what is on your network, how it is configured and when it changes. Open-AudIT will run on Windows and Linux systems. Essentially, Open-AudIT is a database of information, that can be queried via a web interface. Data about the network is inserted via a Bash Script (Linux) or VBScript (Windows). The entire application is written in php, bash and vbscript.
https://www.open-audit.org/
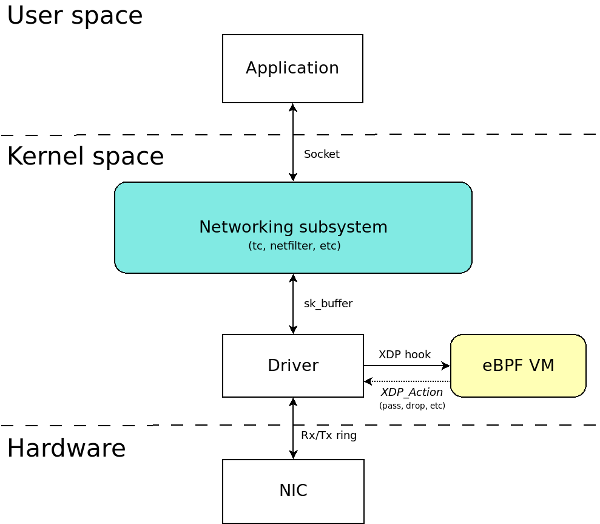
- purely in-kernel solutions for some packet-processing intensive workloads still lag behind the bypass solution, namely Data Plane Development Kit (DPDK), by almost an order of magnitude.
the kernel community never sleeps (almost literally) and the holy grail of kernel-based networking performance has
been found under the name of XDP: the
eXpress Data Path.
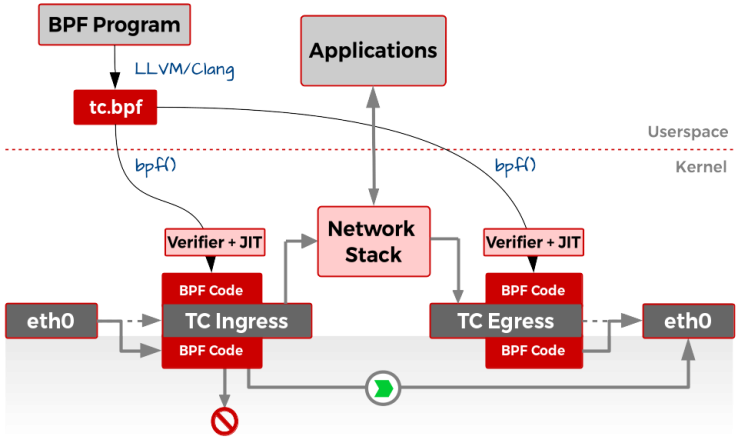
This technology allows you to implement new networking features (and/or re-implement existing ones) via custom extended BPF (
eBPF) programs attached to the kernel packet processing deep down the stack, killing the overhead of socket buffers (SKBs) management, reducing the per-packet memory management overhead, and allowing more-effective bulking.
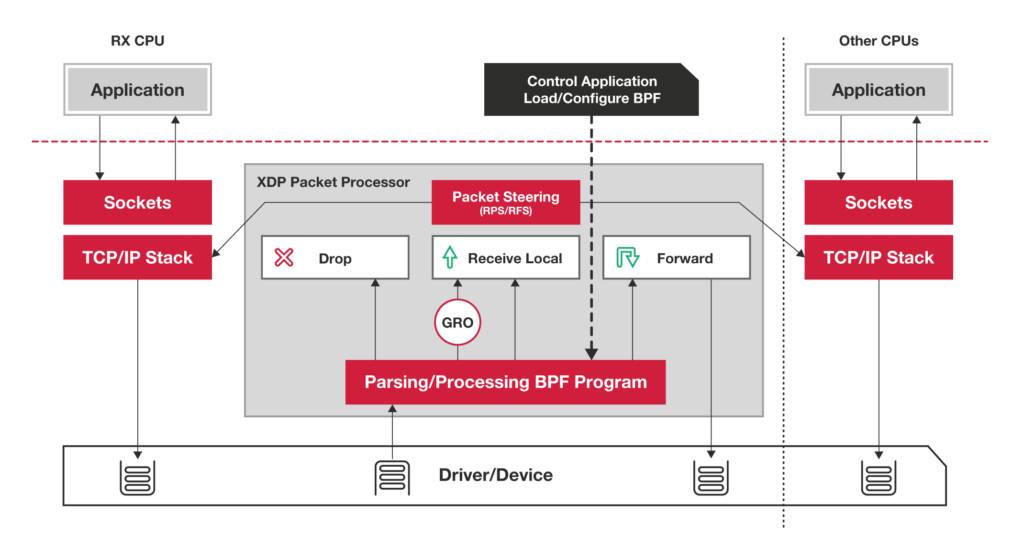
XDP
eBPF programs have access to helpers for packet manipulation and packet forwarding, offering almost unlimited opportunity to change and extend the kernel behavior without the need to add new in-kernel code—and, while at it, reaching a higher
possible processing speed.
XDP allows you to attach an
eBPF program to a lower-level hook inside the kernel
Such a hook
is implemented by the network device driver, inside the ingress traffic processing function (usually, the NAPI poll
() method), before
an SKB is allocated for the current packet.
XDP is not a programming language,
butit it uses a programming language (
eBPF), and every programming-related tutorial has to start with a “Hello world” program
https://developers.redhat.com/blog/2018/12/06/achieving-high-performance-low-latency-networking-with-xdp-part-1/
You install it behind your firewall so
that you can securely store and manage the Docker images you use in your applications.
Image management
DTR can
be installed on-premises, or on a virtual private cloud. And with it, you can store your Docker images securely, behind your firewall
You can use DTR as part of your continuous integration, and continuous delivery processes to build, ship, and run your applications.
It even allows you to see what
dockerfile lines
were used to produce the image and,
if security scanning is enabled, to see a list of
all of the software installed in your images.
Security scanning
DTR has a built in security scanner that can
be used to discover what versions of software
are used in your images. It scans each layer and aggregates the results to give you a complete picture of what you are shipping as a part of your stack.
Most importantly, it co-relates this information with a vulnerability database that
is kept up to date through periodic updates. This gives you unprecedented insight into your exposure to known security threats.
Image signing
DTR ships with Notary built in so
that you can use Docker Content Trust to sign and verify images.
https://docs.docker.com/v17.12/datacenter/dtr/2.4/guides/
- 10 Docker Image Security Best Practices
1. Prefer minimal base images
By preferring minimal images that bundle only the
necessary system tools and libraries required to run your project, you are also minimizing the attack surface for attackers and ensuring that you ship a secure OS.
2. Least privileged user
When a
Dockerfile doesn’t specify
a USER, it defaults to executing the container using the root user
.Docker defaults to running containers using the root user. When that
namespace is then mapped to the root user in the running container, it means that the container potentially has root access on the Docker host.
To minimize exposure, opt-in to create a dedicated user and a dedicated group in the Docker image for the application; use the USER directive in the
Dockerfile to ensure the container runs the application with the least privileged access possible
A specific user might not exist in the image; create that user using the instructions in the
Dockerfile
3. Sign and verify images to mitigate MITM attacks
Verify docker images
Make it a best practice
that you always verify images before pulling them in, regardless of policy
To experiment with verification, temporarily enable Docker Content Trust with the following command
export DOCKER_CONTENT_TRUST=1
Now attempt to pull an image
that you know
is not signed—the request
is denied and the image is not pulled
Sign docker images
To sign images, use Docker Notary. Notary verifies the image signature for you, and blocks you from running an image if the signature of the image is invalid.
When Docker Content Trust
is enabled a Docker image build signs the image.
When the image
is signed for the first time, Docker generates and saves a private key in ~/docker/trust for your user.
This private key is then used to sign any additional images as
they are built
4. Find, fix and monitor for open source vulnerabilities
5. Don’t leak sensitive information to Docker images
when building an application inside a Docker image, you need secrets such as an SSH private key to pull code from a private repository, or you need tokens to install private packages. If you copy them into the Docker intermediate container they
are cached on the layer to which
they were added, even if you delete them later on.
These tokens and keys must be kept outside of the
Dockerfile
Using multi-stage builds
By leveraging Docker support for multi-stage builds, fetch and manage secrets in an intermediate image layer that
is later disposed of so that no sensitive data reaches the image build.
Use code to add secrets to
said intermediate layer
Using Docker secret commands
Use an alpha feature in Docker for managing secrets to mount sensitive files without caching them
Beware of recursive copy
the following command copies the entire build context folder, recursively, to the Docker image, which could end up copying sensitive files as
wel
If you have sensitive files in your folder, either remove them or use
.dockerignore to ignore them
6. Use fixed tags for immutability
The most common tag is latest, which represents the latest version of the image. Image tags are not immutable, and the author of the images can publish the same tag multiple times
Instead of pulling a tag, pull an image using the specific SHA256 reference of the Docker image, which guarantees you get the same image for every pull.
However notice that using a SHA256 reference can be risky, if the image changes that hash might not exist anymore
7. Use COPY instead of ADD
Space and image layer considerations
using COPY allows separating the addition of an archive from remote locations and unpacking it as different layers, which optimizes the image cache.
If
remote files are needed, combining all of them into one RUN
command that downloads, extracts, and
cleans-up afterwards optimizes a single layer operation over several layers that would
be required if
ADD were used.
zip bombs and Zip Slip vulnerabilities
When local archives
are used, ADD automatically extracts them to the destination directory. While this may be acceptable, it adds the risk of zip bombs and Zip Slip vulnerabilities that could then
be triggered automatically.
When using COPY
the source for the files to be downloaded from remote URLs should be declared over a secure TLS connection and their origins need to
be validated as well.
8. Use metadata labels
The most common label is
“maintainer”, which specifies the email address and the name of the person maintaining this image.
This metadata could contain: a commit hash, a link to the relevant build, quality status (did all tests pass?), source code, a reference to your SECURITY
.TXT file location
It is good practice to adopt a SECURITY
.TXT (RFC5785) file that points to your responsible disclosure policy for your Docker label schema when adding labels
9. Use multi-stage build for small and secure images
This is a good reason
why Docker has the multi-stage build capability. This feature allows you to use multiple temporary images in the build process, keeping only the latest image along with the information you copied into it.
First image—a
very big image size, bundled with many dependencies that
are used in order to build your app and run tests.
Second image—a very thin image in terms of size and
number of libraries, with only a copy of the artifacts required to run the app in production.
10. Use a linter
Adopt the use of a linter to avoid common mistakes and establish best practice guidelines that engineers can follow in an automated way.
https://snyk.io/blog/10-docker-image-security-best-practices/
- Docker Bench for Security
The Docker Bench for Security is a script that checks for dozens of common best-practices around deploying Docker containers in production. The tests are all
automated, and
are inspired by the CIS Docker Community Edition Benchmark v1.1.0.
https://github.com/docker/docker-bench-security
- Docker Security Best Practices
1. Image Authenticity
Use Private or Trusted Repositories
Docker Cloud and Docker Hub can scan images in private repositories to verify that they are free from known security vulnerabilities or
exposures, and report the results of the scan for each image tag.
Use Docker Content Trust
This is a new feature introduced in Docker Engine 1.8, which allows you to verify Docker image publishers.
the service protects against image forgery, replay attacks, and key compromises.
2. Excess Privileges
Drop Unnecessary Privileges and Capabilities
The best practice for users would be to remove all capabilities except those explicitly required for their processes.
3. System Security
make use of other Linux security options, such as
AppArmor,
SELinux,
grsecurity and Seccomp.
a Linux kernel security module that allows the system administrator to restrict programs’ capabilities with per-program profiles.
Profiles can allow capabilities like network access, raw socket access, and the permission to read, write, or execute files on matching paths.
AppArmor supplements the traditional Unix discretionary access control (DAC) model by providing mandatory access control (MAC).
Security-Enhanced Linux (
SELinux) is a Linux kernel security module that provides a mechanism for supporting access control security policies, including…
(MAC)
A set of patches for the Linux kernel which emphasize security enhancements.
Grsecurity provides a collection of security features to the Linux kernel, including address space protection, enhanced auditing and process control
seccomp( secure computing mode)
a computer security facility in the Linux kernel.
seccomp allows a process to make a one-way transition into a “secure” state where it cannot make any system calls except exit
(),
sigreturn(), read
() and write
() to already-open file descriptors.
Should it attempt any other system calls, the kernel will
terminate the process with SIGKILL.
4. Limit
Available Resource Consumption
-
m /
--memory: Set a memory limit
--memory-reservation: Set a soft memory limit
--kernel-memory: Set a kernel memory limit
--cpus: Limit the number of
CPUs
--device-read-bps: Limit the read rate from a device
https://blog.sqreen.com/docker-security/
- Docker containers are a wrapper around Linux control groups (cgroups) and namespaces.
Cgroups are used in the Linux kernel for monitoring and restricting resources among a group of processes
Namespaces determine what a process can see.
For example, the PID
namespace restricts
which processes can be seen within a container.
Securing the host OS
One can also develop custom security modules using Linux Security Modules (LSMs).
SELinux is a
type of Mandatory Access Control (MAC) security module based on type enforcement.
Type enforcement revolves around defining a type and assigning privileges to those types
AppArmor is another MAC solution
It is based on file system paths rather than defining types.
Users can specify a file path to a binary and the permissions they have
Seccomp
Seccomp (short for ‘Secure Computing’) is another security module included in many Linux distributions that allows users to restrict system calls.
Seccomp can be used to sandbox applications that handle untrusted user inputs to a subset of system calls.
The first step in using
seccomp is to determine all the system calls an application makes when it runs. This can be a difficult and error-prone exercise that should
be conducted when the application
is written.
Users can use tools like audit to profile all the system calls
that it makes by exercising it in different ways.
The drawback with
seccomp is that the profile has to
be applied during the launch of the application. The granularity of restricting system calls is too narrow and requires
extensive working knowledge of Linux to come up with good profiles.
Capabilities
Linux capabilities are groups of permissions that can
be given to child processes.
Container Runtime Security Practices
Unix socket (/var/run/docker
.sock)
By default, the Docker client communicates with the Docker daemon using the unix socket.
This socket can also be mounted by any other container unless proper permissions are in place.
Once mounted, it is
very easy to spin up any container, create new images, or shut down existing containers.
Solution:
Set up appropriate
SELinux/
AppArmor profiles to limit containers mounting this socket
Volume mounts
Docker allows mounting to sensitive host directories. Also, the contents of the host file system can
be changed directly from the container. For application containers with direct Internet exposure, it is important to be extra careful when mounting sensitive host directories (/etc/, /
usr/)
Solution:
Mount host-sensitive directories as read-only.
Privileged containers
Privileged containers can do almost anything a host can do
Solution:
Use capabilities to grant fine-grained privileges instead
SSH within container
Running ssh service within containers makes managing ssh keys/ access policies difficult
Solution:
Do not run ssh services inside a container.
Instead, run ssh on the host and use `docker exec` or `docker attach` to interact with the container.
Binding privileged ports
By default, Docker allows binding privileged ports (<1024) to a container.
Solution:
List all containers and their port mappings using the code below to ensure that the container's ports
are not mapped to host ports below port 1024.
docker ps --quiet |
xargs docker inspect
--format '{{
.Id }}: Ports={{
.NetworkSettings.Ports }}'`
Exposing ports
Ensure that there are no unnecessary ports exposed
Running without default
AppArmor/
SELinux or
seccomp
Docker runs containers with
default AppArmor/
SELinux and
seccomp profiles.
They can be disabled with the
--unconfined option
Solution:
Do not disable the default profiles that Docker supplies.
Containers can be started with
-pid to connect with the host PID
namespace or
--net to share its network
namespace
These allow containers to see and kill PIDs running on the host or even connect to privileged ports
Solution:
Avoid sharing host
namespaces with containers
Enabling TLS
If the Docker daemon is running on a TCP endpoint, it
is advised to run with TLS enabled
Solution:Docker offers a
[helpful guide on enabling TLS with Docker
Do not set mount propagation mode to shared
Mount propagation mode allows mounting volumes in shared, slave or private mode on a container
Mounting a volume in shared mode
does not restrict any other container to mount and
make changes to that volume.
Solution:
Run the following command to list the propagation mode for mounted volumes:
`docker
ps --quiet
--all |
xargs docker inspect
--format '{{
.Id }}:
Propagation={{range $
mnt :=
.Mounts}} {{
json $
mnt.Propagation}} {{end}}'`
Restrict a container from
acquiring new privileges
A process can set the
no_new_priv bit in the kernel
The
no_new_priv bit ensures that the
process or its children processes
do not gain any additional privileges via
setuid or
sgid bits.
Solution:
List the security options for all the containers using the following command:
`docker
ps --quiet
--all |
xargs docker inspect
--format '{{
.Id }}:
SecurityOpt={{
.HostConfig.SecurityOpt }}'`
One can start a container with `
no_new_privileges` as below:
`docker run
--security-
opt=no-new-privileges`
https://www.stackrox.com/post/2017/08/hardening-docker-containers-and-hosts-against-vulnerabilities-a-security-toolkit/
- Linux Security Modules (LSM) is a framework that allows the Linux kernel to support a variety of computer security models while avoiding favoritism toward any single security implementation.
since Linux 2.6.
AppArmor,
SELinux, Smack, and TOMOYO Linux are the
currently accepted modules in the official kernel.
TOMOYO Linux is a Mandatory Access Control (MAC) implementation for Linux that can
be used to increase the security of a system, while also being useful purely as a system analysis tool.
TOMOYO Linux allows each process to declare behaviours and resources needed to achieve their purpose. When protection
is enabled, TOMOYO Linux acts like an operation watchdog, restricting each process to only the behaviours and resources allowed by the administrator.
The main features of TOMOYO Linux include:
System analysis
Increased security through Mandatory Access Control
Tools to aid in policy generation
Simple syntax
Easy to use
Requires no modification of existing binaries
http://tomoyo.osdn.jp/
- The most complete implementation of a Smack based system is Tizen.
The Automotive Grade Linux project uses Smack. This uses the
Yocto Project build tools
.
Smack (full name: Simplified Mandatory Access Control Kernel) is a Linux kernel security module that protects data and process interaction from malicious manipulation using a set of custom mandatory access control (MAC) rules, with simplicity as its main design goal
http://schaufler-ca.com/
- Protect the Docker daemon socket
By default, Docker runs via a non-networked Unix socket.
It can also optionally communicate using an HTTP socket.
If you need Docker to be reachable via the network
in a safe manner, you can enable TLS by specifying the
tlsverify flag and pointing Docker’s
tlscacert flag to a trusted CA certificate.
In the daemon mode, it only allows connections from clients authenticated by a certificate signed by that CA. In the client mode, it only connects to servers with a certificate signed by that CA
https://docs.docker.com/v17.12/engine/security/https/
The first of these features is called cgroups.
This feature was developed as a way to group processes and provide more control over the resources
that were available to the group, such as CPU, memory, and I/O.
This feature also allows for better accounting of the usage, such as when teams need to report the usage for billing
purposes
The
cgroups feature of containers allows them to scale
in a controllable way and have a predictable capacity.
It is also a good security feature because processes running in containers can not easily consume all the resources on a system - for example, a denial of service attack by starving other processes of required resources
The other feature is called namespaces which
essentially allows a process to have its own dedicated set of resources, such as files, users, process ids, and
hostnames
Namespaces limit what the process running inside a container can see and do
Container processes can only see processes running in the same
namespace
In a lot of ways, this can make a container process seem like it is a virtual machine, but the process still executes system calls on the main kernel.
These processes see a filesystem which is a small subset of the real filesystem.
The user ids inside the container can be mapped from different ids outside the container
(you could make the user root have user id 0 inside the container but
actually has user id 1099 outside the container - thus appearing to give administrative control when not
actually doing so)
Priviledged Containers
A good example is running a web server that needs to listen on a privileged port, such as 80.
Ports under 1024
are privileged and usually assigned to more sensitive network processes such as mail, secure shell access, HTTP, and network time synchronization
If you wanted to run an Apache server (
which is often used as a secure entry point to an application) in a container and listen on port 80, you would need to give that container privileged access.
Your intent was to give the process the ability to open a privileged port, but now the process
has the ability to do other things that require privileged access.
The limitations imposed by the
cgroups controller have been lifted, and the process can do almost anything
that is possible to do running outside the container.
To avoid this issue, it is possible to map a non-privileged port outside the container to a privileged port inside the container. For example, you map port 8080 on the host to port 80 inside the container. This will allow you to run processes that normally require privileged ports without
actually giving them privileged access.
Seccomp Profiles
The default
seccomp profile for Docker disables around 40 system calls to provide a baseline level of security.
The issue with these
seccomp profiles is that
they must be specified at the start of the container and are difficult to manage.
Capabilities
Capabilities are another way of specifying privileges that need to be available to a process running in a container. The advantage of capabilities is that groups of permissions
are bundled together into meaningful groups which makes it easier to collect the privileges required for doing common tasks.
Using capabilities is much more secure than
simply running a container as privileged, and a lot easier to manage than using
seccomp profiles
SELinux and
AppArmor
A lot of the security concerns for processes running in containers apply to processes on a host in general
SELinux is a Linux kernel security module that provides a mandatory access control (MAC) mechanism for providing stricter security enforcement.
SELinux defines a set of users, roles, and domains that can
be mapped to the actual system users and groups.
AppArmor is a similar MAC mechanism that aims to confine programs to a limited set of resources.
AppArmor is more focused on binding access controls to programs rather than users
It also combines capabilities and defining access to resources by
path.
https://rancher.com/blog/2018/2018-09-12-introduction-to-container-security-1/
Making sense Of Linux
namespaces
They are a combination of Linux kernel technologies. Specifically,
cgroups,
namespaces and LSMs.
To get a better understanding of how
namespaces work I sat down last weekend and read a bunch of code and dug into some containers running on one of my
Kubernetes workers
seven types of
namespaces in the Linux kernel:
Cgroups control the
cgroup information a process can see.
IPC controls the System V IPC and POSIX message queues a process can see.
Network controls the network resources a process can see.
Mount controls the set of file systems and mounts a process can see.
PID controls the process IDs a process can see.
User controls the user information (e.g.,
uids,
gids, etc.) a process can see.
UTS controls the hostname and domain information a process can see.
Processes can be assigned to a
namespace in two ways.
The first is via one or more CLONE_NEWXXXX flags passed to the clone system call
.Clone allows new
newspaces to be created
The second way is through the
setns(2) system call
.setns adds a process to an existing
namespace
Each
processs on a system has their process id registered in /proc. Inside that pid directory is a
ns directory which lists
all of the namespaces (and their ids) associated with the process.
Let’s
take a look at the
ns entries for a docker shim process running on a
Kubernetes worker:
When the
kubelet is asked to create a new
container it will
actually spin up two. One container will
be used to execute your application and
the second container will be used to run a pause container. If you want to learn all about the differences between the two types of
containers you can check out the amazing pod and
pause container posts from Ian Lewis.
Now what makes this interesting is the way the
namespaces are shared between containers in a pod. To better understand the relationships between containers in a
namespace I fired up a pod with
kubectl:
This helped me visualize the
namespace associations and walk away with the following notes:
Each container has its own
mnt,
uts and pid
namespace.
All of the processes on the system share the
cgroup namespace (need to dig more into this).
The pause container and application container share the net and
ipc namespace.
If you are using docker and your container needs access to a
namespace outside of the default
namespaces it was assigned (net &
ipc) you can use the following options to add it to additional
namespaces:
https://prefetch.net/blog/2018/02/22/making-sense-of-linux-namespaces/
- To understand the current state of Kernel Audit, it’s important to understand its relationship with namespaces, which are kernel-enforced user space views. Currently, there are seven namespaces: peer namespaces which include the Mount namespace; the UTS namespace (hostname and domain information); the IPC namespace (no one really knows what this one does); NET namespaces which are peer systems, peer namespaces so the system comes up in the initial NET namespace and all of the physical devices appear in that namespace; and, three hierarchy namespaces – PID, User, and Cgroups – so that the permissions are inherited from one to another.
The User
namespaces are the most contentious, because there are
a number of traps inherent to their
use making securing them vexing. “As a result, there are
number of distributions that have not enabled user
namespaces by default yet, because there's still some work to
be done to iron out where these are going,” Briggs said.
There Can Be Only One
As to containers, there is no hard definition
as to what they are and
certainly the kernel
has no concept of containers. As far as
the kernel is concerned, it's a concept that's completely in user space at the moment.
https://www.
linux.com/news/understanding-and-securing-linux-namespaces
- The Curious Case of Pid Namespaces And How Containers Can Share Them
Namespaces provide isolation of shared resources
they give each application its own unique view of the system
Because of
namespaces, each docker container to appears to have its own filesystem and network
Pids in Linux
Processes in
linux live in a tree-like structure
The pid is also passed to the parent when
the a process
is created via the fork
syscall.
The kernel generates a new pid for the child and returns the identifier to the calling process, but it is up to the parent to keep track of this pid manually.
The first process started by the kernel has pid 1
This process is referred to as the init process, or
simply ‘init’.
The parent pid of init is pid 0, signifying that its parent is the kernel.
Pid 1 is the root of the user-space process tree
It is possible to reach pid 1 on a
linux system from any process by recursively following each process’ parent.
If pid 1 dies, the kernel will panic and you have to reboot the machine.
A Quick Overview of
Namespaces
Linux
namespaces are created using the
unshare syscall, passing a set of flags representing which
namespaces to create
In most cases,
unshare pops you right into the new
namespace.
For example, as soon as a process creates a network
namespace it immediately sees an empty view of the network with no devices.
when you
unshare the pid
namespace, the process doesn’t immediately enter the new
namespace.
Instead, it
is required to fork. The child process enters the pid
namespace and becomes pid 1
a pid
namespace creates a separate view of the process hierarchy.
In other words the forked process will
actually have two
pids: it has pid 1 inside the
namespace, and has a different pid when viewed from outside the
namespace.
Pid 1 in a
Namespace
Inside a
namespace, init (pid 1) has three unique features when compared to other processes:
1) It does not automatically get default signal handers, so
a signal sent to it is ignored unless it registers a signal hander for that signal. (
This is why many
dockerized processes
fail to respond to ctrl-c and
you are forced to kill them with something like `docker kill`).
2) If another process in the
namespace dies before its children, its children will be
reparented to pid 1. This allows init to collect the exit status from the process so that the kernel can remove it from the process table.
3) If it dies, every other process in the pid
namespace will
be forcibly terminated and the
namespace will be cleaned up
The Docker “Mistake”
Docker (
and runc) run the process specified as the containers
entrypoint (or cmd) as pid 1 in a new pid
namespace.
This can lead to some unexpected behavior for an application processes because it usually
isn’t designed to run as pid 1. If it doesn’t set up its own signal handlers, signaling the process will not work. If it forks a child that dies before any grandchildren exit, zombie processes can accumulate in the container, potentially filling up the process table.
It is possible to run a special init process in your container and have it fork-exec into the application process, and many containers do this to avoid these problems. One unfortunate
side affect of this decision is that the container gains more complexity. Once the container has a real init system, people are apt to embed multiple processes which sacrifices
some of the benefit of dependency isolation
The
Rkt “Solution”
It assumes that the process you are starting is not an init process, so it creates an init process for you (
systemd) and then has
systemd create
a the filesystem
namespace for the container process and start it
Systemd becomes pid 1 in the
namespace and the container process runs as pid 2.
A Simpler Alternative
It is possible to pass the
--init flag when starting your container, which will cause
docker to start a simple init process for you.
Multiple Containers in a Pod
it is preferable to bundle these processes separately so that
their dependencies can be isolated.
To achieve this,
rkt and
kubernetes introduced
the idea of pods.
A pod is a set of related containers that share some
namespaces. In the
rkt implementation, every
namespace but the filesystem
namespace is shared.
Due to some of the aforementioned issues with pid
namespaces,
kubernetes doesn’t yet share pid
namespaces between containers in the same pod.
that means processes in the same pod cannot signal each other
In addition, each container in the pod has the aforementioned init problem: every container process will run as pid 1
The
rkt approach is superior for pods.
You are not required to run an init process inside your containers, but it is easy to create multiple processes that can communicate and even signal each other
Adding
a Containers to a Pod
With the container runtime interface,
kubernetes has introduced the concept of a pod sandbox. This allows the container runtime to allocate resources
in advance of starting the containers. While especially useful for networking, the concept also enables adding containers to existing pods. If you are creating the pod sandbox first and then starting the containers one by one, why not allow a for
an additional container to be added later? This would be especially useful for periodic tasks like database backups or log collection
Rkt has introduced experimental support for this
very feature, allowing for the creation of a pod independently of any containers. Containers (or “apps” in the
rkt terminology) can
be added or removed from the pod at a later time.
Rkt accomplishes this by starting
systemd with no running units.
It then communicates with the pod’s
systemd to start new apps on demand
in this model the init process has additional privileges and introduces a new attack vector.
The
systemd process in
rkts sandbox model:
has access to the host’s filesystem
namespace so it can create the filesystem
namespace for the containers it starts.
has to maintain full privileges because it doesn’t know in advance the set of privileges each new app will need.
is visible to
all of the other processes running in the container.
Sandboxes and Pid
Namespaces
1
.Pid
namespaces are not created along with the sandbox. Instead, each container gets its own pid
namespace. This fits with how
kubernetes works today, and can
benefit from the simpler init strategy for handling a single process mentioned above. The main drawback of this approach is that the processes in the pod cannot signal each other.
3
.Pid
namespaces are created along with the sandbox. The sandbox includes a smart init process
which can be used to start other processes. This how the
rkt app sandbox works
.the drawback is that the init process is too privileged, introducing new security attack vectors.
2
.Pid
namespaces are not created along with the sandbox. Instead, each container gets its own pid
namespace. This fits with how
kubernetes works today, and can
benefit from the simpler init strategy for handling a single process mentioned above. The main drawback of this approach is that the processes in the pod cannot signal each other.
4
.Pid
namespaces are created along with the sandbox. The sandbox includes a simple init process which only handles signals and reaps zombies. Each other process enters the pid
namespace but still has an active parent outside of the
namespace. Because the init process is not starting new containers, it
does not need to maintain privileges or have access to the host filesystem. The drawback of this approach is that inside the
namespace each process appears to have a parent of pid 0, so the normal tree-like structure of the process tree
is broken
5
.The pid
namespace and init are exactly the same as option four. Each other process enters the pid
namespace and
daemonizes (the parent exits). The kernel will
reparent the process to
init, which fixes option four’s broken process tree. The drawback in this case is monitoring the new process from the outside after
daemonization becomes difficult.
The containerization system is forced to track the process via pid instead of
simply waiting on the process.
https://hackernoon.com/the-curious-case-of-pid-namespaces-1ce86b6bc900
But consider what happens if a process
terminates. Let's say that the bash (PID 5) process
terminates. It turns into a so-called "defunct process", also known as a "zombie process".
It's because
Unix is designed in such a way that parent processes must explicitly "wait" for
child process termination,
in order to collect its exit status
The action of calling
waitpid() on a child process
in order to eliminate its zombie,
is called "reaping". Many applications reap their child processes correctly. In the above example with
sshd, if bash
terminates then the operating system will send a SIGCHLD signal to
sshd to wake it up.
Sshd notices this and reaps the child process
Suppose the parent process
terminates, either intentionally (because the program logic has determined that it should exit), or caused by a user action (e.g. the user killed the process). What happens then to its children? They no longer have a parent process, so they become "orphaned" (this is the actual technical term).
And this is where the init process kicks in. The init process
-- PID 1
-- has a special task. Its task is to "adopt" orphaned child processes (again, this is the actual technical term). This means that the init process becomes the parent of such processes, even though those processes
were never created directly by the init process.
Why zombie processes are harmful
Why are zombie processes a bad thing, even though they're
terminated processes? Surely the original application memory has already
been freed, right? Is it anything more than just an entry
that you see in
ps?
You're right,
the original application memory has been freed. But
the fact that you still see it in
ps means
that it's still taking up some kernel resources
But doesn't
running a full init system make the container heavyweight and like a VM?
You may
be thinking about Upstart,
Systemd,
SysV init etc with all the implications that come with them.
A "full init system" as we may call it, is neither necessary nor desirable.
The init system
that I'm talking about is a small, simple program whose only responsibility is to spawn your application, and to reap adopted child processes.
https://blog.phusion.nl/2015/01/20/docker-and-the-pid-1-zombie-reaping-problem/
- Containers as everyone knows them are normal processes that are executed using two features of the Linux kernel called namespaces and cgroups.
Namespaces allow you to provide a "view" to the process that hides everything outside of those
namespaces, thus giving it its own environment to run in. This makes it so processes can't see or interfere with other processes:
Namespaces include:
Hostname
Process IDs
File System
Network interfaces
Inter-Process Communication (IPC)
While I said above that processes running in a
namespace can't interfere with other processes that's not
really true.
Linux has a feature called
cgroups.
Processes can be run in a
cgroup much like a
namespace but the
cgroup limits the resources that the process can use
The thing I wanted to point out here was that
cgroups and each
namespace type are separate features. Some subset of the
namespaces listed above could
be used or not used at all. You could use only
cgroups or some other combination of the two (well, you're still using
namespaces and
cgroups just the root ones but whatever).
Namespaces and
cgroups also work on groups of processes. You have
have multiple processes running with a single
namespace. That way they can see and interact with each other. Or you could run them in a single
cgroup. That way the processes together will
be limited to a specific amount of CPU and RAM.
You can also think of other types of abstractions you could use. Service meshes like
istio can
be bolted on as sidecars and provide service routing, telemetry, policy enforcement without ever having to change the main application.
You can also use multiple sidecars. There's nothing stopping you from using both the
confd sidecar and
istio sidecar at the same time.
Applications can be combined in this way to build much more complex and reliable systems while keeping each individual app relatively simple.
https://www.ianlewis.org/en/what-are-kubernetes-pods-anyway
- Kubernetes provides a clean abstraction called pods for just this use case. It hides the complexity of Docker flags and the need to babysit the containers, shared volumes, and the like. It also hides differences between container runtimes. For example, rkt supports pods natively so there is less work for Kubernetes to do but you as the user of Kubernetes don't have to worry about it.
In
Kubernetes, the pause container serves as the "parent container" for
all of the containers in your pod.
The pause container has two core responsibilities. First, it serves as the basis of Linux
namespace sharing in the pod. And second, with PID (process ID)
namespace sharing enabled, it serves as PID 1 for each pod and reaps zombie processes.
Sharing
namespaces
In Linux, when you run a new process, the process inherits its
namespaces from the parent process.
The way that you run a process in a new
namespace is by "unsharing" the
namespace with the parent process thus creating a new
namespace
Once the process is running, you can add other processes to the process'
namespace to form a pod
.New processes can
be added to an existing
namespace using the
setns system call.
Containers in a pod share
namespaces among them.
In both cases we specify the pause container as the container whose
namespaces we want to join. This will
effectively create our pod. If you access http://localhost:8080/ you should be able to see ghost running through
an nginx proxy because the network
namespace is shared among the pause,
nginx, and ghost containers.
Reaping Zombies
In Linux, processes in a PID
namespace form a tree with each process having a parent process. Only one process at the root of the tree doesn't really have a parent. This is the "init" process, which has PID 1.
Processes can start other processes using the fork and exec
syscalls
Processes can start other processes using the fork and exec
syscalls. When they do this, the new process' parent is the process that called the fork
syscall. fork
is used to start another copy of the running process and
exec is used to replace the current process with a new one, keeping the same PID (
in order to run a
totally separate application you need to run the fork and exec
syscalls. A process creates a new copy of itself as a child process with a new PID using
fork and then when the child process runs it checks if it's the child process and runs exec to replace itself with the one you
actually want to run. Most languages provide a way to do this via a single function). Each process has an entry in the OS process table. This records info about the process' state and exit code. When a child process has finished running, its process table entry remains until the parent process has retrieved its exit code using the wait
syscall.
This is called "reaping" zombie processes.
Longer lived zombie processes occur when parent processes don't call the wait
syscall after the child process has finished. One situation where this occurs is when the parent process
is poorly written and
simply omits the wait call or when the parent process dies before the child and the new parent process does not call wait on it. When a process' parent dies before the child, the OS assigns the child process to the "init" process or PID 1. i.e. The init process "adopts" the child process and becomes its parent. This means that now when the child process exits the new parent (init) must call
waitto get its exit code or its process table entry remains forever and it becomes a zombie
In containers, one process must be the init process for each PID
namespace. With Docker, each container usually has its own PID
namespace and the ENTRYPOINT process is the init process
on
Kubernetes pods,
a container can be made to run in another container's
namespace.
In this case, one container must assume the role of the init process, while
others are added to the
namespace as children of the init process.
It's useful to note that there has been a lot of back-and-forth on PID
namespace sharing. Reaping zombies
is only done by the pause container if you have PID
namespace sharing enabled, and
currently it is only available in Kubernetes 1.7+. It
is enabled by default if running Kubernetes 1.7 with Docker 1.13.1+ unless disabled with a
kubelet flag (--docker-disable-shared-
pid=true). This
was reverted in Kubernetes 1.8 and now it's disabled by default unless enabled by a
kubelet flag (--docker-disable-shared-
pid=false)
https://www.ianlewis.org/en/almighty-pause-container
- init container - kubernetes
A
PodThe smallest and simplest
Kubernetes object. A Pod represents a set of running containers on your cluster.
can have multiple containers running apps within it, but it can also have one or more init containers, which
are run before
the app containers are started.
Init containers are exactly like regular containers, except:
Init containers always run to completion.
Each init container must complete successfully before the next one starts.
https://kubernetes.io/docs/concepts/workloads/pods/init-containers/
- Introduction to Container Security
We will begin by talking about two of the Linux kernel features that helped make containers as we know them today possible
This feature was developed as a way to group processes and provide more control over the resources
that were available to the group, such as CPU, memory, and I/O.
This feature also allows for better accounting of the usage, such as when teams need to report the usage for billing
purposes
The
cgroups feature of containers allows them to scale
in a controllable way and have a predictable capacity.
It is also a good security feature because processes running in containers can not easily consume all the resources on a system - for example, a denial of service attack by starving other processes of required resources.
https://rancher.com/blog/2018/2018-09-12-introduction-to-container-security-1/
- The underlying technology
Docker is written in
Go and takes advantage of several features of the Linux kernel to deliver its functionality.
Docker uses a technology called
namespaces to provide the isolated workspace called the container. When you run a container, Docker creates a set of
namespaces for that container.
These
namespaces provide a layer of isolation
Each aspect of a container runs in a separate
namespace and
its access is limited to that
namespace.
Docker Engine uses
namespaces such as the following on Linux:
The pid
namespace: Process isolation (PID: Process ID).
The net
namespace: Managing network interfaces (NET: Networking).
The
ipc namespace: Managing access to IPC resources (IPC:
InterProcess Communication).
The
mnt namespace: Managing filesystem mount points (MNT: Mount).
The uts
namespace: Isolating kernel and version identifiers. (UTS: Unix Timesharing System).
Control groups
Docker Engine on Linux also relies on another technology called control groups (
cgroups). A
cgroup limits an application to a specific set of resources. Control groups allow Docker Engine to share
available hardware resources to containers and optionally enforce limits and constraints. For example, you can limit the memory available to a specific container.
Union file systems
Union file systems, or UnionFS, are file systems that operate by creating layers, making them
very lightweight and fast. Docker Engine uses UnionFS to provide the building blocks for containers. Docker Engine can use multiple UnionFS variants, including AUFS,
btrfs,
vfs, and
DeviceMapper.
Container format
Docker Engine combines the
namespaces, control groups, and
UnionFS into a wrapper called a container format. The default container format is
libcontainer.
In the future, Docker may support other container formats by integrating with technologies such as BSD Jails or Solaris Zones.
https://docs.docker.com/engine/docker-overview/#the-underlying-technology
- Unionfs: A Stackable Unification File System
This project builds a stackable unification file system, which can appear to merge the contents of several directories (branches), while keeping their physical content separate.
Unionfs is useful for
unified source tree management, merged contents of split CD-ROM, merged separate software package directories, data grids, and more.
http://unionfs.filesystems.org/
- Kernel Korner - Unionfs: Bringing Filesystems Together
In this situation,
unioning allows administrators to keep such files separate physically, but to merge them logically into a single view. A collection of merged directories
is called a union, and
each physical directory is called a branch
https://www.linuxjournal.com/article/7714
Harbor is an open source cloud native registry that stores, signs, and scans container images for vulnerabilities.
It fills a gap for organizations and applications that cannot use a public or cloud-based registry, or want a consistent experience across clouds.
https://goharbor.io/