Thursday, July 12, 2018

python

  •  Python, an interpreted, interactive, object-oriented, extensible programming language.
  •  http://www.python.org/

  • Data Science and Machine Learning
    Connect to your big data and databases including Hadoop, Redis, MongoDB, MySQL, ODBC
    Prepare, analyze and visualize your data with NumPy, SciPy, Pandas, MatPlotLib and more
    Build and train machine learning models with TensorFlow, Theano and Keras
    Accelerate your numerical computations with the Intel Math Kernel Library (MKL)

    Get up and running in minutes whether an individual or large team
    Develop web applications with frameworks like Django and Flask
    Deploy to AWS or Google Cloud
    Secure your applications with pyOpenSSL, Cryptography and OAuthLib
    Test and ensure code quality with pytest, nose, selenium, coverage and flake8
https://www.activestate.com/activepython


  • Dask.distributed

Dask.distributed is a lightweight library for distributed computing in Python.
Architecture
Dask.distributed is a centrally managed, distributed, dynamic task scheduler. The central dask-scheduler process coordinates the actions of several dask-worker processes spread across multiple machines and the concurrent requests of several clients.
http://distributed.dask.org/en/latest/


  • Distributed Pandas on a Cluster with Dask DataFrames 

Summary
Dask Dataframe extends the popular Pandas library to operate on big data-sets on a distributed cluster.

Introduction: Pandas is intuitive and fast, but needs Dask to scale
Read CSV and Basic operations

    Read CSV
    Basic Aggregations and Groupbys
    Joins and Correlations

Shuffles and Time Series
Parquet I/O

https://matthewrocklin.com/blog/work/2017/01/12/dask-dataframes
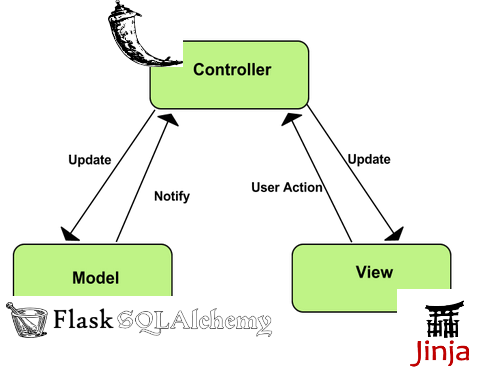
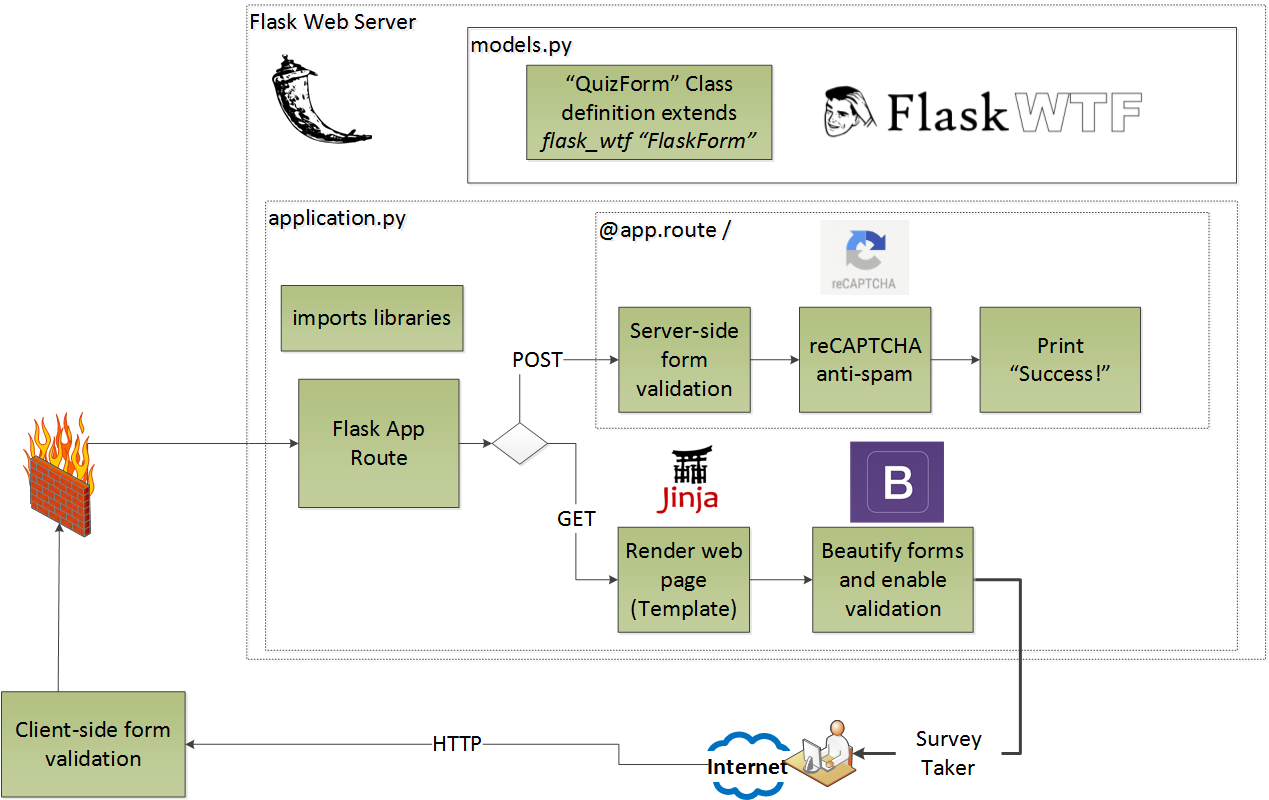

  • Flask is a microframework for Python based on Werkzeug, Jinja 2 and good intentions

http://flask.pocoo.org/
  • The main reason why need an API is because client-side Javascript libraries like ReactJS cannot communicate directly with your database (which resides on the server) directly. Though Server side Javascript like NodeJS can do that.

https://danidee10.github.io/2016/10/05/flask-by-example-5.html

  • Buidling a database driven RESTFUL JSON API in Python 3 with Flask Flask-Restful and SQLAlchemy

What is REST?
REST is  a programming style which describes how data should be transferred between two systems on the Internet
The key principles of REST are as follows:
Client–server : There must be a clear separation between client and server such that clients are not concerned with data storage and servers are not concerned with the User Interface.
Stateless: State information is not stored on the server.  A client  request must contain all information like session to service the request.
Cacheable : The server must indicate if  request data is cacheable.
Layered system: To improve performance instead of an API server intermediaries like load balancers must be able to serve requests.
Uniform interface : The communication method between the client and server must be uniform.
Code on demand (optional) : Servers can provide executable code for the client to download and execute.
It is also important to note that REST is not a standard but encourages the use of standards such as the JSON API
Flask-Restful: will be used to define our API endpoints and bind them to Python Classes.
Flask-SQLAlchemy: will be used to define our database models using the underlying SQLAlchmey ORM framework.
Marshmallow: is used to Serailize/Deserialize JSON data to python objects and vice versa. We will also use it for validation.
Marshmallow-jsonapi:   Is a modified version of Marshmallow which will produce JSON API-compliant data.
Psycopg2 : Python database driver for PostgresSQL, if you are using MySQL then you can install PyMySQL
Flask-Migrate and Flask-Script: will be used for database migrations.

Installation
Flask-Restful: will be used to define our API endpoints and bind them to Python Classes.
Flask-SQLAlchemy: will be used to define our database models using the underlying SQLAlchmey ORM framework.
Marshmallow: is used to Serailize/Deserialize JSON data to python objects and vice versa. We will also use it for validation.
Marshmallow-jsonapi:   Is a modified version of Marshmallow which will produce JSON API-compliant data.
Psycopg2 : Python database driver for PostgresSQL
if you are using MySQL then you can install PyMySQL
Flask-Migrate and Flask-Script: will be used for database migrations.

Defining Database Models  and Validation Schema with Flask-SQLAlchemy and Marshmallow_jsonapi
Flask-SQLAlchemy's provides access to the SQLAlchemy Object Relation Mapper (ORM) .


https://techarena51.com/blog/buidling-a-database-driven-restful-json-api-in-python-3-with-flask-flask-restful-and-sqlalchemy/
  • Sanic is a Flask-like Python 3.5+ web server that’s written to go fast.

Sanic supports async request handlers.
This means you can use the new shiny async/await syntax from Python 3.5, making your code non-blocking and speedy.
https://sanic.readthedocs.io/en/latest/
  • Domain and codomain simplified

Domain is a set where x values are stored and the codomain is a set where y values are stored.

Injection: the injection class means that each x value/element of the 2d coordinate system has a corresponding y value of the coordinate system, in other words every x value in a set (this set is called the domain) is connected to an appropriate/corresponding y value in the other set (this set is called the codomain).
In order for a function to be injective all of the values from x must be connected to all of the appropriate/corresponding values to y.
Injection is also called one to one relationship since every x value MUST match the corresponding y value.

If a value remains without a connection in any of the sets (domain & codomain) or if there are multiple connections for example from the x values/elements from the domain to one y value from the codomain (vice versa) then the function is NOT injective.

the surjection class means that each x value/element in the domain of the 2d coordinate system has AT LEAST ONE (but can have multiple, most often two) corresponding values/elements in the codomain.
Surjection is also called onto function.

the bijection function class represents the injection and surjection combined, both of these two criteria’s have to be met in order for a function to be bijective

If a function is neither injective, surjective nor bijective, then the function is just called: General function

Horizontal lines actually tell us which class does NOT BELONG TO THE FUNCTION  (injection, surjection)
Vertical lines are test which evaluate the existence of the function. This means that they determine if the graph inside a coordinate system is really a function  or  it isn’t.
https://programmingcroatia.com/2016/02/11/math-functions-classes-injections-surjection-bijection/


  • A function f from A to B is an assignment of exactly one element of B to each element of A (A and B are non-empty sets). A is called Domain of f and B is called co-domain of f. If b is the unique element of B assigned by the function f to the element a of A, it is written as f(a) = b. f maps A to B. means f is a function from A to B, it is written as f: A -.> B


Terms related to functions:

    Domain and co-domain – if f is a function from set A to set B, then A is called Domain and B is called co-domain.
    Range – Range of f is the set of all images of elements of A. Basically Range is subset of co- domain.
    Image and Pre-Image – b is the image of a and a is the pre-image of b if f(a) = b.
https://www.geeksforgeeks.org/functions-properties-and-types-injective-surjective-bijective/


  • (If we want to encode information without losing data, we need to make sure that no two keys map to the same value, i.e. the mapping has to be injective. Later, we want to reverse the mapping -- to decode a coded message -- and will need that the mapping has to be bijective, i.e. there has to be a one-to-one correspondence between input and output sets.)

https://www.southampton.ac.uk/~fangohr/training/python/labs/lab9/index.html
  • Go vs. Python


The true strength of Go is that it's succinct and minimalistic and fast
Go is much more verbose than Python. It just takes so much more lines to say the same thing.
Goroutines are awesome. They're a million times easier to grok than Python's myriad of similar solutions.
Go doesn't have the concept of "truthy" which I already miss. I.e. in Python you can convert a list type to boolean and the language does this automatically by checking if the length of the list is 0.
Go gives you very few choices (e.g. there's only one type of loop and it's the for loop) but you often have a choice to pass a copy of an object or to pass a pointer. Those are different things but sometimes I feel like the computer could/should figure it out for me.
I love the little defer thing which means I can put "things to do when you're done" right underneath the thing I'm doing. In Python you get these try: ...20 lines... finally: ...now it's over... things.
Everything about Go and Go tools follow the strict UNIX pattern to not output anything unless things go bad.

https://www.peterbe.com/plog/govspy


  • Differences Between To Python vs Go


Python is a general-purpose programming language
Python supports multiple programming paradigms and comes up with a large standard library, paradigms included are object-oriented, imperative, functional and procedural.
the most wanted scripting language in modern software development which varies from infrastructure management to data analysis

Go supports multi-paradigm like procedural, functional and concurrent. Its syntax is traditionally coming from C
Most of the features about Go and its tools follow the UNIX pattern
You don’t have to compile your Go code to run it. It will be automatically compiled and run.
Although Go is not a scripting language like Python but people do write a lot of scripts with it.
Go can act as a very powerful tool when it comes to web-programming, micro-services or mobile development.
In many use cases, Go web development has proved to be more rapid than Python.

Concurrency is very different between Python and Go. Python includes lots of solid concurrency libraries but at the same time, it requires the developer to be clean about side effects and isolation. With Go one can write concurrent programs which operate on multiple cores easily, similar to Python, the developer is responsible for side effects and isolation issues. Python concurrency process is more resource demanding as compare to Go, hence Go saves the resources of CPU and memory efficiently.

Key Differences Between Python vs Go
Python being a scripting language has to be interpreted whereas Go is faster most of the time since it does not have to consider anything at runtime.
Python does not provide built-in concurrency mechanism whereas Go has built-in concurrency mechanism.
When it comes to safety, Python is a strongly typed language which is compiled, hence adding a layer of security whereas Go is very decent since every variable must have a type associated with it. It means a developer cannot let away the details which will further lead to bugs.
Python is less verbose than Go to achieve the same functionality.
Python is still a favorite language when it comes to solving data science problems whereas Go is more ideal for system programming.
Python is dynamically typed language whereas Go is a statically typed language, which actually helps catch bugs at compile time which can further reduce serious bugs later in the production.
Python is great for basic programming, using it can become complicated if one wishes to build complex systems whereas, with Go, the same task can be accomplished rapidly without going into subtleties of programming language.

Both Python and Go can be immediately installed regardless of operating system, thus bringing in a cross-platform feature.

Python can be virtually utilized across domains like web development, animation, graphics, machine learning. It is mainly used in data science and holds a good number of libraries for scientific computing.

On the other hand, when it comes to networking services, Go has become a breather.  It started as a system language but over a period, has built a reputation when it comes to networking services.

https://www.educba.com/python-vs-go/


  • the main 5 reasons why we choose Go over Python Django

#1 It Compiles Into Single Binary
Golang built as a compiled language
sing static linking it actually combining all dependency libraries and modules into one single binary file based on OS type and architecture.

#2 Static Type System
Go will let you know about this issue during compile time as a compiler error

#3 Performance
in most of the application cases Go is faster than Python (2 and 3)
For our case Go performed better because of his concurrency model and CPU scalability
Whenever we need to process some internal request we are doing it with separate Goroutine, which are 10x cheaper in resources than Python Threads

#4 You Don’t Need Web Framework For Go
For example it has http, json, html templating built in language natively and you can build very complex API services without even thinking about finding library on Github

#5 Great IDE support and debugging


We got about 30% more performance on our Backend and API services. And now we can handle logging real time, transfer it to database and make a streaming with Websocket from single or multiple services

https://hackernoon.com/5-reasons-why-we-switched-from-python-to-go-4414d5f42690


  • A virtual environment is a way of giving each of your Python projects a separate and isolated world to run in, with its own version of Python and installed libraries.


Using a Virtual Environment
When working at the command line, you can put the virtual environment's "bin" directory first on your PATH, what we call "activating" the environment, and from then on, anytime you run python, you'll be running in the environment

#!/usr/bin/env python

By using the "/usr/bin/env" version, you'll get the first copy of Python that's on your PATH, and if you've activated a virtual environment, your script will run in that environment.)
Virtual environments provide a "bin/activate" script that you can source from your shell to activate them


https://www.caktusgroup.com/blog/2016/11/03/managing-multiple-python-projects-virtual-environments/


  • Consider the following scenario where you have two projects: ProjectA and ProjectB, both of which have a dependency on the same library, ProjectC. The problem becomes apparent when we start requiring different versions of ProjectC. Maybe ProjectA needs v1.0.0, while ProjectB requires the newer v2.0.0, for example.


This is a real problem for Python since it can’t differentiate between versions in the site-packages directory. So both v1.0.0 and v2.0.0 would reside in the same directory with the same name:
Since projects are stored according to just their name, there is no differentiation between versions. Thus, both projects, ProjectA and ProjectB, would be required to use the same version,

What Is a Virtual Environment?
This means that each project can have its own dependencies, regardless of what dependencies every other project has
The great thing about this is that there are no limits to the number of environments you can have since they’re just directories containing a few scripts.
created using the virtualenv or pyenv command line tools.

Using Virtual Environments

if you’re not using Python 3, you’ll want to install the virtualenv tool with pip:
pip install virtualenv

If you are using Python 3, then you should already have the venv module from the standard library installed

Start by making a new directory to work with:
$ mkdir python-virtual-environments && cd python-virtual-environments
Create a new virtual environment inside the directory:
# Python 2:
$ virtualenv env

# Python 3
$ python3 -m venv env


By default, this will not include any of your existing site packages

The Python 3 venv approach has the benefit of forcing you to choose a specific version of the Python 3 interpreter that should be used to create the virtual environment. This avoids any confusion as to which Python installation the new environment is based on.

More interesting are the activate scripts in the bin directory. These scripts are used to set up your shell to use the environment’s Python executable and its site-packages by default.

In order to use this environment’s packages/resources in isolation, you need to “activate” it
$ source env/bin/activate
(env) $

Let’s say we have bcrypt installed system-wide but not in our virtual environment.
Before we test this, we need to go back to the “system” context by executing deactivate
(env) $ deactivate
$

Now your shell session is back to normal, and the python command refers to the global Python
Now, install bcrypt and use it to hash a password
$ pip -q install bcrypt
$ python -c "import bcrypt; print(bcrypt.hashpw('password'.encode('utf-8'), bcrypt.gensalt()))"
$2b$12$vWa/VSvxxyQ9d.WGgVTdrell515Ctux36LCga8nM5QTW0.4w8TXXi

if we try the same command when the virtual environment is activated:
$ source env/bin/activate
(env) $ python -c "import bcrypt; print(bcrypt.hashpw('password'.encode('utf-8'), bcrypt.gensalt()))"

In one instance, we have bcrypt available to us, and in the next we don’t. This is the kind of separation we’re looking to achieve with virtual environments


let’s first check out the locations of the different python executables. With the environment “deactivated,”
$ which python
/usr/bin/python

activate it and run the command again
$ source env/bin/activate
(env) $ which python

deactivated
$ echo $PATH

activated
$ source env/bin/activate
(env) $ echo $PATH


    What’s the difference between these two executables anyway?
This can be explained by how Python starts up and where it is located on the system. There actually isn’t any difference between these two Python executables. It’s their directory locations that matter.When Python is starting up, it looks at the path of its binary. In a virtual environment, it is actually just a copy of, or symlink to, your system’s Python binary.It then sets the location of sys.prefix and sys.exec_prefix based on this location, omitting the bin portion of the path.


    How is the virtual environment’s Python executable able to use something other than the system’s site-packages?
    The path located in sys.prefix is then used for locating the site-packages directory by searching the relative path lib/pythonX.X/site-packages/, where X.X is the version of Python you’re using.

Managing Virtual Environments With virtualenvwrapper
It’s just some wrapper scripts around the main virtualenv tool.

Organizes all of your virtual environments in one location
    Provides methods to help you easily create, delete, and copy environments
    Provides a single command to switch between environments

download the wrapper with pip
$ pip install virtualenvwrapper

$ which virtualenvwrapper.sh

start a new project
$ mkvirtualenv my-new-project
(my-new-project) $

 stop using that environment
 (my-new-project) $ deactivate
 $

 list environments
 $ workon
my-new-project
my-django-project
web-scraper

 $ workon web-scraper
(web-scraper) $


virtualenv has a parameter -p that allows you to select which version of Python to use
create a new Python 3 environment
$ virtualenv -p $(which python3) blog_virtualenv

substitute python3 for python2 (or python if you system defaults to python2).

Using Different Versions of Python
Unlike the old virtualenv tool, pyvenv doesn’t support creating environments with arbitrary versions of Python, which means you’re stuck using the default Python 3 installation for all of the environments you create.

There are quite a few ways to install Python, but few of them are easy enough or flexible enough to frequently uninstall and re-install different versions of the binary.
This is where pyenv comes in to play.

Despite the similarity in names (pyvenv vs pyenv), pyenv is different in that its focus is to help you switch between Python versions on a system-level as well as a project-level. While the purpose of pyvenv is to separate out modules, the purpose of pyenv is to separate Python versions.

https://realpython.com/python-virtual-environments-a-primer/

  • How to use Python virtualenv

What is Virtualenv?
A Virtual Environment is an isolated working copy of Python which
allows you to work on a specific project without worry of affecting other projects

It enables multiple side-by-side installations of Python
It doesn’t actually install separate copies of Python
it does provide a clever way to keep different project environments isolated.

(add --no-site-packages if you want to isolate your environment from the main site
packages directory)

What did Virtualenv do?
Packages installed here will not affect the global Python installation.
Virtualenv does not create every file needed to get a whole new python environment
It uses links to global environment files instead of in order to save disk space end
speed up your virtualenv.
Therefore, there must already have an active python environment installed on your
system.
You don't have to use sudo since the files will all be installed in the virtualenv
/lib/python2.7/site-packages directory which was created as your own user account

https://www.pythonforbeginners.com/basics/how-to-use-python-virtualenv/

  • virtualenvwrapper should be installed into the same global site-packages area where virtualenv is installed. You may need administrative privileges to do that. 


virtualenv lets you create many different Python environments. You should only ever install virtualenv and virtualenvwrapper on your base Python installation (i.e. NOT while a virtualenv is active) so that the same release is shared by all Python environments that depend on it.

https://virtualenvwrapper.readthedocs.io/en/latest/install.html

  • The headaches of dependency management are common to developers. One errant update requires hours of research to correct.  Often multiple applications overlap on library dependency requirements.  This could cause two applications running in the same environment to require two version of the same library.  These type of conflicts could cause a number of issues both in development and production.Enter VirtualenvVirtualenv is a tool that creates dependency silos.  It allows you to deploy applications to a single environment with isolated dependencies. Docker employs a similar strategy at the OS level. Virtualenv segregates only at the Python and library level — that is, the environments Python executable and libraries are unique to that virtual environment.  So instead of using the libraries installed at the OS environment level, you can separate Python versions and libraries into siloed virtual environments.  This allows you to deploy multiple applications in the same OS environment with different versions of the same dependencies.
https://linuxhint.com/python-virtualenv-tutorial/
  • The venv module provides support for creating lightweight “virtual environments” with their own site directories, optionally isolated from system site directories. Each virtual environment has its own Python binary (which matches the version of the binary that was used to create this environment) and can have its own independent set of installed Python packages in its site directories.
https://docs.python.org/3/library/venv.html

  • pip
Let's dive in. pip is a tool for installing Python packages from the Python Package Index.

PyPI (which you'll occasionally see referred to as The Cheeseshop) is a repository for open-source third-party Python packages. It's similar to 
RubyGems in the Ruby world, 
PHP's Packagist
CPAN for Perl, and 
NPM for Node.js.

Python actually has another, more primitive, package manager called easy_install, which is installed automatically when you install Python itself

virtualenv
virtualenv solves a very specific problem: it allows multiple Python projects that have different (and often conflicting) requirements, to coexist on the same computer.

How does virtualenv help?
virtualenv solves this problem by creating a completely isolated virtual environment for each of your programs. An environment is simply a directory that contains a complete copy of everything needed to run a Python program, including a copy of the python binary itself, a copy of the entire Python standard library, a copy of the pip installer, and (crucially) a copy of the site-packages directory mentioned above. When you install a package from PyPI using the copy of pip that's created by the virtualenv tool, it will install the package into the site-packages directory inside the virtualenv directory.

Usually pip and virtualenv are the only two packages you ever need to install globally, because once you've got both of these you can do all your work inside virtual environments.
In fact, virtualenv comes with a copy of pip which gets copied into every new environment you create, so virtualenv is really all you need

How do I use my shiny new virtual environment?
The one you care about the most is bin. This is where the local copy of the python binary and the pip installer exists

Instead of typing env/bin/python and env/bin/pip every time, we can run a script to activate the environment.

Requirements files
virtualenv and pip make great companions, especially when you use the requirements feature of pip. Each project you work on has its own requirements.txt file, and you can use this to install the dependencies for that project into its virtual environment:
https://www.dabapps.com/blog/introduction-to-pip-and-virtualenv-python/

  • Installing Pipenv

Pipenv is a dependency manager for Python projects. If you’re familiar with Node.js’ npm or Ruby’s bundler, it is similar in spirit to those tools.

Lower level: virtualenv
virtualenv is a tool to create isolated Python environments. virtualenv creates a folder which contains all the necessary executables to use the packages that a Python project would need.
It can be used standalone, in place of Pipenv.

virtualenvwrapper
virtualenvwrapper provides a set of commands which makes working with virtual environments much more pleasant. It also places all your virtual environments in one place.

https://docs.python-guide.org/dev/virtualenvs/

  • Logically, a Requirements file is just a list of pip install arguments placed in a file.


there are 4 common uses of Requirements files:

1-Requirements files are used to hold the result from pip freeze for the purpose of achieving repeatable installations. In this case, your requirement file contains a pinned version of everything that was installed when pip freeze was run.
2-Requirements files are used to force pip to properly resolve dependencies. As it is now, pip doesn’t have true dependency resolution, but instead simply uses the first specification it finds for a project.
3-Requirements files are used to force pip to install an alternate version of a sub-dependency.
4-Requirements files are used to override a dependency with a local patch that lives in version control

Constraints Files
Constraints files are requirements files that only control which version of a requirement is installed, not whether it is installed or not. Their syntax and contents is nearly identical to Requirements Files. There is one key difference: Including a package in a constraints file does not trigger the installation of the package.
Constraints files are used for exactly the same reason as requirements files when you don’t know exactly what things you want to install. For instance, say that the “helloworld” package doesn’t work in your environment, so you have a locally patched version. Some things you install depend on “helloworld”, and some don’t.

One way to ensure that the patched version is used consistently is to manually audit the dependencies of everything you install, and if “helloworld” is present, write a requirements file to use when installing that thing.

Constraints files offer a better way: write a single constraints file for your organisation and use that everywhere. If the thing being installed requires “helloworld” to be installed, your fixed version specified in your constraints file will be used.
https://pip.pypa.io/en/latest/user_guide/#requirements-files

  • Installing Python Modules

Alternate Installation
Often, it is necessary or desirable to install modules to a location other than the standard location for third-party Python modules. For example, on a Unix system you might not have permission to write to the standard third-party module directory. 

Or you might wish to try out a module before making it a standard part of your local Python installation. This is especially true when upgrading a distribution already present: you want to make sure your existing base of scripts still works with the new version before actually upgrading.

Note that the various alternate installation schemes are mutually exclusive: you can pass --user, or --home, or --prefix and --exec-prefix, or --install-base and --install-platbase, but you can’t mix from these groups.

Alternate installation: the user scheme
This scheme is designed to be the most convenient solution for users that don’t have write permission to the global site-packages directory or don’t want to install into it. It is enabled with a simple option:

https://docs.python.org/3/install/index.html#alternate-installation-the-user-scheme
  • User Installs
With Python 2.6 came the “user scheme” for installation, which means that all Python distributions support an alternative install location that is specific to a user. The default location for each OS is explained in the python documentation for the site.USER_BASE variable. This mode of installation can be turned on by specifying the –user option to pip install.

Moreover, the “user scheme” can be customized by setting the PYTHONUSERBASE environment variable, which updates the value of site.USER_BASE.

Pinned Version Numbers
Pinning the versions of your dependencies in the requirements file protects you from bugs or incompatibilities in newly released versions:

https://pip.pypa.io/en/latest/user_guide/#requirements-files

  • OpenCanary is a daemon that runs several canary versions of services that alerts when a service is (ab)used.

Prerequisites
    Python 2.7
    [Optional] SNMP requires the python library scapy
    [Optional] RDP requires the python library rdpy
    [Optional] Samba module needs a working installation of samba

Installation on Ubuntu:

$ sudo apt-get install python-dev python-pip python-virtualenv
$ virtualenv env/
$ . env/bin/activate
$ pip install opencanary
$ pip install scapy pcapy # optional

virtualenv is a tool to create isolated Python environments. virtualenv creates a folder which contains all the necessary executables to use the packages that a Python project would need.

https://github.com/thinkst/opencanary
  • JSON supports primitive types, like strings and numbers, as well as nested lists and objects.

Python Supports JSON Natively
https://realpython.com/python-json/


  • JSONPlaceholder

Fake Online REST API for Testing and Prototyping
https://jsonplaceholder.typicode.com


  • jq is a fast, lightweight, flexible, CLI JSON processor. jq stream-processes JSON like awk stream processes text. jq, coupled with cURL

http://blog.librato.com/posts/jq-json


  • The json module enables you to convert between JSON and Python Objects. 

https://pythonspot.com/json-encoding-and-decoding-with-python/


  • JSON stands for JavaScript Object notation and is an open standard human readable data format.

Popular alternatives to JSON are YAML and XML.
An empty JSON file simply contains two curly braces {}
https://codingnetworker.com/2015/10/python-dictionaries-json-crash-course/
  • Gensim is a FREE Python library

Scalable statistical semantics
Analyze plain-text documents for semantic structure
https://radimrehurek.com/gensim/


  • statsmodels is a Python module that provides classes and functions for the estimation of many different statistical models, as well as for conducting statistical tests, and statistical data exploration

http://www.statsmodels.org/stable/index.html


  • Nilearn is a Python module for fast and easy statistical learning on NeuroImaging data.

https://nilearn.github.io/


  • Numenta Platform for Intelligent Computing is an implementation of Hierarchical Temporal Memory (HTM), a theory of intelligence based strictly on the neuroscience of the neocortex

https://numenta.org/


  • PyMC is a python module that implements Bayesian statistical models and fitting algorithms, including Markov chain Monte Carlo.

https://pymc-devs.github.io/pymc/README.html


  • NumPy, which stands for Numerical Python, is a library consisting of multidimensional array objects and a collection of routines for processing those arrays. Using NumPy, mathematical and logical operations on arrays can be performed.

https://www.tutorialspoint.com/numpy/index.htm


  • Using NumPy, a developer can perform the following operations −


    Mathematical and logical operations on arrays.

    Fourier transforms and routines for shape manipulation.

    Operations related to linear algebra. NumPy has in-built functions for linear algebra and random number generation.

NumPy – A Replacement for MatLab
NumPy is often used along with packages like SciPy (Scientific Python) and Mat−plotlib (plotting library). This combination is widely used as a replacement for MatLab, a popular platform for technical computing.
https://www.tutorialspoint.com/numpy/numpy_introduction.htm


  • Standard Python distribution doesn't come bundled with NumPy module. A lightweight alternative is to install NumPy using popular Python package installer, pip.

The best way to enable NumPy is to use an installable binary package specific to your operating system. These binaries contain full SciPy stack (inclusive of NumPy, SciPy, matplotlib, IPython, SymPy and nose packages along with core Python).

https://www.tutorialspoint.com/numpy/numpy_environment.htm


  • NumPy’s main object is the homogeneous multidimensional array. It is a table of elements (usually numbers), all of the same type, indexed by a tuple of positive integers. In NumPy dimensions are called axes.

https://docs.scipy.org/doc/numpy-1.15.1/user/quickstart.html

  • SymPy is a computer algebra system written in the Python programming language. Among its many features are algorithms for computing derivatives, integrals, and limits; functions for manipulating and simplifying expressions; functions for symbolically solving equations and ordinary and partial differential equations; two- and three-dimensional (2D and 3D) plotting

http://www.admin-magazine.com/HPC/Articles/Symbolic-Mathematics-with-Python-s-SymPy-Library
  • Python is a great general-purpose programming language on its own, but with the help of a few popular libraries (numpy, scipy, matplotlib) it becomes a powerful environment for scientific computing.

http://cs231n.github.io/python-numpy-tutorial/


  • NumPy is an open source library available in Python that aids in mathematical, scientific, engineering, and data science programming

For any scientific project, NumPy is the tool to know. It has been built to work with the N-dimensional array, linear algebra, random number, Fourier transform, etc. It can be integrated to C/C++ and Fortran.
In this part, we will review the essential functions that you need to know for the tutorial on 'TensorFlow.'
https://www.guru99.com/numpy-tutorial.html

  • SciPy, a scientific library for Python is an open source, BSD-licensed library for mathematics, science and engineering. The SciPy library depends on NumPy, which provides convenient and fast N-dimensional array manipulation

https://www.tutorialspoint.com/scipy/s
  • Nose Testing - Framework

It was written by Jason Pellerin to support the same test idioms that had been pioneered by py.test, but in a package that is easier to install and maintain.
https://www.tutorialspoint.com/unittest_framework/nose_testing_framework.htm


  • Nose’s tagline is “nose extends unit test to make testing easier.

It’s is a fairly well-known python unit test framework, and can run doc tests, unit tests, and “no boilerplate” tests.
http://pythontesting.net/framework/nose/nose-introduction/


  • Beautiful Soup is a Python library for pulling data out of HTML and XML files.

One common task is extracting all the URLs found within a page’s 'a' tags
Another common task is extracting all the text from a page
let's grab all the links from Reddit
https://www.pythonforbeginners.com/beautifulsoup/beautifulsoup-4-python


  • Scrapy is an application framework for crawling web sites and extracting structured data which can be used for a wide range of useful applications, like data mining, information processing or historical archival.

Even though Scrapy was originally designed for web scraping, it can also be used to extract data using APIs (such as Amazon Associates Web Services) or as a general purpose web crawler.
https://scrapy.readthedocs.io/en/latest/intro/overview.html

  • Django

Django is a high-level Python Web framework that encourages rapid development and clean, pragmatic design.
https://www.djangoproject.com/


  • web2py

Free open source full-stack framework for rapid development of fast, scalable, secure and portable database-driven web-based applications.
Written and programmable in Python.
http://www.web2py.com/


  • The Python SQL Toolkit and Object Relational Mapper

SQLAlchemy is the Python SQL toolkit and Object Relational Mapper that gives application developers the full power and flexibility of SQL.
It provides a full suite of well known enterprise-level persistence patterns, designed for efficient and high-performing database access, adapted into a simple and Pythonic domain language.
https://www.sqlalchemy.org/


  • Distributed Evolutionary Algorithms in Python

DEAP is a novel evolutionary computation framework for rapid prototyping and testing of
ideas. It seeks to make algorithms explicit and data structures transparent.
https://pypi.org/project/deap/


  • Gunicorn

Gunicorn 'Green Unicorn' is a Python WSGI HTTP Server for UNIX. It's a pre-fork worker model ported from Ruby's Unicorn project.
http://gunicorn.org/

  • Asynchronous HTTP Client/Server for asyncio and Python.

https://aiohttp.readthedocs.io/en/stable/

  • Why do I need  Anaconda Distribution?
Installing Python in a terminal is no joy. Many scientific packages require a specific version
of Python to run, and it's difficult to keep them from interacting with each other. It is even
harder to keep them updated. Anaconda Distribution makes getting and maintaining
these packages quick and easy

What is
Anaconda Distribution?
It is an open source, easy-to-install high performance Python and R distribution, with the
conda package and environment manager and collection of 1,000+ open source packages
with free community support.


what is Miniconda
It’s Anaconda Distribution without the collection of 1,000+ open source packages.
With Miniconda you install only the packages you want with the conda command,
conda install PACKAGENAME
Example:
conda install anaconda-navigator

http://docs.anaconda.com/_downloads/Anaconda-Starter-Guide-Cheat-Sheet.pdf

  • There are two variants of the installer: Miniconda is Python 2 based and Miniconda3 is Python 3 based. Note that the choice of which Miniconda is installed only affects the root environment. Regardless of which version of Miniconda you install, you can still install both Python 2.x and Python 3.x environments.
https://conda.io/miniconda.html

  • Choose Anaconda if you:

    Are new to conda or Python.
    Like the convenience of having Python and over 150 scientific packages automatically installed at once.
    Have the time and disk space—a few minutes and 300 MB.
    Do not want to individually install each of the packages you want to use.

Choose Miniconda if you:

    Do not mind installing each of the packages you want to use individually.
    Do not have time or disk space to install over 150 packages at once.
    Want fast access to Python and the conda commands and you wish to sort out the other programs later


GUI versus command line installer
Both GUI and command line installers are available for Windows, macOS and Linux:

    If you do not wish to enter commands in a Terminal window, choose the GUI installer.
    If GUIs slow you down, choose the command line version.

Choosing a version of Python

    The last version of Python 2 is 2.7, which is included with Anaconda and Miniconda.
    The newest stable version of Python is 3.6, which is included with Anaconda3 and Miniconda3.
    You can easily set up additional versions of Python such as 3.5 by downloading any version and creating a new environment with just a few clicks


https://conda.io/docs/user-guide/install/download.html#choosing-a-version-of-python
  • Anaconda Distribution


With over 6 million users, the open source Anaconda Distribution is the fastest and easiest way to do Python and R data science and machine learning on Linux, Windows, and Mac OS X. It's the industry standard for developing, testing, and training on a single machine.
https://www.anaconda.com/what-is-anaconda/


  • Easily install 1,400+ data science packages for Python/R and manage your packages, dependencies, and

environments—all with the single click of a button. Free and open source
https://www.anaconda.com/distribution/


  • Anaconda is an open-source package manager, environment manager, and distribution of the Python and R programming languages.

Anaconda offers a collection of over 720 open-source packages, and is available in both free and paid versions. The Anaconda distribution ships with the conda command-line utility.

Installing Anaconda
The best way to install Anaconda is to download the latest Anaconda installer bash script, verify it, and then run it.

Setting Up Anaconda Environments
Anaconda virtual environments allow you to keep projects organized by Python versions and packages needed.
For each Anaconda environment you set up, you can specify which version of Python to use and can keep all of your related programming files together within that directory.
Since we are using the Anaconda with Python 3 in this tutorial, you will have access only to the Python 3 versions of packages.


    copy the hash from the site
    echo "HASH GOES HERE" > hashcheck.txt
    sha256sum Anaconda3-5.0.1-Linux-x86_64.sh | awk '{print $1;}' >> hashcheck.txt
    [optional] less hashcheck.txt
    cat hashcheck.txt | uniq | wc -l

Comments:
1 - pretty obvious.
2 - this creates hashcheck.txt with the hash as the only line of content.
3 - this runs the checksum, but then pipes (passes) that result to the awk command, which here takes everything up to the first space (in this case, the hash resulting from the checksum), and then appends that result to the hashcheck.txt file.
4 - [optional] this just displays the contents of the file so you can give it the eye test.
5 - if you don't trust your eyes with those long hash strings, even when mashed together in the file, run this command. this passes the contents of the file to check uniqueness, by line. The output is thus: 1 == they match, 2 == they do not match, and you should run away. :)


https://www.digitalocean.com/community/tutorials/how-to-install-the-anaconda-python-distribution-on-ubuntu-16-04


  • Package, dependency and environment management for any language—Python, R, Ruby, Lua, Scala, Java, JavaScript, C/ C++, FORTRAN

Conda is an open source package management system and environment management system that runs on Windows, macOS and Linux.
Conda quickly installs, runs and updates packages and their dependencies.
Conda easily creates, saves, loads and switches between environments on your local computer.
It was created for Python programs, but it can package and distribute software for any language

Conda as a package manager helps you find and install packages. If you need a package that requires a different version of Python, you do not need to switch to a different environment manager, because conda is also an environment manager. With just a few commands, you can set up a totally separate environment to run that different version of Python, while continuing to run your usual version of Python in your normal environment.

Conda can be combined with continuous integration systems such as Travis CI and AppVeyor to provide frequent, automated testing of your code.
Conda is also available on PyPI
s
https://conda.io/docs/index.html


  • Package, dependency and environment management for any language—Python, R, Ruby, Lua, Scala, Java, JavaScript, C/ C++, FORTRAN
Conda is an open source package management system and environment management system that runs on Windows, macOS and Linux.
Conda easily creates, saves, loads and switches between environments on your local computer
Conda as a package manager helps you find and install packages. If you need a package that requires a different version of Python, you do not need to switch to a different environment manager, because conda is also an environment manager.
https://conda.io/docs/


  • The Jupyter Notebook is an open-source web application that allows you to create and share documents that contain live code, equations, visualizations and narrative text. Uses include: data cleaning and transformation, numerical simulation, statistical modeling, data visualization, machine learning, and much more

http://jupyter.org/


  • IntelliJ IDEA Community Edition is the open source version of IntelliJ IDEA, an IDE (Integrated Development Environment) for Java, Groovy and other programming languages such as Scala or Clojure. It is made by JetBrains, maker of PyCharm Python IDE.
You should have both Miniconda and IntelliJ installed and working.
http://docs.anaconda.com/anaconda/user-guide/tasks/integration/intellij/

  • Eclipse and PyDev
Eclipse is an open source platform that provides an array of convenient and powerful code-editing and debugging tools. PyDev is a Python IDE that runs on top of Eclipse.
After you have Eclipse, PyDev, and Anaconda installed, set Anaconda Python as your default:
http://docs.anaconda.com/anaconda/user-guide/tasks/integration/eclipse-pydev/


  • Python for Visual Studio Code
Visual Studio Code (VSC) is a free cross-platform source code editor. The Python for Visual Studio Code extension allows VSC to connect to Python distributions installed on your computer.
If you’ve installed Anaconda as your default Python installation and installed Python for Visual Studio Code, your VSC installation is already set to use Anaconda’s Python interpreter.
http://docs.anaconda.com/anaconda/user-guide/tasks/integration/python-vsc/

  • Spyder, the Scientific PYthon Development EnviRonment, is a free integrated development environment (IDE) that is included with Anaconda. It includes editing, interactive testing, debugging and introspection features.
http://docs.anaconda.com/anaconda/user-guide/tasks/integration/spyder/

  • R is one of the most popular languages in the world for data science. Built specifically for working with data, R provides an intuitive interface to the most advanced statistical methods available today. Here are a few highlights of the language:
https://www.datacamp.com/onboarding


  • Installation of Python, Spyder, Numpy, Sympy, Scipy, Pytest, Matplotlib via Anaconda (2016)

we suggest to use the Anaconda Python distribution.


    numpy (NUMeric Python): matrices and linear algebra
    scipy (SCIentific Python): many numerical routines
    matplotlib: (PLOTting LIBrary) creating plots of data

    sympy (SYMbolic Python): symbolic computation
    pytest (Python TESTing): a code testing framework

The packages numpy, scipy and matplotlib are building stones of computational work with Python and extremely widely spread.
Sympy has a special role as it allows SYMbolic computation rather than numerical computation.
The pytest package and tool supports regression testing and test driven development -- this is generally important, and particularly so in best practice software engineering for computational studies and research.

Spyder (home page) is s a powerful interactive development environment for the Python language with advanced editing, interactive testing, debugging and introspection features.
The name SPYDER derives from "Scientific PYthon Development EnviRonment" (SPYDER).

Useful features include
    provision of the IPython (Qt) console as an interactive prompt, which can display plots inline
    ability to execute snippets of code from the editor in the console
    continuous parsing of files in editor, and provision of visual warnings about potential errors
    step-by-step execution
    variable explorer

Anaconda is one of several Python distributions. Python distributions provide the Python interpreter, together with a list of Python packages and sometimes other related tools, such as editors.

Running the tests with Spyder


http://www.southampton.ac.uk/~fangohr/blog/installation-of-python-spyder-numpy-sympy-scipy-pytest-matplotlib-via-anaconda.html


How to Install sklearn, numpy, & scipy with Anaconda on Windows 10 64-bit


Jupyter Notebook Tutorial: Introduction, Setup, and Walkthrough

  • What Is A Jupyter Notebook?

In this case, "notebook" or "notebook documents" denote documents that contain both code and rich text elements, such as figures, links, equations,
the ideal place to bring together an analysis description and its results as well as they can be executed perform the data analysis in real time.
"Jupyter" is a loose acronym meaning Julia, Python, and R. These programming languages were the first target languages of the Jupyter application


What Is The Jupyter Notebook App?
As a server-client application, the Jupyter Notebook App allows you to edit and run your notebooks via a web browse
Its two main components are the kernels and a dashboard.
A kernel is a program that runs and introspects the user’s code. The Jupyter Notebook App has a kernel for Python code, but there are also kernels available for other programming languages.
Project Jupyter started as a spin-off project from IPython. IPython is now the name of the Python backend, which is also known as the kernel.


How To Install Jupyter Notebook
Running Jupyter Notebooks With The Anaconda Python Distribution
Running Jupyter Notebook The Pythonic Way: Pip
Running Jupyter Notebooks in Docker Containers


To run the official Jupyter Notebook image in your Docker container, give in the following command in your Docker Quickstart Terminal:
docker run --rm -it -p 8888:8888 -v "$(pwd):/notebooks" jupyter/notebook

The "Files" tab is where all your files are kept, the "Running" tab keeps track of all your processes and the third tab, "Clusters", is provided by IPython parallel, IPython's parallel computing framework. It allows you to control many individual engines, which are an extended version of the IPython kernel.

Toggling Between Python 2 and 3 in Jupyter Notebooks

# Python 2.7
conda create -n py27 python=2.7 ipykernel
# Python 3.5
conda create -n py35 python=3.5 ipykernel

source activate py27
source deactivate

https://www.datacamp.com/community/tutorials/tutorial-jupyter-notebook

  • One of the most common question people ask is which IDE / environment / tool to use, while working on your data science projects

there is no dearth of options available – from language specific IDEs like R Studio, PyCharm to editors like Sublime Text or Atom
Jupyter Notebooks (previously known as iPython notebooks as well)
Jupyter Notebooks allow data scientists to create and share their documents, from codes to full blown reports.

Jupyter Notebook is an open-source web application that allows us to create and share codes and documents.
It provides an environment, where you can document your code, run it, look at the outcome, visualize data and see the results without leaving the environment
This makes it a handy tool for performing end to end data science workflows – data cleaning, statistical modeling, building and training machine learning models, visualizing data

Jupyter Notebooks really shine when you are still in the prototyping phase. This is because your code is written in indepedent cells, which are executed individually. This allows the user to test a specific block of code in a project without having to execute the code from the start of the scrip

allow you to run other languages besides Python, like R, SQL, etc

How to install Jupyter Notebook
you need to have Python installed on your machine first. Either Python 2.7 or Python 3.3 (or greater)

For new users, the general consensus is that you should use the Anaconda distribution to install both Python and the Jupyter notebook.
Anaconda installs both these tools and includes quite a lot of packages commonly used in the data science and machine learning community. 

The pip method
you decide not to use Anaconda, then you need to ensure that your machine is running the latest pip version.

Jupyter notebook will open up in your default web browser with the below URL
http://localhost:8888/tree

You can even use other languages in your Notebook, like R, Julia, JavaScript, etc

JupyterLab enables you to arrange your work area with notebooks, terminals, text files and outputs – all in one window

https://www.analyticsvidhya.com/blog/2018/05/starters-guide-jupyter-notebook/
  • IPython notebooks (more recently known as Jupyter notebooks) for the programming assignments. An IPython notebook lets you write and execute Python code in your web browser. IPython notebooks make it very easy to tinker with code and execute it in bits and pieces; for this reason IPython notebooks are widely used in scientific computing.

http://cs231n.github.io/ipython-tutorial/

  • Start IPython by issuing the ipython command from your shell, you should be greeted by the following:

Unlike the Python REPL, you will see that the input prompt is In [N]: instead of >>>.
https://ipython.readthedocs.io/en/stable/interactive/tutorial.html

  • The R Notebook Versus The Jupyter Notebook


Notebook Sharing
The source code for an R Markdown notebook is an .Rmd file.
when you save a notebook, an .nb.html file is created alongside it. 
This HTML file is an associated file that includes a copy of the R Markdown source code and the generated output.
You can publish your R Markdown notebook on any web server, GitHub or as an email attachment.
To share the notebooks you make in the Jupyter application, you can export the notebooks as slideshows, blogs, dashboards, etc

Code Execution
when you’re working with R because the R Markdown Notebook allows all R code pieces to share the same environment. However, this can prove to be a huge disadvantage if you’re working with non-R code pieces, as these don’t share environments.
in the Jupyter application,The code environment is shared between code cells.

Version control
The R Markdown notebooks seem to make this issue a bit easier to handle, as they have associated HTML files that save the output of your code and the fact that the notebook files are essentially plain text files, version control will be much easier. You can choose to only put your .Rmd file on GitHub or your other versioning system, or you can also include the .nb.html file.

Project Management
the Jupyter project is not native to any development kit: in that sense, it will cost some effort to integrate this notebook seamlessly with your projects.


https://www.datacamp.com/community/blog/jupyter-notebook-r#compare


  • R includes a powerful and flexible system (Sweave) for creating dynamic reports and reproducible research using LaTeX. Sweave enables the embedding of R code within LaTeX documents to generate a PDF file that includes narrative and analysis, graphics, code, and the results of computations.


knitr is an R package that adds many new capabilities to Sweave and is also fully supported by RStudio.

To use Sweave and knitr to create PDF reports, you will need to have LaTeX installed on your system. LaTeX can be installed following the directions on the LaTeX project page.
https://support.rstudio.com/hc/en-us/articles/200552056-Using-Sweave-and-knitr


  • Use R Markdown to publish a group of related data visualizations as a dashboard.

https://rmarkdown.rstudio.com/flexdashboard/


  • Write HTML, PDF, ePub, and Kindle books with R Markdown

https://bookdown.org/


  • A dashboard has three parts: a header, a sidebar, and a body. Here’s the most minimal possible UI for a dashboard page.

https://rstudio.github.io/shinydashboard/get_started.html


  • Python(x,y) is a free scientific and engineering development software for numerical computations, data analysis and data visualization based on Python programming language, Qt graphical user interfaces and Spyder interactive scientific development environment. 

https://python-xy.github.io/


  •     Anaconda: A free distribution of Python with scientific packages. Supports Linux, Windows and Mac.

    Enthought Canopy: The free and commercial versions include the core scientific packages. Supports Linux, Windows and Mac.
    Python(x,y): A free distribution including scientific packages, based around the Spyder IDE. Windows and Ubuntu; Py2 only.
    WinPython: Another free distribution including scientific packages and the Spyder IDE. Windows only, but more actively maintained and supports the latest Python 3 versions.
    Pyzo: A free distribution based on Anaconda and the IEP interactive development environment. Supports Linux, Windows and Mac.
https://scipy.org/install.html


  • Spyder is an Integrated Development Environment (IDE) for scientific computing, written in and for the Python programming language. It comes with an Editor to write code, a Console to evaluate it and view the results at any time, a Variable Explorer to examine the variables defined during evaluation

http://www.southampton.ac.uk/~fangohr/blog/spyder-the-scientific-python-development-environment.html


  • Anaconda, Jupyter Notebook, TensorFlow and Keras for Deep Learning

There are different ways of installing TensorFlow:
    “native” pip or install from source
    install in a virtual environment with Virtualenv, Anaconda, or Docker.

Anaconda will enable you to create virtual environments and install packages needed for data science and deep learning. With virtual environments you can install specific package versions for a particular project or a tutorial without worrying about version conflicts.

Conda is a package manager to manage virtual environment and install packages.

Conda vs Pip install
You can use either conda or pip for installation in an virtual environment created with conda.

https://medium.com/@margaretmz/anaconda-jupyter-notebook-tensorflow-and-keras-b91f381405f8


  • IronPython is an open-source implementation of the Python programming language which is tightly integrated with the .NET Framework. IronPython can use the .NET Framework and Python libraries, and other .NET languages can use Python code just as easily.

http://ironpython.net/


  • Jython: Python for the Java Platform

How to use Java from Jython?
Using Java from Jython is as simple as importing the Java package that you'd like to use.
There are a variety of ways to use Jython from within Java. Perhaps the most widely used solution is to create an object factory in Java that coerces the Jython object into Java code. There are a multitude of ways create such a factory. Object factories can be created one-to-one with Jython classes, or they can be more loosely-coupled such that one factory implementation would work for any Jython object
http://www.jython.org


  • PyPy is a fast, compliant alternative implementation of the Python language (2.7.13 and 3.5.3). It has several advantages and distinct features:

http://pypy.org/


  • tox aims to automate and standardize testing in Python. It is part of a larger vision of easing the packaging, testing and release process of Python software.

        automatic customizable (re)creation of virtualenv test environments
        installs your setup.py based project into each virtual environment
        test-tool agnostic: runs pytest, nose or unittests in a uniform manner

Basic example
First, install tox with pip install tox. Then put basic information about your project and the test environments you want your project to run in into a tox.ini file residing right next to your setup.py file:
You can also try generating a tox.ini file automatically, by running tox-quickstart and then answering a few simple questions.
    Invoke is a general-purpose task execution library, similar to Make. Invoke is far more general-purpose than tox but it does not contain the Python testing-specific features that tox specializes in.
    Nox is a project similar in spirit to tox but different in approach. Nox’s key difference is that it uses Python scripts instead of a configuration file. Nox might be useful if you find tox’s configuration too limiting but aren’t looking to move to something as general-purpose as Invoke or Make.

https://tox.readthedocs.io/en/latest/

  •  tox is a generic virtualenv management and test command line tool you can use for:


    - checking your package installs correctly with different Python versions and interpreters

    - running your tests in each of the environments, configuring your test tool of choice

    - acting as a frontend to Continuous Integration servers, greatly reducing boilerplate and merging CI and shell-based testing.

This is a really simple example, envlist in the tox section specifies that we want to run the commands of the testenv section against two versions of python, in the example, our targets are 2.7 and 3.5. Tox will work by creating a separate virtualenv for each version and installing our package in both of them.

https://medium.com/@alejandrodnm/testing-against-multiple-python-versions-with-tox-9c68799c7880


  • However, it repeats a section (the list of available environments) from my tox.ini file, which is sad. I could get around this by giving up having individual build jobs, or by just saying that I’ll fix the file when I add an environment to tox to test.

https://www.dominicrodger.com/2013/07/26/tox-and-travis/


  • setup.py is the build script for setuptools.

https://packaging.python.org/tutorials/packaging-projects/#setup-py


  • Avoiding expensive sdist

Some projects are large enough that running an sdist, followed by an install every time can be prohibitively costly. To solve this, there are two different options you can add to the tox section. First, you can simply ask tox to please not make an sdist:
https://tox.readthedocs.io/en/latest/example/general.html#avoiding-expensive-sdist


  •  envlist(comma separated values)


    Determining the environment list that tox is to operate on happens in this order (if any is found, no further lookups are made):

        command line option -eENVLIST
        environment variable TOXENV
        tox.ini file’s envlist
https://tox.readthedocs.io/en/latest/config.html


  • KNIME makes understanding data and designing data science workflows and reusable components accessible to everyone.

KNIME Analytics Platform is the open source software for creating data science applications and services.
Build end to end data science workflows
Open and combine simple text formats (CSV, PDF, XLS, JSON, XML, etc), unstructured data types (images, documents, networks, molecules, etc), or time series data
Leverage Machine Learning and AI
Build machine learning models for classification, regression, dimension reduction, or clustering, using advanced algorithms including deep learning, tree-based methods, and logistic regression.
https://www.knime.com/knime-software/knime-analytics-platform

CI/Continuous Delivery/Continuous Deployment

For many, continuous integration is synonymous with using Automated Continuous Integration where a continuous integration server or daemon monitors the version control system for changes, then automatically runs the build process.
http://en.wikipedia.org/wiki/Continuous_integration

  • Continuous integration attempts to automate building and testing of source code at regular intervals in order to alert a team as early as possible about problems and merging issues


From Wikipedia: Continuous Integration, "In software engineering, continuous integration (CI) implements continuous processes of applying quality control — small pieces of effort, applied frequently. Continuous integration aims to improve the quality of software, and to reduce the time taken to deliver it, by replacing the traditional practice of applying quality control after completing all development."

From Martin Fowler: "Continuous Integration is a software development practice where members of a team integrate their work frequently, usually each person integrates at least daily - leading to multiple integrations per day. Each integration is verified by an automated build (including test) to detect integration errors as quickly as possible. Many teams find that this approach leads to significantly reduced integration problems and allows a team to develop cohesive software more rapidly."


http://obscuredclarity.blogspot.com/2012/04/continuous-integration-using-jenkins.html
  • the goal of CD is validation of every change, preferably in an automated way, so that it is potentially shippable.
The CI practices are:

    Keep everything under version control
    Automate the build
    Run unit test in the build
    Commit early and often
    Build each change
    Fix build errors immediately
    Keep the build fast
    Test in a clone of the production environment
    Make it easy to get the latest build results
    Ensure that the build process is transparent to everyone
    Automate the deployment

Continuous Delivery (CD) adds the following aspect to the Continuous Integration practices:
Any change passing the tests is immediately ready to be deployed to production, both from a technical and from a quality standpoint.
This means that the most current version of the product is successfully built, tested, and provided in a shippable format.
With a press of a button at any time, based on a release decision by the development team or delivery manager, it can be shipped to customers or deployed to production

Continuous Deployment, which is not discussed in this document, means that each change is automatically built, tested, and deployed to production without manual interaction.
https://www.sap.com/developer/tutorials/ci-best-practices-ci-cd.html
  • What is the difference between Continuous Integration, Continuous Deployment & Continuous Delivery?
Continuous Integration (CI) is a development practice where developers integrate code into a shared repository frequently, preferably several times a day. Each integration can then be verified by an automated build and automated tests. While automated testing is not strictly part of CI it is typically implied.

Continuous Deployment
is closely related to Continuous Integration and refers to keeping your application deployable at any point or even automatically releasing to a test or production environment if the latest version passes all automated tests.

Continuous Delivery
is the practice of keeping your codebase deployable at any point. Beyond making sure your application passes automated tests it has to have all the configuration necessary to push it into production. Many teams then do push changes that pass the automated tests into a test or production environment immediately to ensure a fast development loop.

https://codeship.com/continuous-integration-essentials

  • Continuous Integration Vs Continuous Delivery Vs Continuous Deployment
Continuous Delivery
Continuous delivery is an extension of CI. In this process, developed code is continuously delivered as soon as the developer deems it ready for being shipped.

Continuous Deployment 
Continuous Deployment (CD) is the next logical step after continuous delivery. It is the process of deploying the code directly to the production stage as soon as it is developed

Continuous Integration
Continuous Integration (CI) involves building and unit-testing the code changes immediately after the developer checks it in, thus enabling the newly incorporated changes to be continually tested.
http://www.saviantconsulting.com/blog/difference-between-continuous-integration-continuous-delivery-and-continuous-deployment.aspx

  • Continuous Delivery is about keeping your application in a state where it is always able to deploy into production. Continuous Deployment is actually deploying every change into production, every day or more frequently.

https://www.todaysoftmag.com/article/1068/continuous-delivery

  • Continuous integration with Maven 2, Archiva and Hudson
The term 'Continuous integration' originates from the Extreme Programming development process, where it is one of the 12 practices.
http://www.extremeprogramming.org/


  • Continuous Integration (CI) Best Practices with SAP – Pipeline Suggestions
CI/CD pipeline
The recommended process flow starts with the change by a developer

As a precondition for a merge, applying a 4-eyes principle by doing code reviews is a common practice. Gerrit for, example collects, feedback of human code reviewers together with voter build and test results in one common place as a prerequisite for the merge
When running a Continuous Delivery scenario, the requirements are much higher. The single change does not only have to be successfully integrated into the main line. After the qualification of every single change the product must still have a quality such that it could be released and deployed to production. T
To reach this, the change has to be deployed to an acceptance test system that by any means should correspond to the productive runtime system.
https://www.sap.com/developer/tutorials/ci-best-practices-pipelines.html

  • Jenkins vs Travis CI vs Circle CI vs TeamCity vs Codeship vs GitLab CI vs Bamboo
Travis CI
Travis CI is one of the more common names in the CI/CD ecosystem, created for open source projects
It’s focused on the CI level, improving the performance of the build process with automated testing and an alert system.
Developers can use Travis CI to watch the tests as they run, run a number of tests in parallel, and integrate the tool with Slack, HipChat, Email and so on to get notified of issues or unsuccessful builds.
It has a limited list of third-party integrations, but since the focus is on CI rather than CD
Price: While Travis CI offers free support for open source projects


Circle CI
Circle CI is a cloud-based tool that automates the integration and deployment process. 
The tool supports containers, OSX, Linux and can run within a private cloud or your own data center
The success or failure status of the builds and tests in question is sent via Slack, HipChat, IRC or a number of other integrations so the team can stay updated
For Linux users, the first container is free
Circle CI can auto-cancel redundant builds on GitHub.

https://blog.takipi.com/jenkins-vs-travis-ci-vs-circle-ci-vs-teamcity-vs-codeship-vs-gitlab-ci-vs-bamboo/

  • Continuous Delivery Part 1: The Deployment Pipeline

Continuous Delivery defines a set of Patterns to implement a rapid, reliable and stress-free process of Software delivery.

This is achieved by following a number of principles:
» Every check in Leads to a Potential Release
» This is very different to the Maven Snapshot-Release process of delivering Software
» Create a Repeatable, Reliable Process for Releasing Software
» Automate almost Everything
» Keep Everything in Version Control
» This includes code, test scripts, configuration, etc
» If It Hurts, Do It More Frequently, and Bring the Pain Forward
» Use the same release process and scripts for each environment
» Build Quality In
» Continuous Integration, Automated Functional Testing, Automated Deployment
» Everyone is Responsible for the Delivery Process
» DevOps – Encourage greater Collaboration between everyone involved in Software Delivery
» Continuous Improvement
» Refine and evolve your delivery platform

The most central pattern for achieving the above is creating a Deployment Pipeline.
This pipeline models the steps from committing a change, through building, testing, promoting and releasing it.
The first step usually builds the module and creates the project artifacts, these artifacts then pass along the pipeline, each step providing more confidence that the release will be successful.

Gates between steps can be automated or manually triggered depending on the work flow desired.
If all gates in the process are automated, this is known as Continuous Deployment.


The following Jenkins plug-ins are required to set up a pipeline such as the one above:
» Build Pipeline
» Groovy Builder – Required to set parameters for manual downstream jobs
» Parameterized Trigger – Required to trigger the next step with the same parameters

And the following plug-ins could be useful when building your pipeline:
» HTML Publisher – Useful for publishing reports such as the Living Documentation produced by functional tests
» Sonar – Integration with Sonar code analytics
» Join plugin – Useful when pipeline steps have forked for concurrent processing
» Performance plugin – Useful for running reporting Load tests
» Clone Workspace – Copies workspace to be used in another job


Build Process
Configuration management
Artifact management
Automated Functional Testing
Automated Deployment

Build Process
When using the Maven release plugin we generally build snapshots continuously until we are happy to create a release, at which point we perform a release.
Using the Maven release plugin this requires 3 builds, 2 POM transformations and 3 SCM revisions.
Versions are usually hard coded directly into the pom.

When following Continuous Delivery every CI build leads to a potential release meaning there is no concept of snapshots and we must provide a unique version number for each build.
This can be achieved by either using the maven command versions:set or by following the process as defined in the article
To set the release version of the artifact add an “Invoke top-level Maven targets” pre step with the command
versions:set -DnewVersion=$RELEASE_NO


Configuration management
Using a declarative configuration management tool such as puppet can ease this concern.
By storing the puppet manifests/modules in version control along with the artifact we can always match up releases with configuration and test them together.

Artifact management
The artifact should be build only once and then used throughout the pipeline.
An artifact repository such as Nexus/Artifactory should take care of this.
It is often preferable to set up a number of repos, one for each environment (e.g. test, UAT, staging, live).
This way we can grant permission to promote an artifact for an environment to one set of users (e.g. to signify UAT is complete) and then a different set can initialize the release.
We can also regularly clear out repositories used earlier in the pipeline (e.g. remove test artifacts older than 2 weeks, UAT artifacts older than 2 months).

Automated Functional Testing
Functional testing tools such as JBehaveFitnesse and Cucumber allow tests written in human readable form to be automated and run against a deployment.

Automated Deployment
this generally requires some kind of orchestration server (Possibly a Jenkins slave).
The responsibilities for this server may include updating puppet configs, deploying multiple artifacts to multiple servers in order, running database migrations (Liquibase is often useful for this task), running smoke tests to validate the deployment or performing automated rollback if something goes wrong.
Extra consideration is needed if zero-downtime deployments are required, for example data migrations will need to be forward/backward compatible.
Tools such as Control Tier, Rundeck and Capistrano can be used to help this process.

Continuous Delivery Part 2: Implementing a Deployment Pipeline with Jenkins
This basic pipeline will consist of a number of jobs:
1.Build the artifact
2.Acceptance testing
3.Deploy to Staging
4.Deploy to live

1.Build the artifact Job
The first job in your pipeline is usually responsible for setting the version number, building the artifact and deploying the artifact to an artifact repo. The build task may also include running unit tests, reporting code coverage and code analytics.

2.Acceptance testing Job
The next job is responsible deploying the artifact from the artifact repo into a test environment and then running a suite of automated acceptance tests against the deployment.
We will now add a trigger from the Build job to the Acceptance Test job. From within the Build Job configuration add a “Trigger parameterized buid on other projects” post-build action. In “Projects to Build” specify “Acceptance Test”. Finally Click on “Add Parameters” and select “Current build parameters” to pass our release number to the next job.

3.Deploy to Staging Job
Create a new free-style project job to named “Deploy to Staging”.
This job will be responsible for running the automated deployment and smoke test scripts against the staging environment.
This job should be a manually triggered gate in the pipeline.
To do this open the Acceptance Test job configuration and create a new “Build Pipeline Plugin -> Manually Execute Downstream Project” Post-build action.

4.Deploy to live
You can repeat the process with the “Deploy to Live” Job just like deploy to staging job?


Create the Pipeline
The final task is to create the pipeline. From the Jenkins homepage create a new view by clicking on the “+” tab next to “All”. Give the view a name and specify a “Build Pipeline View”.

http://www.agitech.co.uk/category/continuousdelivery/

  • How to Build True Pipelines with Jenkins and Maven

The essence of creating a pipeline is breaking up a single build process in smaller steps, each having its own responsibility
Lets define a true pipeline as being a pipeline that is strictly associated with a single revision within a version control system
This makes sense as ideally we want the build server to return full and accurate feedback for each single revision
As new revisions can be committed any time it is natural that multiple pipelines actually get executed next to each other.
If needed it is even possible to allow concurrent executions of the same build step for different pipelines.


Now lets say we have a continuous build for a multi-module top-level Maven project that we want to break up in the following steps, each step being executed by a separate Jenkins job.
1.create – checkout the head revision, compile and unit-test the code, build and archive the artifacts
2.integration test – run integration tests for these artifacts
3.live deploy – deploy artifacts to a live server
4.smoke test – run smoke tests for these deployed artifacts

For efficiency it is recommended to prevent doing work multiple times within the same pipeline, such as doing a full checkout, compiling code, testing code, building artifacts and archiving artifacts.

The different steps in a pipeline can typically be executed by activating different Maven profiles which actually reuse artifacts that have been created and archived in an upstream build within the same pipeline. The built-in automatic artifact archiving feature is enabled by default in Jenkins. This feature can often be disabled for downstream jobs as these jobs typically do not produce any artifact that need to be reused.


The Maven 2 Project Plugin sets the local maven repository by default to ~/.m2/repository.
Especially when implementing pipelines it is necessary to change this setting to local to the executor in order to prevent interference between concurrent pipeline builds.
if Jenkins nodes are running with multiple executors it is recommended to change the generic local maven repository setting anyway, as the local Maven repositories are not safe for concurrent access by different executors.

With the executors having each there own private local Maven repository, it is no longer needed to let a Maven build actually install the generated artifacts into the local repository, as there are no guarantees that the consecutive steps of the same pipeline are executed by the same executor. Furthermore, as we will see below, the artifacts that are needed in downstream builds will be downloaded into the local repository of the assigned executor anyway.


As every pipeline creates unique artifact versions the size of the executor local Maven repositories can grow very quickly.
Because every pipeline build only needs one specific version of the generated artifacts, there is no point to keep the older versions.
So it is a good idea to cleanup the local Maven repositories on all nodes regularly, at least for the artifacts that are generated by the pipelines.
This can be done by creating a cleanup job for each node executing a simple shell script.

http://java.dzone.com/articles/how-build-true-pipelines

  • Creating a build pipeline using Maven, Jenkins, Subversion and Nexus

Builds were typically done straight from the developer’s IDE and manually deployed to one of our app servers.
We had a manual process in place, where the developer would do the following steps.
•Check all project code into Subversion and tag
•Build the application.
•Archive the application binary to a network drive
•Deploy to production
•Update our deployment wiki with the date and version number of the app that was just deployed.

The problem is that there were occasionally times where one of these steps were missed, and it always seemed to be at a time when we needed to either rollback to the previous version, or branch from the tag to do a bugfix.
Sometimes the previous version had not been archived to the network, or the developer forgot to tag SVN.


The Maven release plug-in provides a number of useful goals.

•release:clean – Cleans the workspace in the event the last release process was not successful.
•release: prepare – Performs a number of operations
?Checks to make sure that there are no uncommitted changes.
?Ensures that there are no SNAPSHOT dependencies in the POM file,
?Changes the version of the application and removes SNAPSHOT from the version.  ie 1.0.3-SNAPSHOT becomes 1.0.3
?Run project tests against modified POMs
?Commit the modified POM
?Tag the code in Subersion
?Increment the version number and append SNAPSHOT.  ie 1.0.3 becomes 1.0.4-SNAPSHOT
?Commit modified POM
•release: perform – Performs the release process
?Checks out the code using the previously defined tag
?Runs the deploy Maven goal to move the resulting binary to the repository.

http://java.dzone.com/articles/creating-build-pipeline-using

  • Maven Release Plugin and Continuous Delivery

The idea behind my Continuous Delivery system was this:

•Every check-in runs a load of unit tests
•If they pass it runs a load of acceptance tests
•If they pass we run more tests – Integration, scenario and performance tests
•If they all pass we run a bunch of static analysis and produce pretty reports and eventually deploy the candidate to a “Release Candidate” repository where QA and other like-minded people can look at it, prod it, and eventually give it a seal of approval.
As you can see, there’s no room for the notion of “snapshot” and “release” builds being separate here. Every build is a potential release build
http://devopsnet.com/2011/06/15/maven-release-plugin-and-continuous-delivery/


  • Jenkins Pipeline (or simply "Pipeline") is a suite of plugins which supports implementing and integrating continuous delivery pipelines into Jenkins.
A continuous delivery pipeline is an automated expression of your process for getting software from version control right through to your users and customers.
Jenkins Pipeline provides an extensible set of tools for modeling simple-to-complex delivery pipelines "as code"
The definition of a Jenkins Pipeline is typically written into a text file (called a Jenkinsfile) which in turn is checked into a project’s source control repository.
https://jenkins.io/doc/pipeline/tour/hello-world/

  • Defining a Pipeline
Both Declarative and Scripted Pipeline are DSLs [1] to describe portions of your software delivery pipeline. Scripted Pipeline is written in a limited form of Groovy syntax.

A Pipeline can be created in one of the following ways:
    Through Blue Ocean - after setting up a Pipeline project in Blue Ocean, the Blue Ocean UI helps you write your Pipeline’s Jenkinsfile and commit it to source control.
    Through the classic UI - you can enter a basic Pipeline directly in Jenkins through the classic UI.
    In SCM - you can write a Jenkinsfile manually, which you can commit to your project’s source control repository
it is generally considered best practice to define the Pipeline in a Jenkinsfile which Jenkins will then load directly from source control.

https://jenkins.io/doc/book/pipeline/getting-started/

  • Staging is an environment for final testing immediately prior to deploying to production. In software deployment, an environment or tier is a computer system in which a computer program or software component is deployed and executed
https://en.wikipedia.org/wiki/Deployment_environment

  • Jenkins
An extendable open source continuous integration server
http://jenkins-ci.org/
  • Jenkins Backup and copying files
Jenkins stores all the settings, logs and build artifacts in its home directory, for example in /var/lib/jenkins under the default install location of Ubuntu.

To create a backup of your Jenkins setup, just copy this directory.

The jobs directory contains the individual jobs configured in the Jenkins install. You can move a job from one Jenkins installation to another by copying the corresponding job directory. You can also copy a job directory to clone a job or rename the directory.

Click reload config button in the Jenkins web user interface to force Jenkins to reload configuration from the disk.

http://www.vogella.com/articles/Jenkins/article.html#jenkins_filesystem

  • how to configure a simple Continuous Delivery pipeline using Git, Docker, Maven and Jenkins.

Traditional Release Cycle
We have to package the release, test it, set up or update the necessary infrastructure and finally deploy it on the server.

Continuous Delivery
we have to automate the whole release process (including package release, set up/update infrastructure, deploy, final tests) and eliminate all manual steps. This way we can increase the release frequency.

Continuous Delivery is about

    reduced risks,
    increased reliability,
    faster feedback,
    accelerated release speed and time-to-market.

Fortunately, Docker is great at creating reproducible infrastructures.
Using Docker we create an image that contains our application and the necessary infrastructure (for instance the application server, JRE, VM arguments, files, permissions).
The only thing we have to do is to execute the image in every stage of the delivery pipeline and our application will be up and running.
Docker is a (lightweight) virtualization, so we can easily clean up old versions of the application and its infrastructure just by stopping the Docker container.

https://blog.philipphauer.de/tutorial-continuous-delivery-with-docker-jenkins/

  • We are using a separate parameterized build for doing exactly the same thing. There two ways of doing it.

1) Use "copy artifact" built step together with a "build selector" Parameter to get the right version, then deploy

2) Use a "run parameter" to get the artifact URL, download (ie. with wget) and deploy

The build selector offer three options
- latest
- last stable (works only with "delete old builds" option)
- specific build

Build selector parameter should work very well
you can enter the
particular build# or use other availabe selectors
I added this idea at http://wiki.hudson-ci.org/display/HUDSON/Deploy+Plugin

http://jenkins-ci.361315.n4.nabble.com/How-to-revert-to-a-build-with-artifacts-td2330574.html


  • We have a number of libraries that are shared across multiple projects and we wanted this build to run every night and use the latest versions of those libraries even if our applications had a specific release version defined in their Maven pom file


In this way we would be alerted early if someone added a change to one of the dependency libraries that could potentially break an application when the developer upgraded the dependent library in a future version of the application.


We also wanted the nightly build to tag a subversion with the build date as well as upload the artifact to our Nexus “Nightly Build” repository.

The first problem to tackle was getting the current date into the project’s version number
For this I started with the Jenkins Zentimestamp plugin.  With this plugin the format of Jenkin’s BUILD_ID timestamp can be changed.
I used this to specify using the format of yyyyMMdd for the timestamp.


The next step was to get the timestamp into the version number of the project.
I was able to accomplish this by using the Maven Versions plugin.

<plugin>
<groupId>org.codehaus.mojo</groupId>
<artifactId>versions-maven-plugin</artifactId>
<version>1.3.1</version>
</plugin>


At this point the Jenkins job can be configured to invoke the “versions;set” goal, passing in the new version string to use.  The ${BUILD_ID} Jenkins variable will have the newly formatted date string.
This will produce an artifact with the name SiestaFramework-NIGHTLY-20120720.jar

Uploading Artifacts to a Nightly Repository
Since this job needed to upload the artifact to a different repository from our Release repository that's defined in our project pom files, the “altDeploymentRepository” property was used to pass in the location of the nightly repository.

${LYNDEN_NIGHTLY_REPO} is a Jenkins variable containing the nightly repo URL.


Tagging Subversion
Finally, the Jenkins Subversion Tagging Plugin was used to tag SVN if the project was successfully built.  The plugin provides a Post-build Action for the job with the configuration section shown below.


So now that the main project is set up, the dependent projects are set up in a similar way, but need to be configured to use the SiestaFramework-NIGHTLY-20120720 of the dependency rather than whatever version they currently have specified in their pom file
This version can then be overriden by the Jenkins job. The example below shows the Jenkins configuration for the Crossdock-shared build.


Enforcing Build Order
the Crossdock-Shared and the Messaging-Shared jobs are “downstream” from the SiestaFramework job.  Once both of these jobs complete, a Join trigger can be used to start other jobs.

http://java.dzone.com/articles/setting-nightly-build-process


  • A "master" operating by itself is the basic installation of Jenkins and in this configuration the master handles all tasks for your build system

If you start to use Jenkins a lot with just a master you will most likely find that you will run out of resources (memory, CPU, etc.).
At this point you can either upgrade your master or you can setup agents to pick up the load.
As mentioned above you might also need several different environments to test your builds. In this case using an agent to represent each of your required environments is almost a must.

An agent is a computer that is set up to offload build projects from the master and once setup this distribution of tasks is fairly automatic.
The exact delegation behavior depends on the configuration of each project; some projects may choose to "stick" to a particular machine for a build, while others may choose to roam freely between agents.
For people accessing your Jenkins system via the integrated website (http://yourjenkinsmaster:8080), things work mostly transparently. You can still browse javadoc, see test results, download build results from a master, without ever noticing that builds were done by agents.  In other words, the master becomes a sort of "portal" to the entire build farm.
Since each agent runs a separate program called an "agent" there is no need to install the full Jenkins (package or compiled binaries) on an agent.
https://wiki.jenkins.io/display/JENKINS/Distributed+builds

  • Bamboo vs Jenkins
Jenkins has no facility for static code analysis within the application environment.

It’s used for continuous build environments and to keep an eye on jobs running externally from an environment to report on outputs from those jobs. This can be frustrating for developers who would like to use Jenkins for its automation facility but are also looking for the application to assist with the security testing of their code.
It’s OK. Jenkins does support static code analysis from other packages. A plugin is used to capture the results and to parse them. Once these results are passed to Jenkins, the application enables the results to be visually represented in a consistent manner. Jenkins can report on the warnings generated by a build, deliver trend reporting that shows the level of warnings generated by subsequent builds, granular reporting (module, type, package, etc.) for warnings, severity reports, an HTML comparison of source and warnings, stability reporting, project health reporting, scoring for builds that are “warning free”, e-mail reports, etc.
https://www.checkmarx.com/2017/03/12/bamboo-vs-jenkins/

  • Bamboo Server vs. Jenkins
Built-in Git branching and workflows
Automatically detect, build, test, and merge branches to deploy code continuously to production or staging servers based on the branch name.
Built-in deployment support
Send a continuous flow of builds to test environments and automatically release builds to customers when they're ready – all while maintaining links to issues and commits behind them.
https://www.atlassian.com/software/bamboo/comparison/bamboo-vs-jenkins

  • We use Jenkins to organize the following jobs:

- commit (with the maven goal "clean test" to check if the commit broke a unit test)
- integration (with the maven goal "clean integration-test" to check if the commit broke an integration test)
- deploy to nexus (with the maven goal "clean deploy -Dmaven.test.skip=true" to deploy the package in the remote nexus repository)
- inspect on sonar (with the maven goal "sonar:sonar" to inspect the code quality)
- release (with maven goal "mvn --batch-mode clean release:clean release:prepare release:perform -DreleaseVersion=${versions.release} -DdevelopmentVersion=${versions.development}" - we used some groovy to execute this since we had some custom version requirements, but if you could use a maven plugin for incrementing versions all the better. We also trigger this manually.)
- deploy to a server (through ssh - a script is available on the server and gets executed to deploy the latest version to the server)
- selenium (with the maven goal "clean test" - using appropriate profile to execute the selenium tests)

Usually all of these execute serially. But there are cases when you might want to make this parallel. For instance if you have multiple servers, you don't need to wait for the artifact to deploy to one server. You could do that in parallel. You might want maybe the inspect and release to go in parallel if you don't mind the code quality in the current release.

For more on the maven goals/ lifecycle check https://maven.apache.org/guides/introduction/introduction-to-the-lifecycle.html
  • CruiseControl

CruiseControl is both a continuous integration tool and an extensible framework for creating a custom continuous build process
http://cruisecontrol.sourceforge.net

  • Teamcity
Continuous Integration is a software development practice where members of a team integrate their work frequently, usually each person integrates at least daily — leading to multiple integrations per day
http://www.jetbrains.com/teamcity/index.html?gclid=CK-Tm8L93asCFQJUgwodP2YPSQ


  • Apache Continuum

Continuous Integration and Build Server
Apache Continuum™ is an enterprise-ready continuous integration server with features such as automated builds, release management, role-based security, and integration with popular build tools and source control management systems. Whether you have a centralized build team or want to put control of releases in the hands of developers, Continuum can help you improve quality and maintain a consistent build environment.
http://continuum.apache.org/


  • Drone is an open source Continuous Delivery platform that automates your testing and release workflows.
https://drone.io/

  • Zuul-ci
    • Keep your builds evergreen by automatically merging changes only if they pass tests.
    • CI/CD with Ansible
    • Use the same Ansible playbooks to deploy your system and run your tests
https://zuul-ci.org/

  • Bamboo
Any build server can mindlessly run your builds over and over. Go further with automated building, testing, deploying, and releasing of your software.
http://www.atlassian.com/software/bamboo/overview


  • GoCD is an open source build and release tool from ThoughtWorks. GoCD is an open source tool which is used in software development to help teams and organizations automate the continuous delivery of software.

https://www.gocd.org/
  • Hudson
extendable continuous integration server
http://hudson-ci.org/

Hudson Continuous Integration quick start
  • Using snapshots for components that are under development is required for the automated continuous integration system to work properly. Note that a fixed version, non-snapshot versioned artifact should not be modified and replaced. The best practice is that you should not update artifacts after they are released. This is a core assumption of the Maven approach


this assumption is not correct in enterprise software development, where vendors and end users do sometimes update "finished" artifacts without changing the version number, for example through patching them in place. Even though it is possible to violate this rule, every attempt should be made to comply to ensure integration stability.

Every project that is part of continuous integration must specify a distributionManagement section in its POM
This section tells Maven where the artifacts are going to be deployed at the end of the build process, that is, which repository (local or remote).
this would be the Archiva repository. Deploying artifacts to a repository makes them available for other projects to use as dependencies.
You must define a distributionManagement section that describes to which repository to deploy snapshots and releases. It is recommended that the distributionManagement configuration be placed at a common inherited POM that is shared among all projects

There are some important settings that govern how and when Maven will access repositories:

Update Policy: This controls how often Maven will check with a remote repository for updates to an artifact that it already has in its local repository. Configure your snapshot repository in your settings.xml in Hudson to use updatePolicy as always. The effect of updatePolicy is on your development systems. The default value is daily. If you want to integrate the changes as they occur in Hudson, you should change their updatePolicy accordingly.


Server credentials: This tells Maven the credentials that are needed to access a remote repository; typically Maven repositories will require you to authenticate before you are allowed to make changes to the repository, for example, publishing a new artifact). Unless you have given the Archiva guest user global upload privileges, which is not recommended, you must specify correct credentials for the snapshot repository in the servers section. You should have a unique Hudson user with snapshot repository upload permissions

Hudson provides a number of ways to manage a continuous integration build's triggers in Hudson. These include manual and automated triggers. The option to manually start a build is always available for any job. When choosing an automated trigger, you may consider factors like the structure of the project, the location of the source code, the presence of any branches, and so on


This type of build trigger is vital to establishing a healthy continuous integration build. As changes are committed to project source, Hudson triggers the builds of the associated Hudson jobs. The trigger does this by periodically checking the associated Subversion URL for changes.

To enable this trigger, select the Poll SCM option. You must then provide a cron expression to determine the schedule Hudson uses to poll the repository.

you can use the SNAPSHOT dependency trigger to monitor the Maven repository for changes in such dependencies. When an updated SNAPSHOT dependency has been detected, the build will trigger and download the new dependency for integration.


Hudson should be configured to send notifications to the correct parties when the build breaks
Hudson should have each user registered as a unique user. The Hudson username must match the Subversion username that they ordinarily commit under. Hudson relies on this name to look up the proper contact email to send a notification to.


http://docs.oracle.com/middleware/1212/core/MAVEN/ci_environmement_hudson.htm

  • There are certainly other CI engines out there, such as the primary open source rivals to Hudson: Apache Continuum and CruiseControl

We've worked with both Continuum and CruiseControl in the past, and consider them to be functional – in an adequate sort of way. Continuum's web-based front-end isn't bad, and for the most part it does what it's designed to do. We've found CruiseControl to be more competent than Continuum when it comes to stability, although we must admit that we have not tried any of Continuum's newer builds. But when it comes to ease of configuration Hudson wins, hands down. If, like us, you're visually-oriented, and if you find it painful to edit an XML file to configure CI (as is the case with CruiseControl), Hudson's graphical user interface just makes perfect sense

configure Hudson to access the Subversion repository, and perform continuous integration builds from there.

Let's go ahead and set up the post-commit hook now. But first, go back into the testWebapp Hudson job configuration and uncheck the "Poll SCM" checkbox. Then click "Save". Now we're ready to configure the post commit hook. Our repository resides in /var/lib/svn/repositories/testWebApp (see above):


http://www.openlogic.com/wazi/bid/188149/Creating-a-Continuous-Integration-Server-for-Java-Projects-Using-Hudson

  • Loose coupling of components of the application, which reduces the impact of change

In this new paradigm, many development organizations are also adopting iterative development methodologies to replace the older waterfall-style methodologies. Iterative, agile development methodologies focus on delivering smaller increments of functionality more often than traditional waterfall approaches.
Continuous integration is a software engineering practice that attempts to improve quality and reduce the time taken to deliver software by applying small and frequent quality control efforts. It is characterized by these key practices:

    Use of a version control system to track changes.

    All developers commit to the main code line, head and trunk, every day.

    The product is built on every commit operation.

    The build must be automated and fast.

    There should be automated deployment to a production-like environment.

    Automated testing should be enabled.

    Results of all builds are published, so that everyone can see if anyone breaks a build.

    Deliverables are easily available for developers, testers, and other stakeholders


Repository Management with Archiva
A typical Maven environment consists of Maven installation on each developer's local machine, a shared Maven repository manager within the enterprise, and one or more public Maven repositories where dependencies are stored.

 internal Maven repository for two purposes:
   To act as a proxy or cache for external Binary repositories, like Maven's central repository, so that dependencies are downloaded only once and cached locally so that all developers can use them.
   To store artifacts that are built by the developers so that they can be shared with other developers or projects.


In a typical enterprise that use Archiva, Archiva is set up on a server that is accessible to developers and build machines. The enterprise defines the following repositories on this server:
    A mirror of Maven's central repository
    An internal repository to store internally developed artifacts that are completed or published
    A snapshot repository to store internally developed artifacts that are under development and not completed yet.


Archiva also provides the ability to manage expiration of artifacts from your snapshot repository. Each time that you execute a build, artifacts are created and stored in the snapshot repository. If you are using continuous integration, you may want to execute builds several times each day. The best practice is to configure Archiva to remove these stored artifacts after a certain amount of time (for example, one week).

Alternatively, you can configure Archiva to keep just the last n versions of each artifact. Either approach helps to automatically manage the expiration and deletion of your snapshot artifacts.


Continuous Integration with Hudson
typically this automation include steps such as:

    Initiating a build whenever a developer commits to the version control system

    Checking out the code from the version control system

    Compiling the code

    Running unit tests and collating results (often through JUnit)

    Packaging the code into a deployment archive format

    Deploying the package to a runtime environment

    Running integration tests and collating results

    Triggering the build to the Maven snapshot repository

    Alerting developers through email of any problems


However, it is also possible to use the build system to enforce compliance with corporate standards and best practices. For example, enterprises can include the following steps in the build process:

    Running code coverage checks to ensure that an appropriate number of unit tests exist and are executed

    Running code quality checks to look for common problems

    Running checks to ensure compliance with naming conventions, namespaces, and so on

    Running checks to ensure that documentation is included in the code

    Running checks to ensure that the approved versions of dependencies are used and that no other dependencies are introduced without approval


http://docs.oracle.com/middleware/1212/core/MAVEN/introduction.htm#BABIBEIJ


  • Committed change sets tend to be smaller and occur more frequently than in a noncontinuous integration process. 

You must commit the active trunk or branch code for the target release so that the continuous integration system can perform an integration build


http://docs.oracle.com/middleware/1212/core/MAVEN/config_svn.htm

  • everything has to be changed in a XML configuration file making it error prone and a pain in the boat to change. Although CruiseControl comes with a web application that can be deployed to any kind of Servlet container jobs can’t be easily configured, monitoring is basic and extensibility would take a lot of effort. Version 2.7 comes with a dashboard trying to fix these shortcomings. Frankly, it doesn’t convince me as an easy-to-use user interface which would even allow beginners to Continuous Integration to get an easy access. Once you were in Hudson-land you never want to go back.


  • 12.2.1 Distribution Management

Every project that is part of continuous integration must specify a distributionManagement section in its POM. This section tells Maven where the artifacts are going to be deployed at the end of the build process, that is, which repository (local or remote)
Deploying artifacts to a repository makes them available for other projects to use as dependencies.
You must define a distributionManagement section that describes which repository to deploy snapshots and releases to
It is recommended that the distributionManagement configuration be placed at a common inherited POM that is shared among all projects such as the oracle-common POM
http://docs.oracle.com/middleware/1212/core/MAVEN/ci_environmement_hudson.htm#A999401

  • Backup Plugin - hudson - Hudson Wiki

wiki.hudson-ci.org › Dashboard › hudson › Plugins?

  • We use groovy scripts/dsl(s) to generate all of the above jobs - great when you have multiple projects and takes least time when you start a new project.


My best experience with CI was when on top of all this we used Gerrit ( https://code.google.com/p/gerrit/ ) to keep the trunk branch clean. No person was allowed to commit crappy code (at least not if at least one person gave a -. If you had 2 pluses and no minuses, your commit was free to go). Not only that the trunk stayed clean, but after 2/3 weeks of arguing (constructively) the whole team managed to absorb the level of knowledge of the most experienced in different areas. We also agreed easier on different conventions. Although people's will and professionalism should do this, this tool forces you constantly to think about such things.
Another way would be to directly comment in git-hub although it doesn't allow rules as much as I know. Or you might use some plugins for reviewing.
Good practice when using git is also to commit in a separate branch (separate branch for each story) so that if something is not proper, it is patched in a separate branch and it gets fixed before it gets to the trunk.

I might be missing something, but I hope al least the above gonna be help

We'll geek out in a minute to help you get Hudson up and running. But first, we'd like to outline how we are currently integrating Hudson into our development workflow, as well as how we hope to take advantage of Hudson in the near future. As of right now, we've setup Hudson to begin the build and testing process every time that we commit upstream to a master code repository on GitHub. By configuring a post-receive hook, GitHub fires off a simple HTTP request to our Hudson server to begin the build process. Hudson clones our Drupal code repository and then executes a short Bash script that uses Drush to install, configure, and test our Drupal distribution. Once the build process is complete, this same Bash script triggers Drupal to run our test scripts (in our case, SimpleTest). Upon completion of the tests, Hudson emails us with the results of our automated tests.
Admittedly, the percentage of automated test coverage of our distros is not high at this point. Since a lot of the user stories that we want to test in our distros revolve around basic content management tasks, writing automated tests often takes considerably more time than configuring the features themselves. We're playing around with using Selenium so that our project and product managers can record tests the first time they click through a site to review features - and then including these tests in our Hudson workflow. This would be a far cry from test-driven development, but it's a start.

For our work with Meedan.net, we are also toying around with the idea of integrating GitHub's Jekyll-based wiki with our project management tool, Pivotal Tracker (PT). Leveraging Pivotal Tracker's API, in theory, we could write out the associated user stories to a GitHub wiki page every time that we close a release in PT. If a GitHub push is tagged with that release, we would then have a wiki page write-up of all the user stories that should be tested with a given Hudson build. That wiki page would then become the test script for repeatable manual testing by our product team.

http://thinkshout.com/blog/2010/09/sean/beginners-guide-using-hudson-continuous-integration-drupal


  • Concourse is an open-source continuous thing-doer.

You can think of a pipeline as a distributed, higher-level, continuously-running Makefile.
Each entry under resources is a dependency, and each entry under jobs describes a plan to run when the job is triggered (either manually or by a get step).
Jobs can depend on resources that have passed through prior jobs. The resulting sequence of jobs and resources is a dependency graph that continuously pushes your project forward, from source code to production.
https://concourse-ci.org/

  • What Is “Jobs-as-Code?

Adopting a Jobs-as-Code approach can transform your business for agile application delivery and processes by avoiding rework and headaches related to your application delivery.
Jobs-as-Code allows your business to reap the benefits of a truly automated and continuous delivery pipeline while ensuring the highest levels of availability and reliability.
The term “jobs” in Jobs-as-Code refers to the automation rules that define how batch applications are run.
These rules define what to run, when to run it, how to identify success or failure, and what action needs to be taken.
Traditionally, Operations defined these rules only at the end of software development lifecycle, which meant these jobs were not tested at the same time that the rest of the application was built.
This approach often led to wasted time in production, hard-to-fix errors and unplanned work, as a result of poor communication and manual intervention.
with the Jobs-as-Code approach, developers can now include jobs as artifacts in the continuous DevOps delivery pipeline the same way the Java or Python code is managed through the entire software development process today.

https://www.bmc.com/blogs/what-is-jobs-as-code/

  • Integrating Ansible with Jenkins in a CI/CD process 
The purpose of using Ansible in the pipeline flow is to reuse roles and Playbooks for provisioning, leaving Jenkins only as a process orchestrator instead of a shell script executor

Example Pipeline Flow
The process starts by pulling the application source code from Github.
The next thing to do is to update the project version according to the build number
After updating the project’s version, Jenkins starts building the source code using Maven.
After a successful compilation, the pipeline will perform unit tests.
If nothing goes wrong during the unit tests, the pipeline flow initiates the integration tests. 
The output from unit and integration tests is a coverage report, which will be one of the artifacts used by Sonar server to generate quality metrics.
The other one is the application source code.
The Jenkins server provides an interface for someone with the right permissions to manually promote the build. 
After the approval, the pipeline continues to execute the flow and goes on to the next step, which is to upload the compiled artifact to the Nexus repository.
Then we have a new application snapshot ready to be deployed. 
The pipeline flow just sets the required parameters like the compiled artifact URL and the target host to execute the Ansible Playbook afterward.
The Playbook is used to automate all target host configuration. 
After the Ansible Playbook execution, the last step could be to send a notification to every stakeholder regarding the results of the new deployment via email or slack.

Ansible Playbooks
Ansible played a fundamental role twice in this lab. First, it automated all the infrastructure for this lab, then we used it as a tool to deploy our application through Jenkins pipeline.

Application deployment
The pipeline has been designed to prepare the application binaries, now called “artifact”, and to upload them in Nexus.

https://www.redhat.com/en/blog/integrating-ansible-jenkins-cicd-process

  • Jenkins pipeline as code is a concept of defining Jenkins build pipeline in Jenkins DSL/Groovy format. 
There are two types of Jenkins pipeline code.
Declarative Pipeline
Scripted Pipeline
https://devopscube.com/jenkins-pipeline-as-code/