Sunday, December 2, 2018

Cluster Orchestration

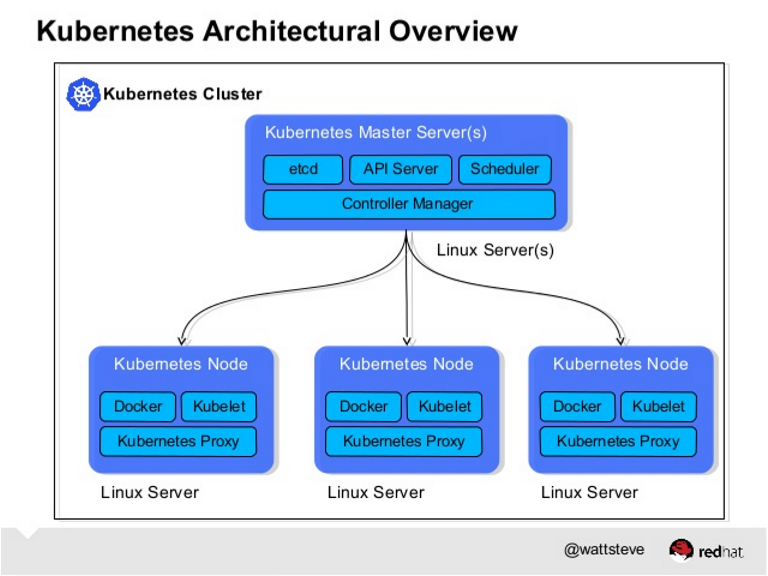
  • Kubernetes is an orchestration framework for Docker containers which helps expose containers as services to the outside world.The minion is the node on which all the services run.
  • https://www.tutorialspoint.com/docker/docker_kubernetes_architecture.htm

  • Kubernetes is an open-source system for automating deployment, scaling, and management of containerized applications
The kubelet is responsible for running containers on your hosts.
kubeadm is a convenience utility to configure the various components that make up a working cluster
kubernetes-cni represents the networking components
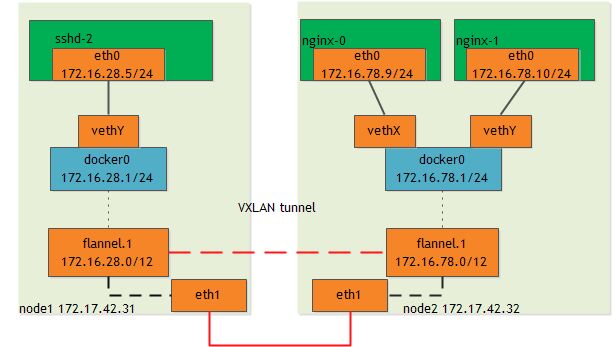
CNI stands for Container Networking Interface which is a spec that defines how network drivers should interact with Kubernetes
Docker Swarm provides an overlay networking driver by default — but with kubeadm this decision is left to us.
how to use the most similar driver to Docker's overlay driver (flannel by CoreOS)
Swap must be disabled
Flannel provides a software defined network (SDN) using the Linux kernel’s overlay and ipvlan modules.

https://medium.com/@Grigorkh/install-kubernetes-on-ubuntu-1ac2ef522a36


  • I now believe containers are the deployment format of the future. They make it much easier to package an application with its required infrastructure. While tools such as Docker provide the actual containers, we also need tools to take care of things such as replication and failovers, as well as APIs to automate deployments to multiple machines.
Kubernetes seemed to be the best choice, since it was being backed by Google, Red Hat, Core OS, and other groups that clearly know about running large-scale deployments.

Load balancing with Kubernetes
When working with Kubernetes, you have to become familiar with concepts such as pods, services, and replication controllers.

It’s possible to expose a service directly on a host machine port—and this is how a lot of people get started—but we found that it voids a lot of Kubernetes' benefits. If we rely on ports in our host machines, we will get into port conflicts when deploying multiple applications. It also makes it much harder to scale the cluster or replace host machine

A two-step load-balancer setup
We found that a much better approach is to configure a load balancer such as HAProxy or NGINX in front of the Kubernetes cluster
HAProxy is configured with a “back end” for each Kubernetes service, which proxies traffic to individual pods.

The Kubernetes community is currently working on a feature called ingress. It will make it possible to configure an external load balancer directly from Kubernetes.

Blue-green deployments in Kubernetes
A blue-green deployment is one without any downtime. In contrast to rolling updates, a blue-green deployment works by starting a cluster of replicas running the new version while all the old replicas are still serving all the live requests.

Logging
There are plenty of open-source tools available for logging. We decided to use Graylog—an excellent tool for logging—and Apache Kafka, a messaging system to collect and digest logs from our containers. The containers send logs to Kafka, and Kafka hands them off to Graylog for indexing

Monitoring
Our application components post metrics to an InfluxDB time-series store. We also use Heapster to gather Kubernetes metrics. The metrics stored in InfluxDB are visualized in Grafana, an open-source dashboard tool. There are a lot of alternatives to the InfluxDB/Grafana stack


Data stores and Kubernetes
Kubernetes has the concept of volumes to work with persistent data.

Besides data stores and our HAProxy servers, everything else does run in Kubernetes, though, including our monitoring and logging solutions.


https://techbeacon.com/one-year-using-kubernetes-production-lessons-learned

  • A pod (as in a pod of whales or pea pod) is a group of one or more containers (such as Docker containers), with shared storage/network, and a specification for how to run the containers. A pod’s contents are always co-located and co-scheduled, and run in a shared context.
https://kubernetes.io/docs/concepts/workloads/pods/pod/

  • Minikube starts a single node kubernetes cluster locally for purposes of development and testing. Minikube packages and configures a Linux VM, Docker and all Kubernetes components, optimized for local development

Minikube requires one of the following:
    The latest Virtualbox.
    The latest version of VMWare Fusion

https://kubernetes-v1-4.github.io/docs/getting-started-guides/minikube/

  • the many benefits it provides, including:
    Cloud-native design: Kubernetes encourages a modular, distributed architecture which increases the agility, availability, and scalability of the application.
    Portability: Kubernetes works exactly the same way, using the same images and configuration, no matter which cloud provider or data-center environment is being used.
    Open-source: Kubernetes is an open-source platform that developers can use without concerns of lock-in and is the most widely validated in the market today.

Kubernetes Installation Models

Install Kubernetes All-in-one
The two all-in-one deployment options described below install Kubernetes as a single host or on your laptop

Kubernetes using Minikube
. Using Minikube, a single-node Kubernetes “cluster” can be installed on locally as a virtual machine. Minikube supports a variety of different operating systems (OSX, Linux, and Windows) and Hypervisors (Virtualbox, VMware Fusion, KVM, xhyve, and Hyper-V).

Kubernetes using Containers
Kubernetes can be easily installed as a set of Docker containers on a single host. The host can be a physical server, a virtual machine or your laptop


Installer-based Kubernetes
This method usually deploys Kubernetes on one or more nodes which are either servers in your datacenter, virtual machines in your datacenter or a public cloud

Kubernetes with kubeadm
Kubernetes with kops
Kubernetes with kargo
CoreOS Tectonic
Everything from scratch

Kubernetes as a Service
Kubernetes can be consumed as a service by users looking for a faster, easier solution which would allow them to focus on building software rather than managing containers
Platform9 Managed Kubernetes (PMK)
Kube2Go.io

Install Kubernetes on Hosted Cloud Infrastructure
If placing all of your data and workloads in a public cloud is acceptable, the easiest way to deploy and consume Kubernetes is through a hosted service provided by a major public cloud vendor. The two prominent options today are Google Container Engine (abbreviated GKE to distinguish it from Google Compute Engine) and Azure Container Service (ACS).

https://platform9.com/docs/install-kubernetes-the-ultimate-guide/

  • abbreviating the words based on their first letter, last letter, and number of letters in between. This is why you’ll sometimes see i18n for internationalization and l10n for localization.of course our favorite kubernetes (k8s).
https://medium.com/@rothgar/why-kubernetes-is-abbreviated-k8s-905289405a3c

  • However, if you have specific IaaS, networking, configuration management, or operating system requirements not met by any of those guides, then this guide will provide an outline of the steps you need to take
You should have kubectl installed on your desktop.

Cloud Provider
Kubernetes has the concept of a Cloud Provider, which is a module which provides an interface for managing TCP Load Balancers, Nodes (Instances) and Networking Routes.

Nodes
You can use virtual or physical machines.
While you can build a cluster with 1 machine, in order to run all the examples and tests you need at least 4 nodes.
Many Getting-started-guides make a distinction between the master node and regular nodes. This is not strictly necessary.
Apiserver and etcd together are fine on a machine with 1 core and 1GB RAM for clusters with 10s of nodes.
Other nodes can have any reasonable amount of memory and any number of cores. They need not have identical configurations

Network Connectivity
Kubernetes allocates an IP address to each pod.
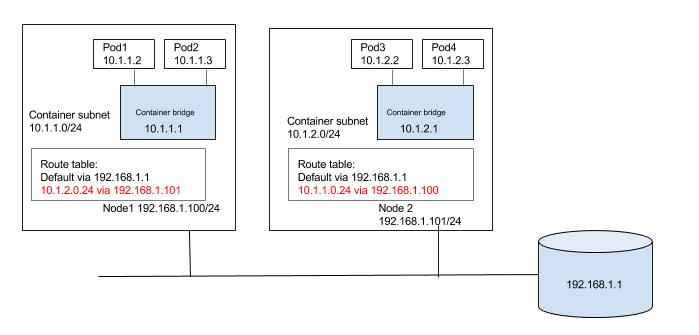
When creating a cluster, you need to allocate a block of IPs for Kubernetes to use as Pod IPs.
The simplest approach is to allocate a different block of IPs to each node in the cluster as the node is added.
A process in one pod should be able to communicate with another pod using the IP of the second pod.
This connectivity can be accomplished in two ways:
    Using an overlay network
        An overlay network obscures the underlying network architecture from the pod network through traffic encapsulation (for example vxlan).
        Encapsulation reduces performance, though exactly how much depends on your solution.
    Without an overlay network
        Configure the underlying network fabric (switches, routers, etc.) to be aware of pod IP addresses.
        This does not require the encapsulation provided by an overlay, and so can achieve better performance.
Kubernetes supports the CNI network plugin interface.

Software Binaries
You will need binaries for:
    etcd
    A container runner, one of:
        docker
        rkt
    Kubernetes
        kubelet
        kube-proxy
        kube-apiserver
        kube-controller-manager
        kube-scheduler

Selecting Images
You will run dockerkubelet, and kube-proxy outside of a container, the same way you would run any system daemon, so you just need the bare binaries. For etcdkube-apiserverkube-controller-manager, and kube-scheduler, we recommend that you run these as containers, so you need an image to be built.

Build your own images.
    Useful if you are using a private registry.
    The release contains files such as ./kubernetes/server/bin/kube-apiserver.tar which can be converted into docker images using a command like docker load -i kube-apiserver.tar
    You can verify if the image is loaded successfully with the right repository and tag using command like docker images

Security Models
There are two main options for security:
    Access the apiserver using HTTP.
        Use a firewall for security.
        This is easier to setup.
    Access the apiserver using HTTPS
        Use https with certs, and credentials for user.
        This is the recommended approach.
        Configuring certs can be tricky.

kube-proxy
All nodes should run kube-proxy. (Running kube-proxy on a “master” node is not strictly required, but being consistent is easier.)

Using Configuration Management
The previous steps all involved “conventional” system administration techniques for setting up machines. You may want to use a Configuration Management system to automate the node configuration process.
There are examples of Saltstack, Ansible, Juju, and CoreOS Cloud Config in the various Getting Started Guides

Apiserver, Controller Manager, and Scheduler
The apiserver, controller manager, and scheduler will each run as a pod on the master nod

https://kubernetes.io/docs/getting-started-guides/scratch/

  • The problem was divided into three layers: Infrastructure, Kubernetes and Application.
We evaluated tools such as Chef, Puppet, Salt etc to managing this layer and eventually we choose Ansible because:
    it has a very similar modus operandi to Terraform, which helps to reduce cognitive load
    it is master-less, saving us from having to have a separate system to manage the ansible master and agent-less, greatly reducing any bootstrapping needed
    with the combination of the -C flag (check mode) and -D flag (diff mode) ansible will show us where the live system differs from the checked in config. We use this (and prom-run) to build an ansiblediff job, and get alerts when reality diverges from the expected configuratio
    formatting the ephemeral disks that come with our VMs and mounting them in a place where we docker and kubernetes can use them – something that was surprising easy with Ansible’s LVM modules

    The rest of the Kubernetes components (API server, scheduler, controller manager, etcd and kubeproxy) are run as Static Pods – pods where the config live on disk on the node where they run, and where the kubelet is responsible for ensure the running Pod matches the on disk config.
    A common question I get is “Why not just use Terraform for the whole thing (config files, packages etc? We could, but Terraform doesn’t have resources to manage apt packages, LVM volumes, systemd services etc like Ansible does. We would end up using Terraform provisioners to execute commands to install packages and I didn’t want to blow away an entire VM just because I wanted to change a package version

https://www.weave.works/blog/provisioning-lifecycle-production-ready-kubernetes-cluster/


  • with the combination of the -C flag (check mode) and -D flag (diff mode) ansible will show us where the live system differs from the checked in config.

We use this (and prom-run) to build an ansiblediff job, and get alerts when reality diverges from the expected configuration
formatting the ephemeral disks that come with our VMs and mounting them in a place where we docker and kubernetes can use them – something that was surprising easy with Ansible’s LVM modules
https://docs.ansible.com/ansible/latest/user_guide/playbooks_checkmode.html
  • Kubernetes:

Does not provide application-level services, such as middleware (e.g., message buses), data-processing frameworks (for example, Spark), databases (e.g., mysql), caches, nor cluster storage systems (e.g., Ceph) as built-in services. Such components can run on Kubernetes, and/or can be accessed by applications running on Kubernetes through portable mechanisms, such as the Open Service Broker.
https://kubernetes.io/docs/concepts/overview/what-is-kubernetes/

  • Docker Swarm is a clustering and scheduling tool for Docker containers. With Swarm, IT administrators and developers can establish and manage a cluster of Docker nodes as a single virtual system.
    • https://searchitoperations.techtarget.com/definition/Docker-Swarm

  • A swarm is made up of multiple nodes, which can be either physical or virtual machines.The basic concept is simple enough: run docker swarm init to enable swarm mode and make your current machine a swarm manager, then run docker swarm join on other machines to have them join the swarm as workers.
             https://docs.docker.com/get-started/part4/#set-up-your-swarm
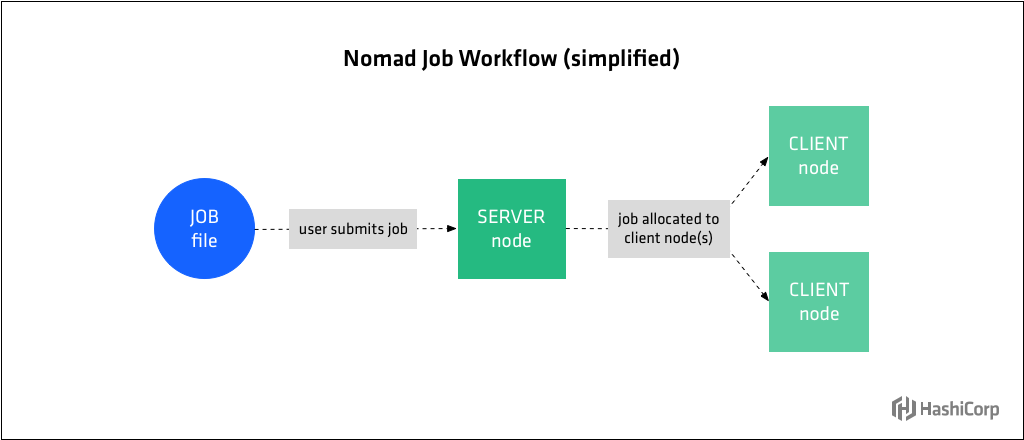
  • Easily Deploy Applications at Any Scale

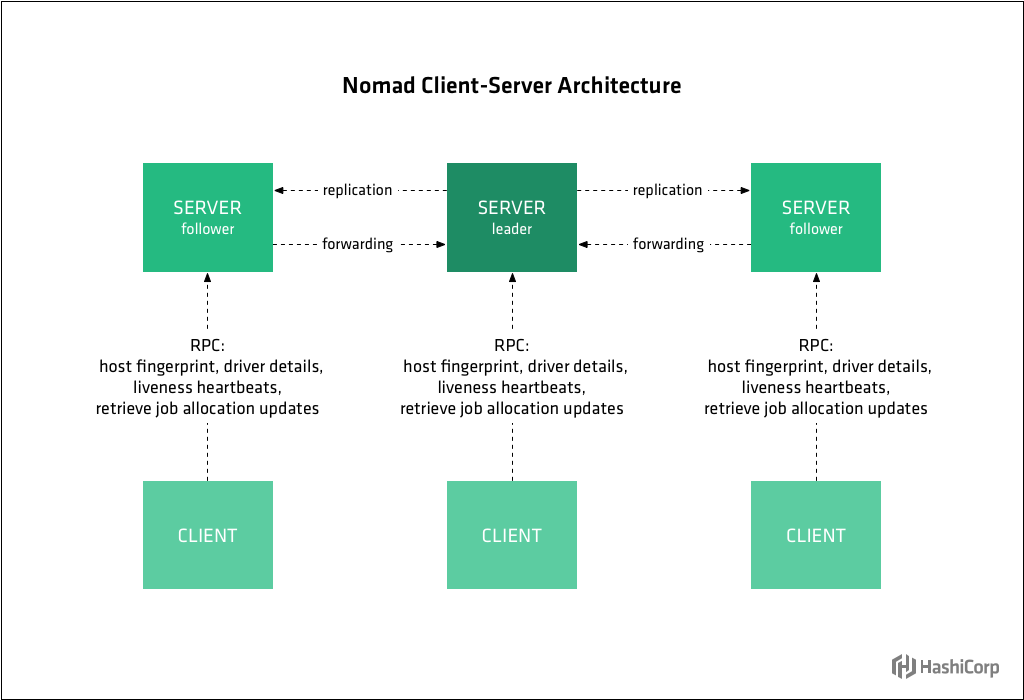
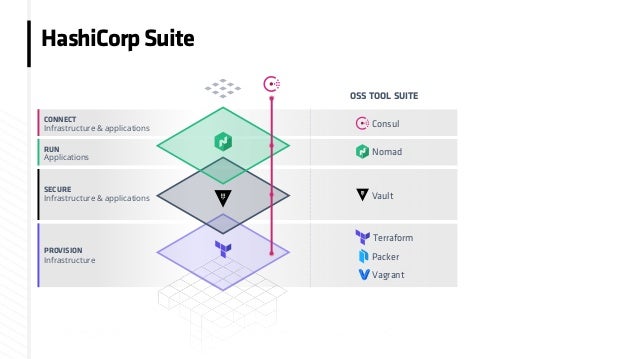
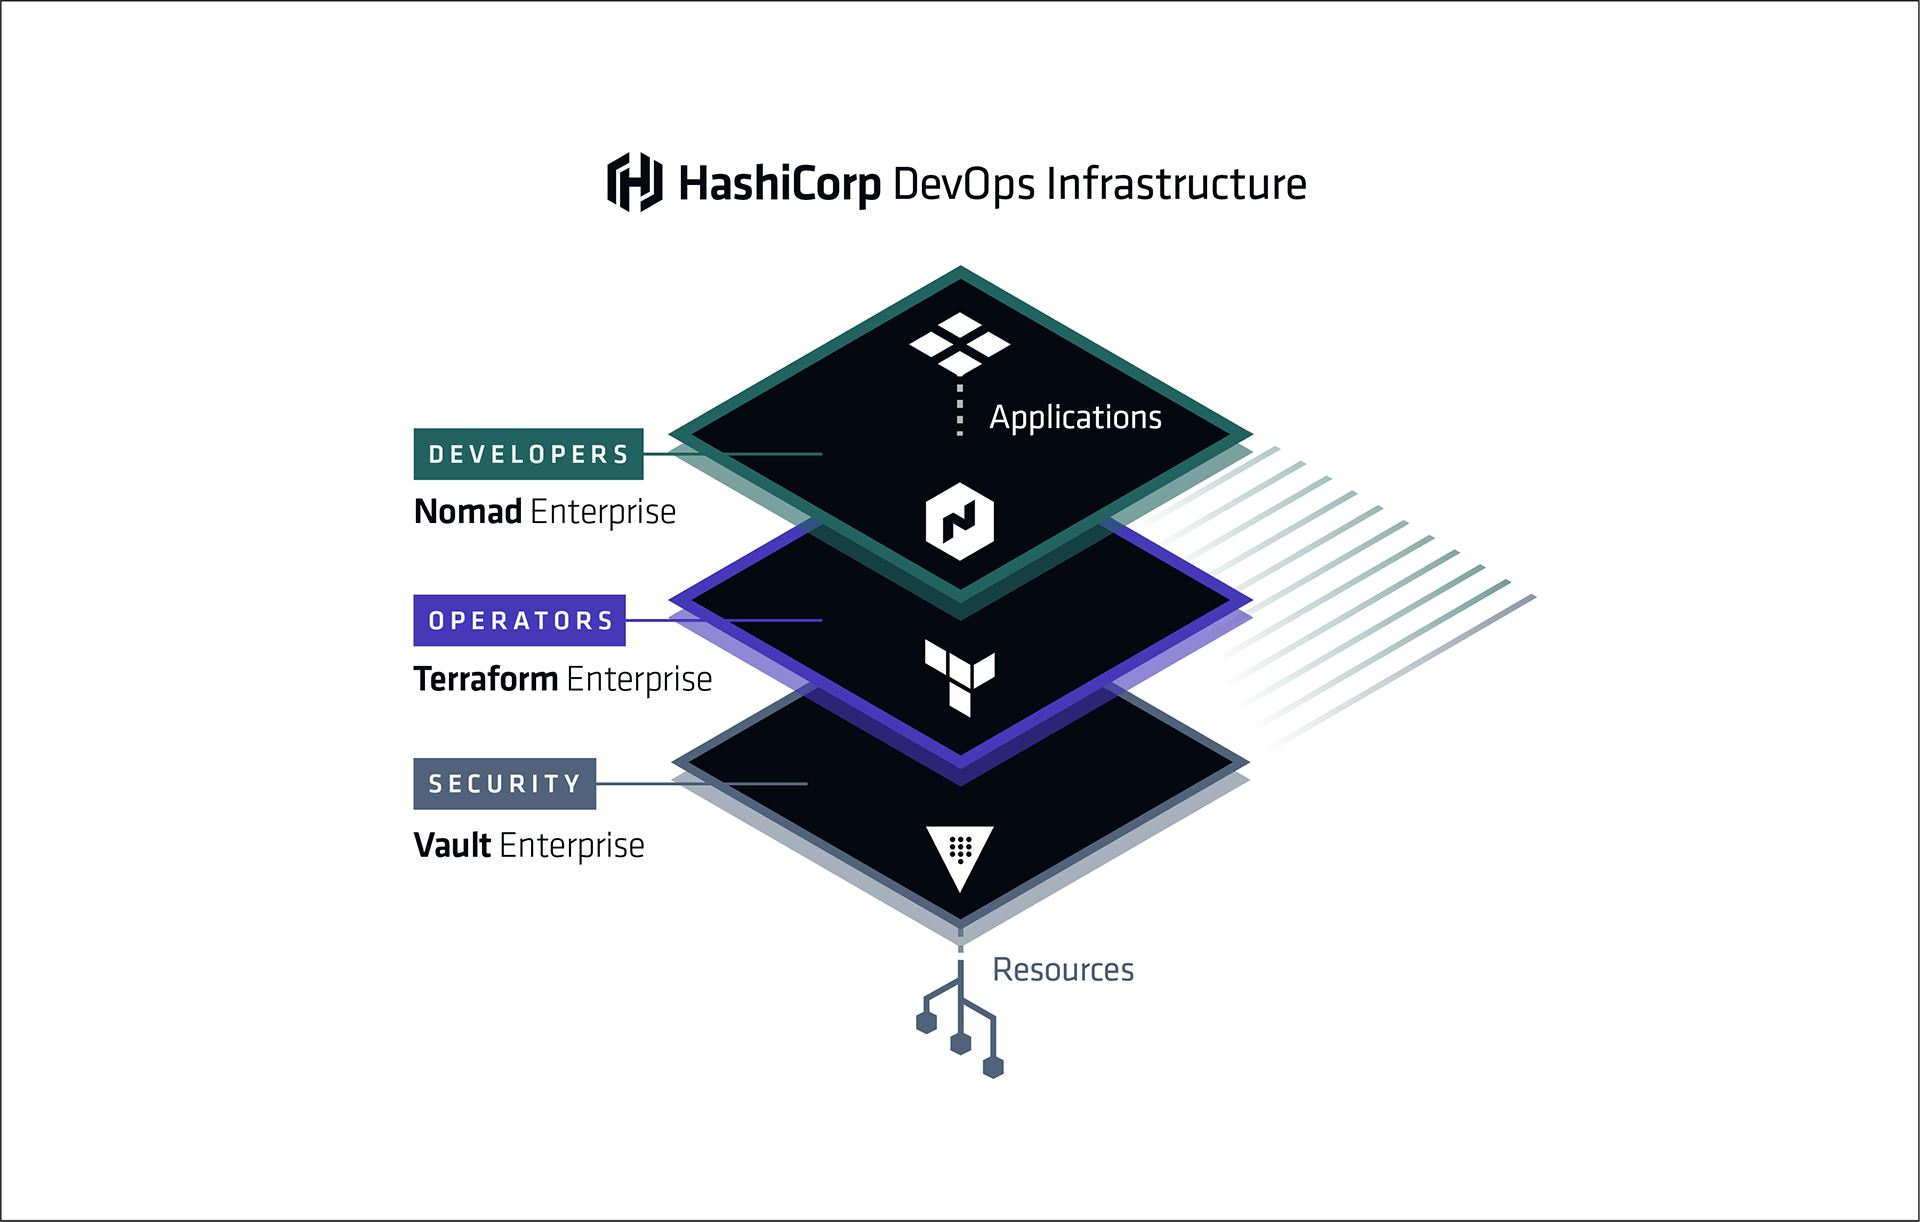
HashiCorp Nomad is a single binary that schedules applications and services on Linux, Windows, and Mac. It is an open source scheduler that uses a declarative job file for scheduling virtualized, containerized, and standalone applications.
https://www.nomadproject.io/


  • The agent is also running in server mode, which means it is part of the gossip protocol used to connect all the server instances together. 

Nomad servers are part of an auto scaling group where new servers are brought up to replace failed servers, using graceful leave avoids causing a potential availability outage affecting the consensus protocol. As of Nomad 0.8, Nomad includes Autopilot which automatically removes failed or dead servers. This allows the operator to skip setting leave_on_terminate
https://www.nomadproject.io/intro/getting-started/running.html


  • To automatically bootstrap a Nomad cluster, we must leverage another HashiCorp open source tool, Consul. 

https://www.nomadproject.io/guides/operations/cluster/automatic.html


1 comment: